Yearly Archive February 22, 2019

How to connect via SSH using keys

How to connect via SSH using keys

Your SSH session can be authenticated either with the username and password or with a pair of private/public keys. It is recommended to use the latter, as it is considered to be a more secure and convenient solution:

For cPanel Basic Theme

For cPanel Retro Theme


For cPanel Basic Theme:

1. Manage SSH Keys

2. Create a new pair of SSH keys

3. Import of the existing keys

4. Use Putty and SSH key pair to connect


1. Manage SSH Keys

In cPanel you can manage SSH keys in the SSH access menu.

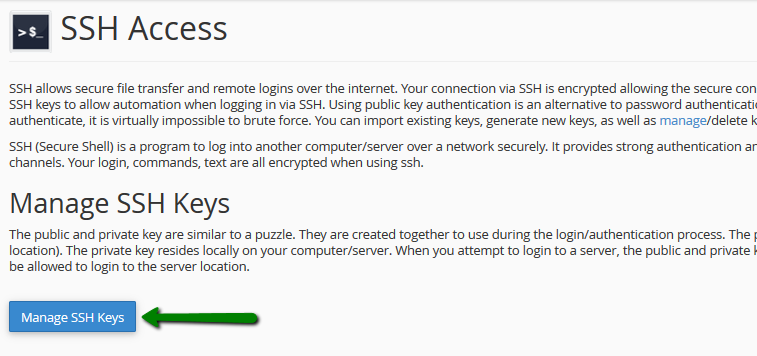
Click on Manage SSH keys:

On the next page, you can either import the existing pair of keys or generate a new one.

2. Create a new pair of SSH keys

2.1. Public and private keys generation

In order to generate a new SSH key pair click on the Generate a new Key option:
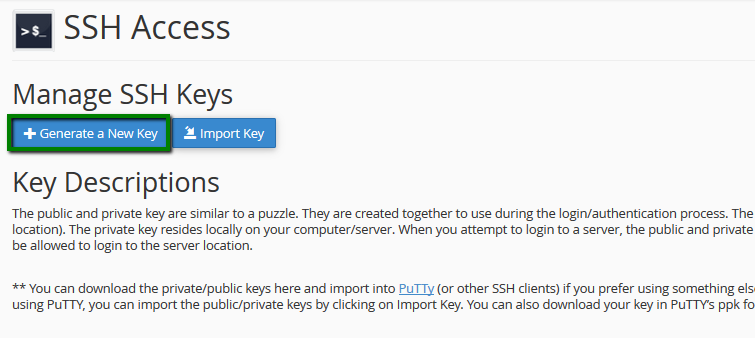
On the generator page, specify the password (passphrase), Key Name, Key Type and Size.
The maximum allowed DSA key size is 1024 which is not enough to guarantee its security nowadays. That’s why we suggest using only RSA with 2048 bits:
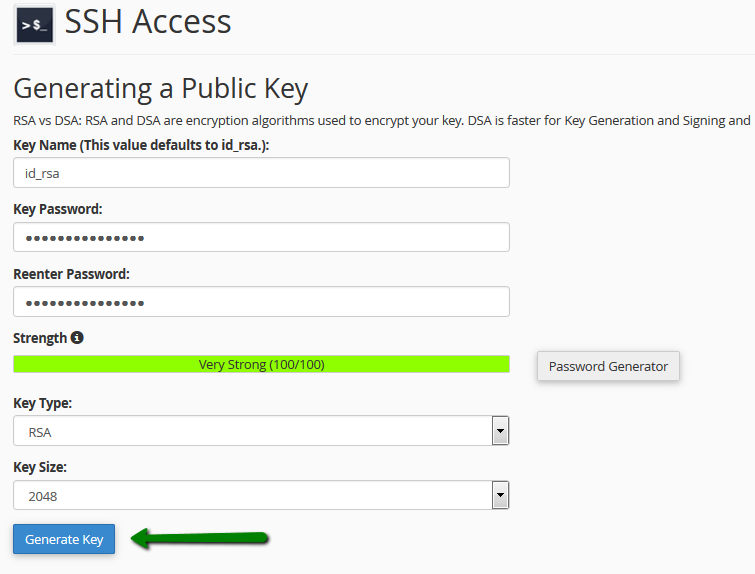
Once everything is set, click Generate Key.

Now you should see both private and public keys you created.

2.2. Public key authorization

In order to authorize SSH access to your hosting account by the private key you created, click on the Manage option:
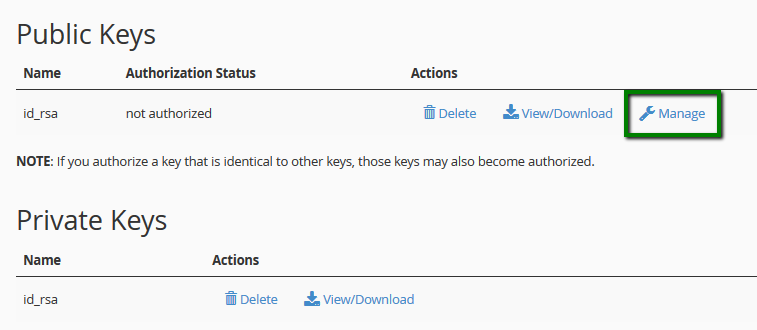
On the next page, click on the Authorize button:

2.3. Acquiring a key pair

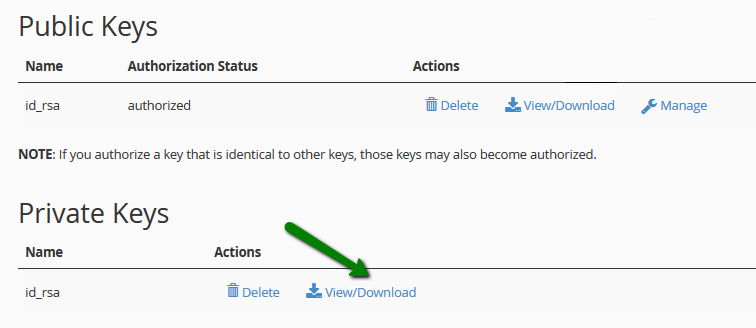
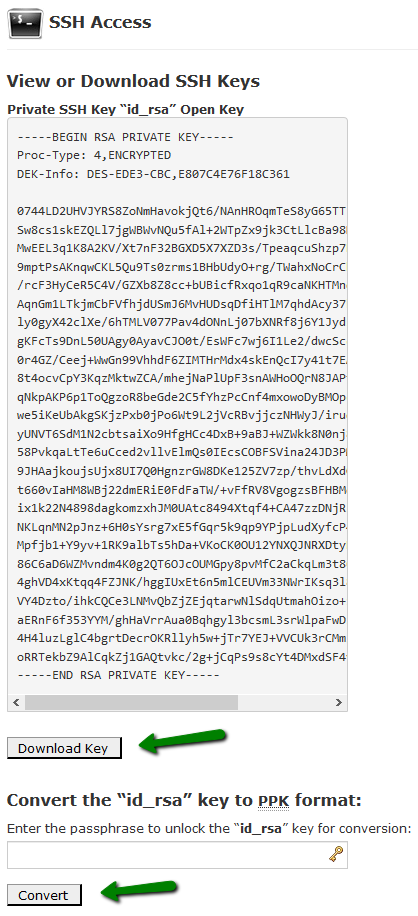
You can view and download keys you have in cPanel by clicking on the View/Download button in the Private Keys section:
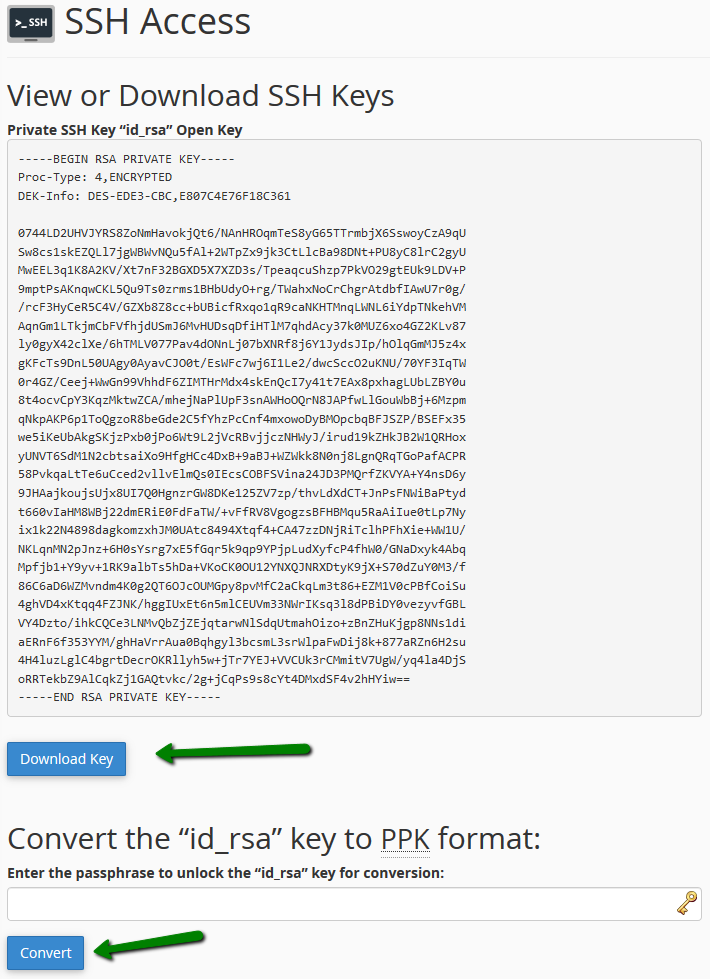
Click on Download Key (it will be saved in a simple text document on your side) or just copy/paste the provided key if needed. You can also convert your key into PuTTY’s ppk format using the Convert option:
3. Import of the existing keys

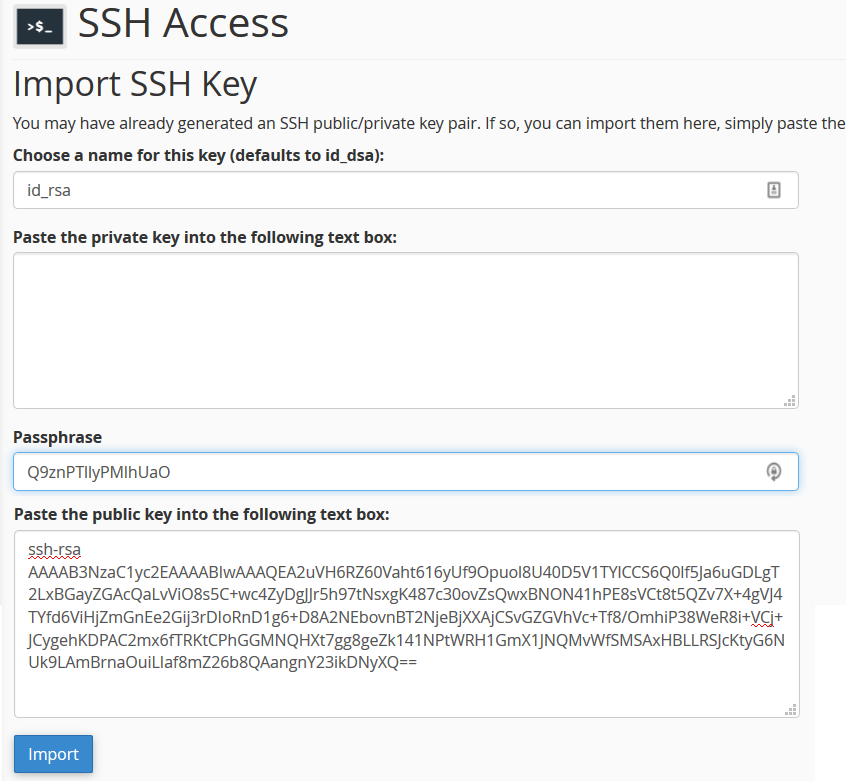
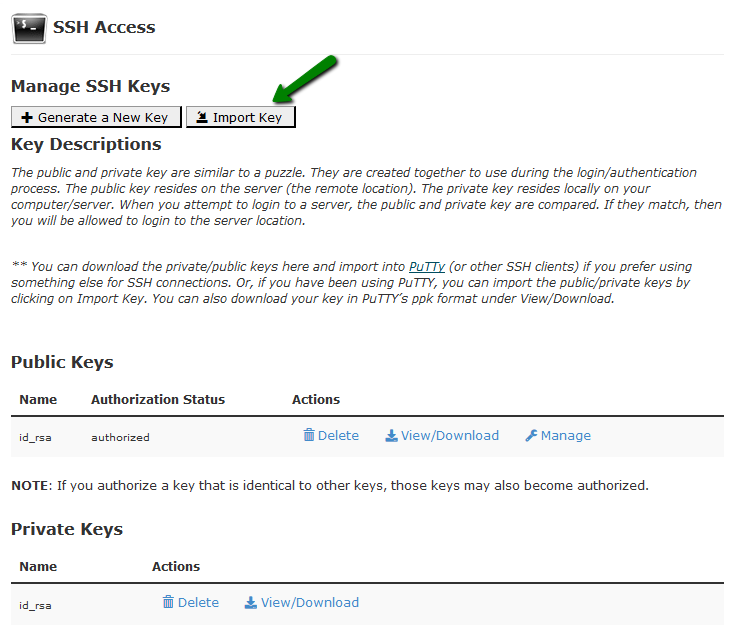
If you already have a key pair generated by other means, you can import the public key using the Import Keyoption:
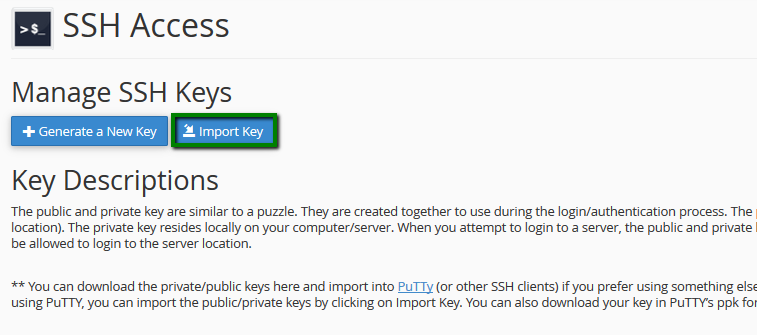
Next, fill in the required details:

  • Choose a name for this key (defaults to id_dsa): type in id_rsa;
  • Paste the Private Key in this box: leave it empty (this field is only used in cases, where you want to have SSH access from your cPanel account to other servers via the keys);
  • Passphrase: input the passphrase;
  • Paste the public key into the following text box: on your local computer open your public key file (e.g./User/name/.ssh/id_rsa.pub) > copy and paste the content of that file into the field;
  • Click Import

Once done, do not forget to authorize your imported public key in the same way as in step 2.2.

4. Use Putty and SSH key pair to connect

In this example, we will use the Putty SSH client and key pair generated by cPanel in order to access the server via SSH:

4.1. Download the Private key as it is shown in step 2.3.

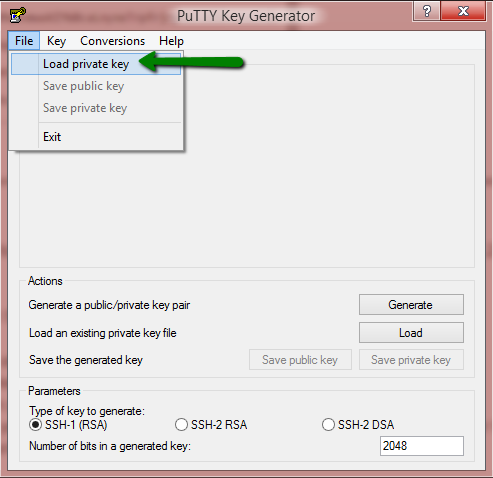
4.2. In the PuTTy folder, run puttygen.exe; in the top menu select the File tab and click on Load private keyand select your private key file (make sure All files (*.*) filter is used so you can see your downloaded private key file):
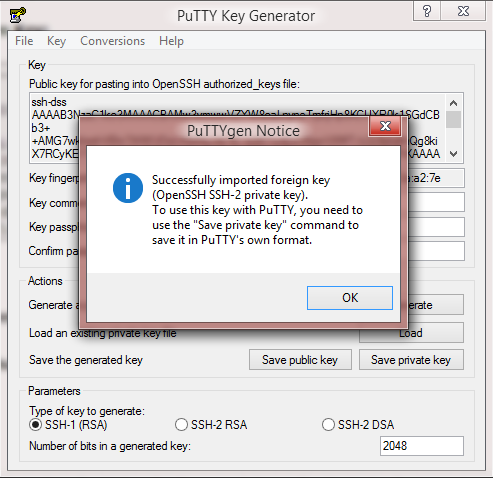
You will be asked for the passphrase you specified during the key generation in step 2.1. After entering it you should receive a successful import message:
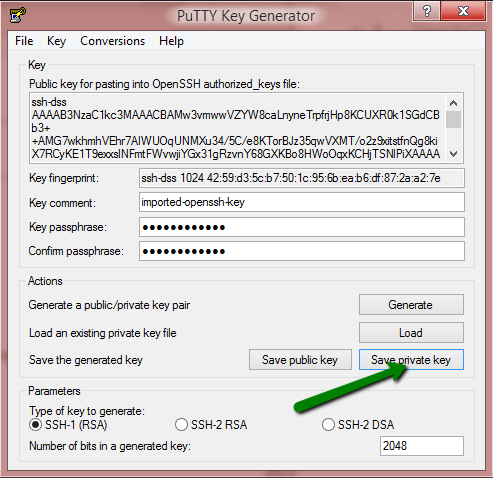
In case you do not wish to set a passphrase for the key, you can empty the Key passphrase and Confirm passphrase fields.
Now click on Save private key and save your key as a .ppk file which will be needed later:

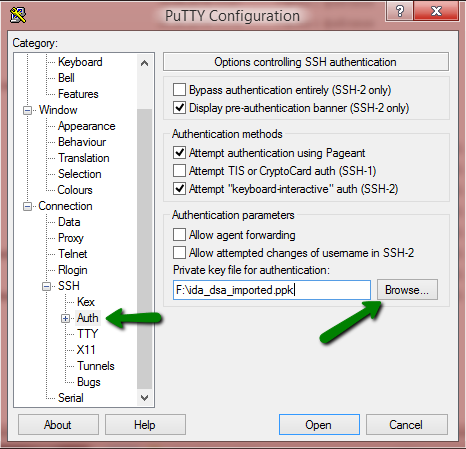
4.3. Run the PuTTy client (putty.exe), select Connection > SSH > Auth and in the Authentication parameterssection, click on Browse to select the saved .ppk file:
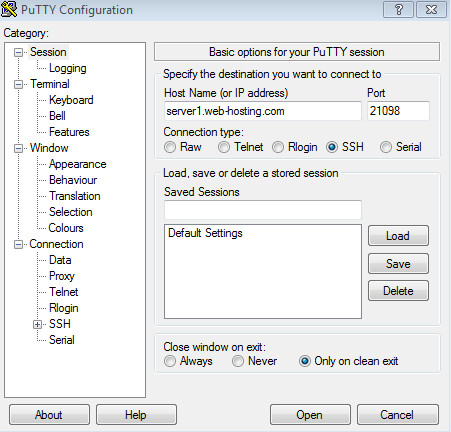
Once done, get back to the Session section and input the server name (IP address) and specify SSH port (it should be 21098 for all shared servers accounts) and click Open:
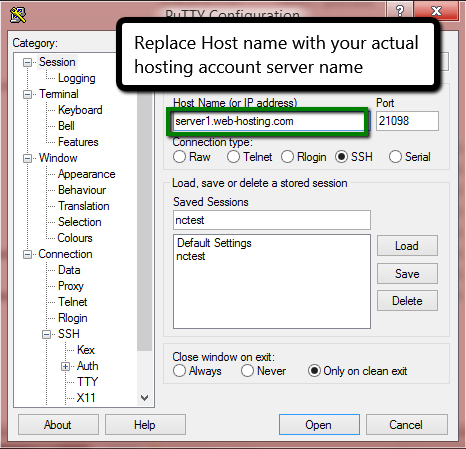
In the console window, you will be asked for the login and passphrase:

For cPanel Retro Theme:

1. Manage SSH Keys

2. Create a new pair of SSH keys

3. Import of the existing keys

4. Use Putty and SSH key pair to connect


1. Manage SSH Keys


In cPanel you can manage SSH keys in the SSH access menu:

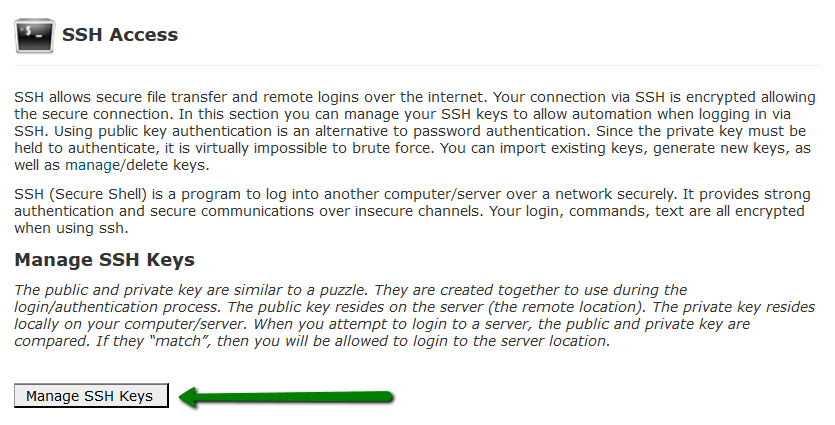
Click on Manage SSH keys

On the next page, you can either import the existing pair of keys or generate a new one.

2. Create a new pair of SSH keys

2.1. Public and private keys generation

In order to generate a new SSH key pair click on the Generate a New Key option:

On the generator page, specify the password (passphrase), Key Name, Key Type and Size.
The maximum allowed DSA key size is 1024 which is not enough to guarantee its security nowadays. That’s why we suggest using only RSA with 2048 bits:
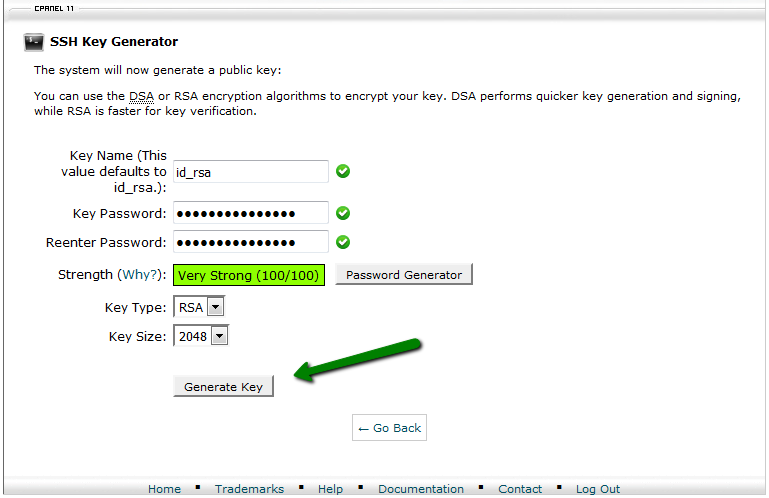
Once everything is set, click Generate Key.

Now you should see both private and public keys you created.

2.2. Public key authorization

In order to authorize SSH access to your hosting account by the private key you created, click on the Manage option:
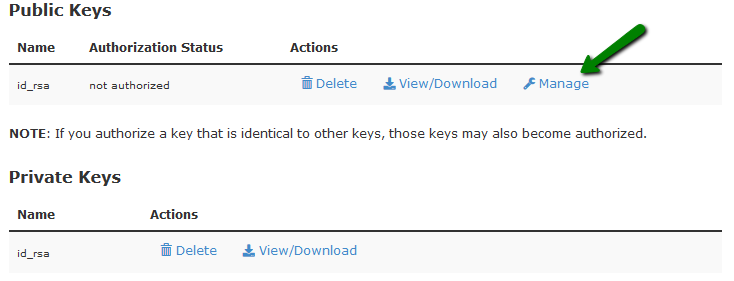
On the next page, click on the Authorize button:

2.3. Acquiring a key pair

You can view and download keys you have in cPanel by clicking on the View/Download button in the Private Keys section:
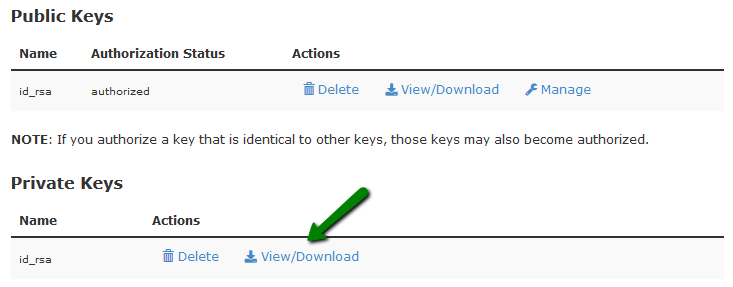
Click on Download Key (it will be saved in a simple text document on your side) or just copy/paste the provided key if needed. You can also convert your key into PuTTY’s ppk format using the Convert option:
3. Import of the existing keys

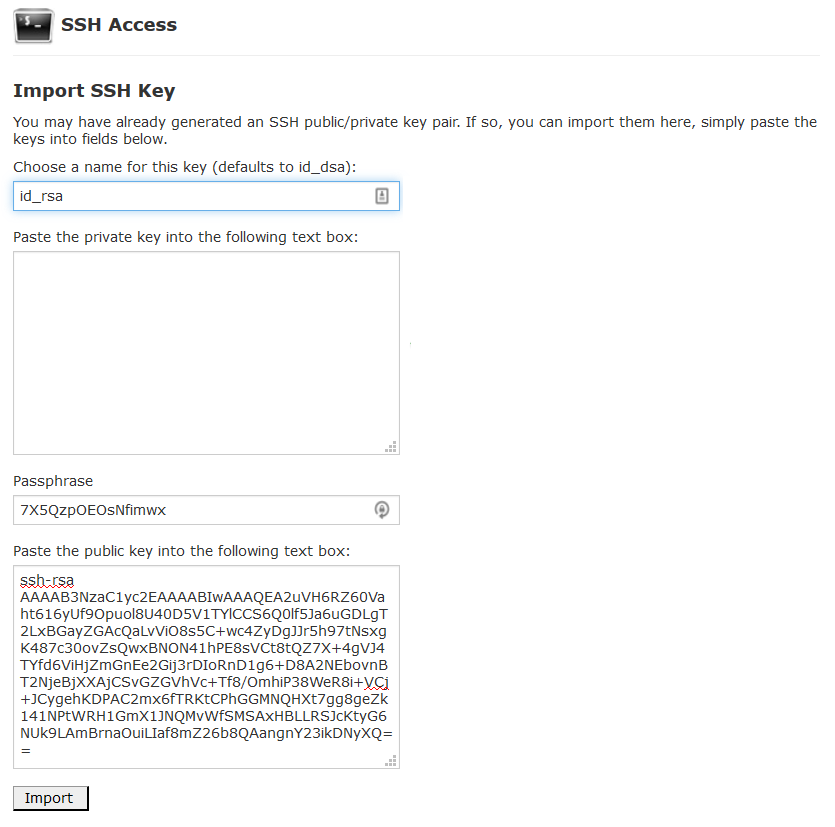
If you already have a key pair generated by other means, you can import them using the Import Key option:
Next, fill in the required details:

  • Choose a name for this key (defaults to id_dsa): type in id_rsa;
  • Paste the Private Key in this box: leave it empty (this field is only used in cases, where you want to have SSH access from your cPanel account to other servers via the keys);
  • Passphrase: input the passphrase;
  • Paste the public key into the following text box: on your local computer open your public key file (e.g./User/name/.ssh/id_rsa.pub) > copy and paste the content of that file into the field;
  • Click Import

Once done, do not forget to authorize your imported public key in the same way as in step 2.2.

4. Use Putty and SSH key pair to connect

In this example, we will use the Putty SSH client and key pair generated by cPanel in order to access the server via SSH:

4.1. Download the Private key as it is shown in step 2.3.

4.2. In the PuTTy folder, run puttygen.exe; in the top menu select the File tab and click on Load private keyand select your private key file (make sure All files (*.*) filter is used so you can see your downloaded private key file):

You will be asked for the passphrase you specified during the key generation in step 2.1. After entering it you should receive a successful import message:

In case you do not wish to set a passphrase for the key, you can empty the Key passphrase and Confirm passphrase fields.
Now click on Save private key and save your key as a .ppk file which will be needed later:

4.3. Run the PuTTy client (putty.exe), select Connection > SSH > Auth and in the Authentication parameterssection, click on Browse to select the saved .ppk file:

Once done, get back to the Session section and input the server name (IP address) and specify SSH port (it should be 21098 for all shared servers accounts) and click Open:

In the console window, you will be asked for the login and passphrase:

That’s it!
What is SSH?

What is SSH?

What is SSH?

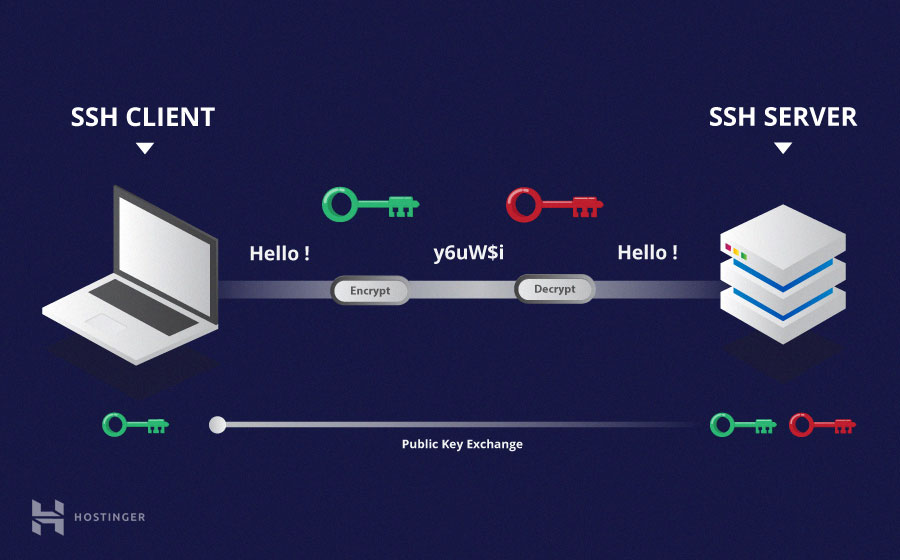
Secure Shell or SSH is a network protocol that allows data to be exchanged using a secure channel between two networked devices. The two major versions of the protocol are SSH-1 and SSH-2.

Shell is a program to log into another computer over a network to execute commands on a remote machine and to move files from one machine to another. It provides strong authentication and secure communications over insecure channels.

SSH was designed as a replacement for Telnet and other insecure remote shells (rlogin, rsh, rcp, and rdist), which send information, notably passwords, in plain text, rendering them susceptible to packet analysis. The encryption used by SSH is intended to provide confidentiality and integrity of data over an unsecured network, such as the Internet.

How to create and maintain MySQL Databases in cPanel

How to create and maintain MySQL Databases in cPanel

This tutorial describes the process of creating and managing MySQL Databases in cPanel. There are two cPanel tools that allow creating MySQL Databases: MySQL Databases menu and MySQL Database Wizard. Let’s find out how each of them actually works.

For cPanel Basic Theme


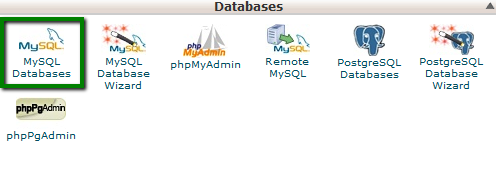
1. In order to start, log into cPanel and click on the MySQL Databases menu in the Databases section:

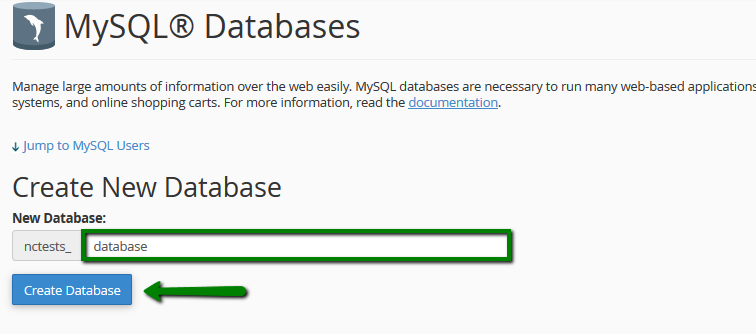
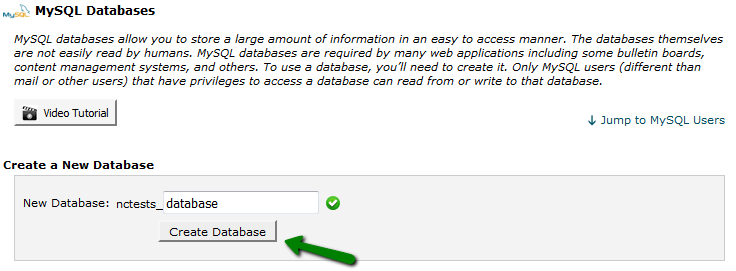
2. Once there, find the Create New Database section, then simply indicate name of the future database and click on the Create Database button:

3. The database is created and ready to use. Now, in order to be able to fill and maintain the database, MySQL User should be created and assigned to the database with correct privileges.

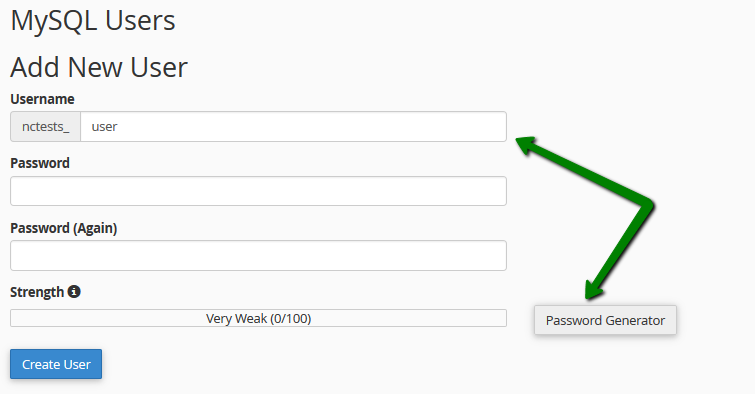
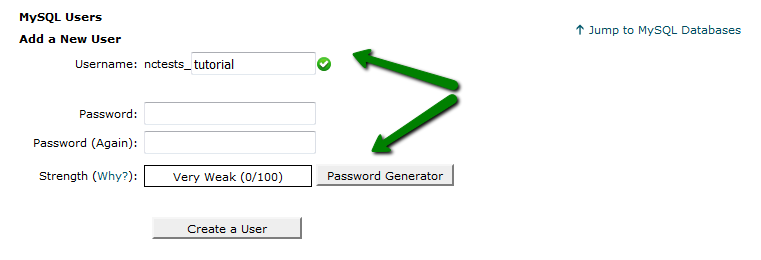
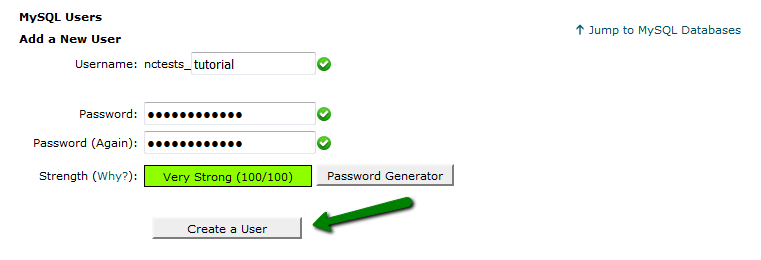
To create a MySQL User, find the section called MySQL Users > Add New User and choose the username you wish to assign to your database. Once done, choose a secure password for MySQL User and type it into the corresponding fields:

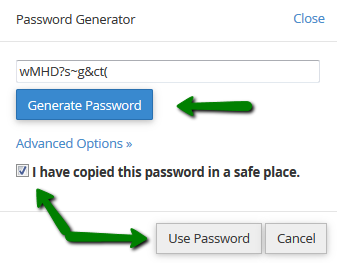
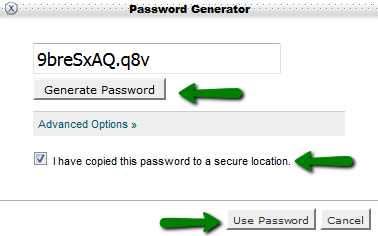
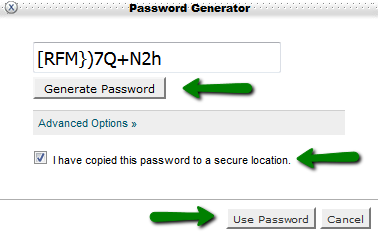
It is highly recommended to use the built-in Password Generator to create a secure password as shown below:

Make sure that you save the password, as you will need it to maintain the Database in the Future.

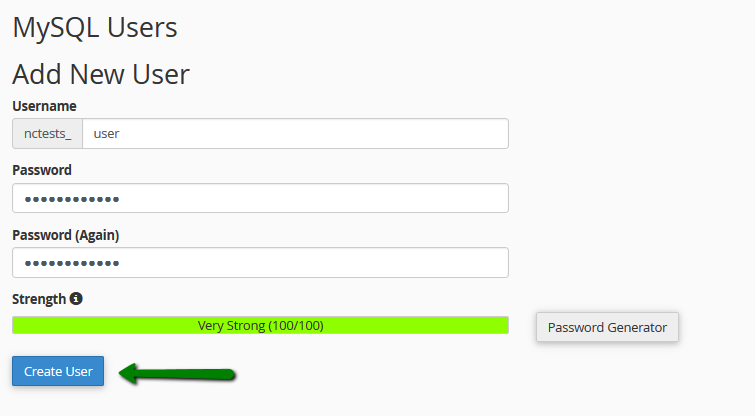
4. After the password is chosen, simply click on the Create User button to finish the process:

5. Now you have both MySQL Database and MySQL User created. Now we need to assign MySQL User to the database and set proper privileges. To do this, find the Add User To Database section and make sure that you choose the correct Database and User correspondingly. Once done, simply click on the Addbutton:

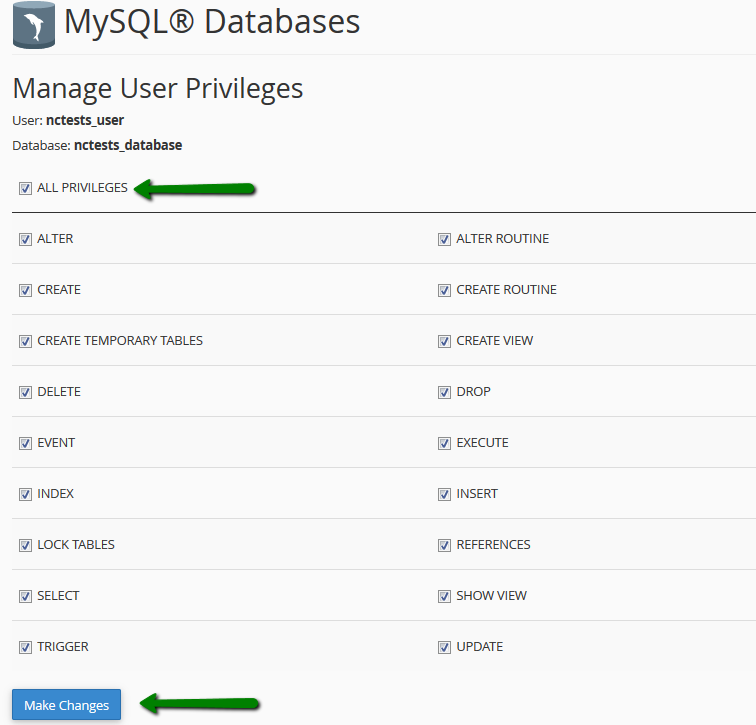
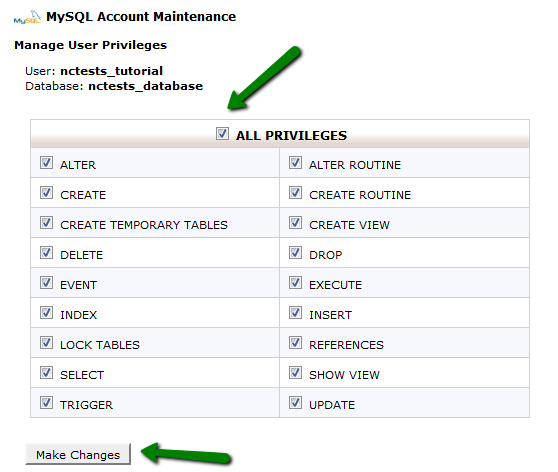
6. In the next window you will need to set correct privileges to the MySQL User. In this example, we shall grant all privileges to be able to maintain our MySQL Database without any restrictions, so you simply need to choose the All Privileges option and click on the Make Changes button:

NOTE: It is important to remember that multiple MySQL Users with different sets of privileges can be assigned to the same MySQL Database.

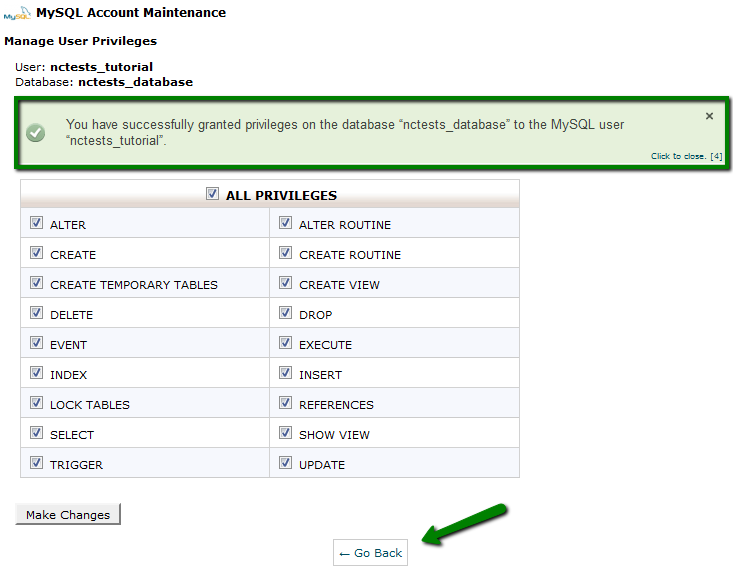
7. Once finished, you will get the message stating that the MySQL User was successfully added to the Database:

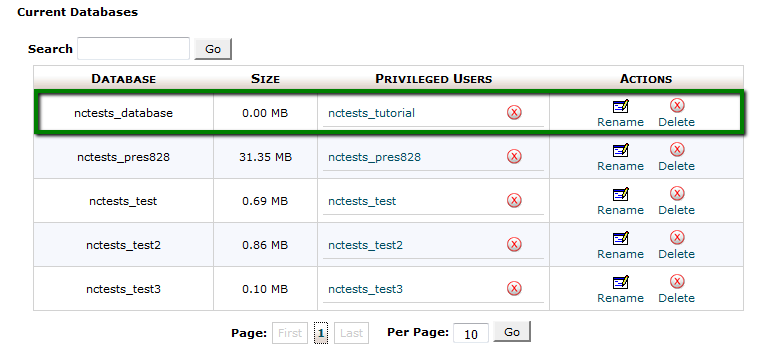
To check this, you can simply go back to the MySQL Databases menu and check the Current Databasessection:

For cPanel Retro Theme

1. In order to start, log into cPanel and click on the MySQL Databases menu in the Databases section:

2. Once there, find the Create New Database section, then simply indicate name of the future database and click on the Create Database button:

3. The database is created and ready to use. Now, in order to be able to fill and maintain the database, MySQL User should be created and assigned to the database with correct privileges. To create a MySQL User, find the section called MySQL Users > Add New User and choose the username you wish to assign to your database. Once done, choose a secure password for MySQL User and type it into the corresponding fields:

It is highly recommended to use the built-in Password Generator to create a secure password as shown below:

Make sure that you save the password, as you will need it to maintain the Database in the Future.

4. After the password is chosen, simply click on the Create User button to finish the process:

5. Now you have both MySQL Database and MySQL User created. Now we need to assign MySQL User to the database and set proper privileges. To do this, find the Add User To Database section and make sure that you choose the correct Database and User correspondingly. Once done, simply click on the Addbutton:

6. In the next window you will need to set correct privileges to the MySQL User. In this example, we shall grant all privileges to be able to maintain our MySQL Database without any restrictions, so you simply need to choose the All Privileges option and click on the Make Changes button:

NOTE: It is important to remember that multiple MySQL Users with different sets of privileges can be assigned to the same MySQL Database.

7. Once finished, you will get the message stating that the MySQL User was successfully added to the Database:

To check this, you can simply go back to the MySQL Databases menu and check the Current Databasessection:


Creating a database with the MySQL Database Wizard tool

MySQL Database Wizard brings the same step-by-step process which is described above, but in a more simplified way. Let’s check how it works:

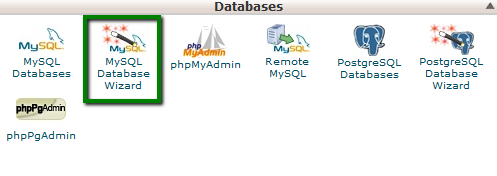
1. To find the tool, log into cPanel and click on the MySQL Database Wizard option under Databases:

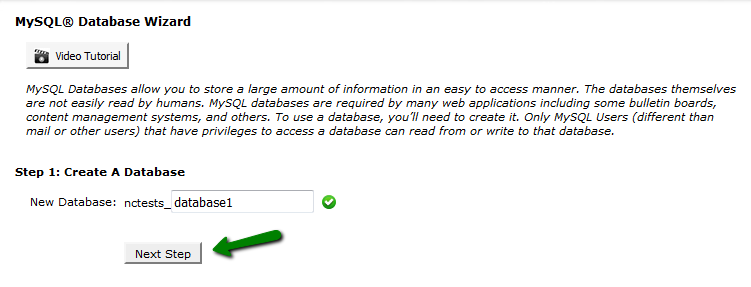
2. Once done, indicate the name of the new database and click on the Next Step button:

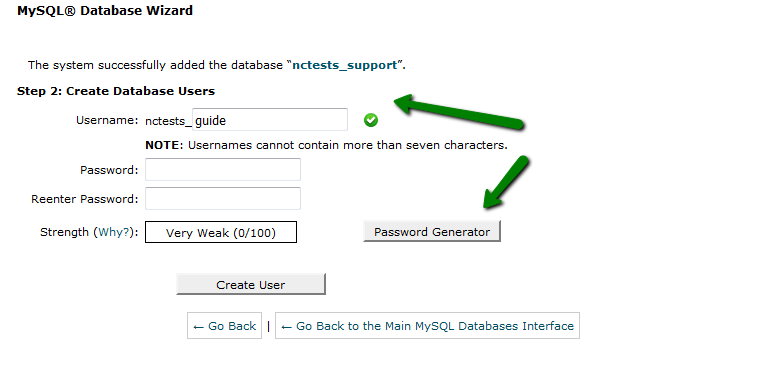
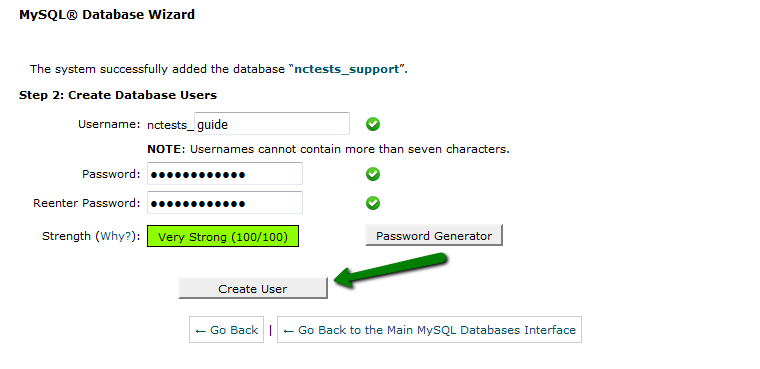
3. At Step 2 you will be prompted to indicate MySQL User and choose a password for it, reciprocally to the process described before:

4. After the username and password are indicated, simply click on the Create User button:

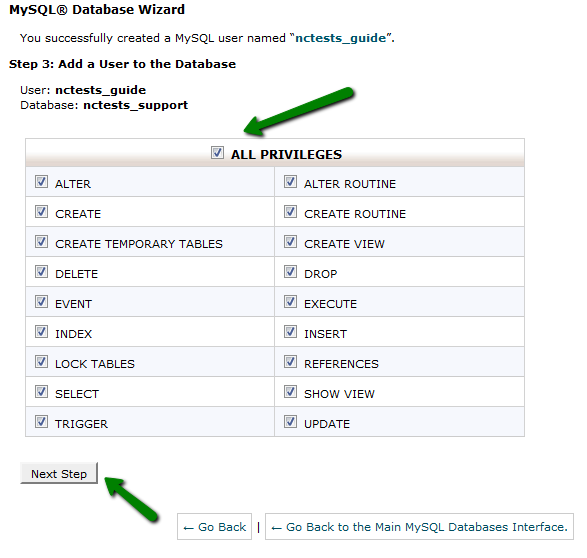
5. The next windows will allow you to set privileges for the newly created MySQL User similarly to the process described previously.

Accordingly, you will need to choose the All Privileges option and click on the Next Step button after that:

6. Once done, you will get a confirmation that the MySQL User was successfully added to the MySQL Database:

That’s it!
How to use Manage Shell in cPanel

How to use Manage Shell in cPanel

Secure Shell (SSH) is a cryptographic network protocol that is used to log into the system via a secure channel. With the help of SSH, you can safely exchange data between two devices. For more detailed information, visit here.

Enabling SSH access allows for:

  • Remote hosting control
  • The ability to add, remove, edit, backup and restore hosting files and directories
  • The easy import and export of your database
  • An established connection between 2 different servers

However, there are some downsides with enabling SSH:

  • More difficult to use than a web interface
  • Increased security risks


The Manage Shell plugin provided by Namecheap allows you to enable or disable SSH access for your respective hosting accounts with just a few clicks.

For cPanel Basic Theme:

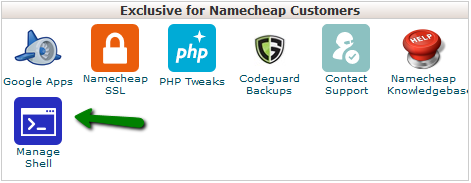
Firstly, locate the Manage Shell plugin from your cPanel:
cPanel >> the Exclusive for Namecheap Customers section >> Manage Shell:

How to use Manage Shell in cPanel - Cheap VPS

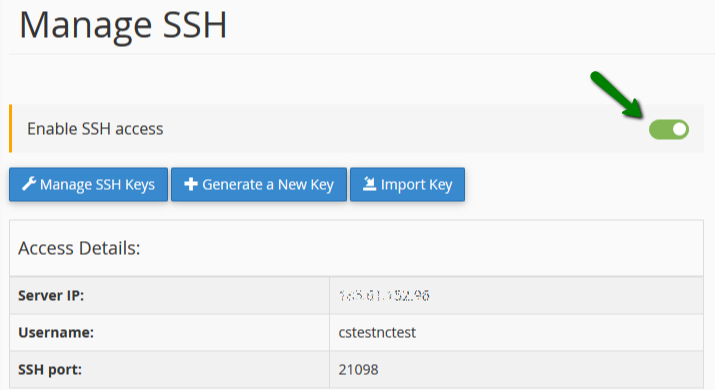
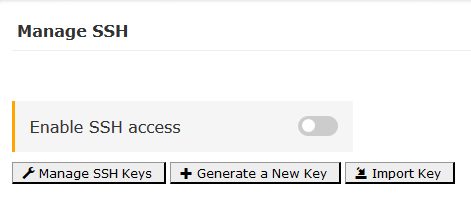
By default, SSH access is disabled for hosting accounts.

How to use Manage Shell in cPanel - Cheap VPS

There are 3 options related to enabling SSH keys:

  • Managing SSH keys
  • Generating a new key
  • Importing a key

All these options will take you to the SSH Access menu in your cPanel. Detailed instructions can be found in this guide.

To enable SSH, turn the toggle button on. After it has been enabled, you will then see how you can manage your SSH.

How to use Manage Shell in cPanel - Cheap VPS

Feel free to explore more about SSH clients here.

For cPanel Retro Theme:

Firstly, locate the Manage Shell plugin from your cPanel:
cPanel >> the Exclusive for Namecheap Customers section >> Manage Shell:

How to use Manage Shell in cPanel - Cheap VPS

By default, SSH access is disabled for hosting accounts.

How to use Manage Shell in cPanel - Cheap VPS

There are 3 options related to enabling SSH keys:

  • Managing SSH keys
  • Generating a new key
  • Importing a key

All these options will take you to the SSH Access menu in your cPanel. Detailed instructions can be found in this guide.

To enable SSH, turn the toggle button on. After it has been enabled, you will then see how you can manage your SSH.

How to use Manage Shell in cPanel - Cheap VPS

Feel free to explore more about SSH clients here.

How to import and export a database via phpMyAdmin (‘Access denied create database db_name’ error)

How to import and export a database via phpMyAdmin (‘Access denied create database db_name’ error)

In cPanel you can import and export databases using the phpMyAdmin menu which you can find in the Databases section. Note, that only databases of 50MB maximum can be imported/exported in phpMyAdmin. Larger databases have to be imported/exported via SSH. To do this, follow the instructions here or simply submit a ticket to our HelpDesk.

Database import

1. Log into your cPanel
2. Navigate to phpMyAdmin menu:

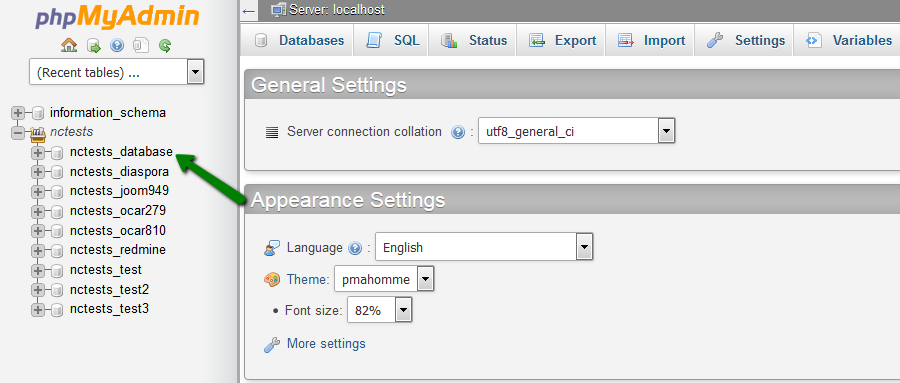
3. Select the database that you will need import to:

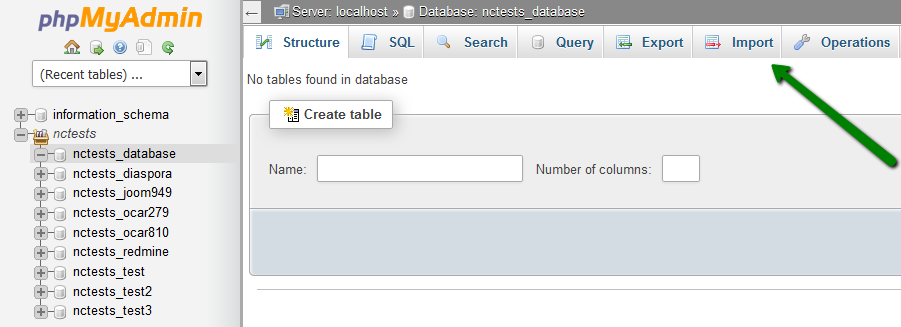
4. In the upper bar, click the tab Import:

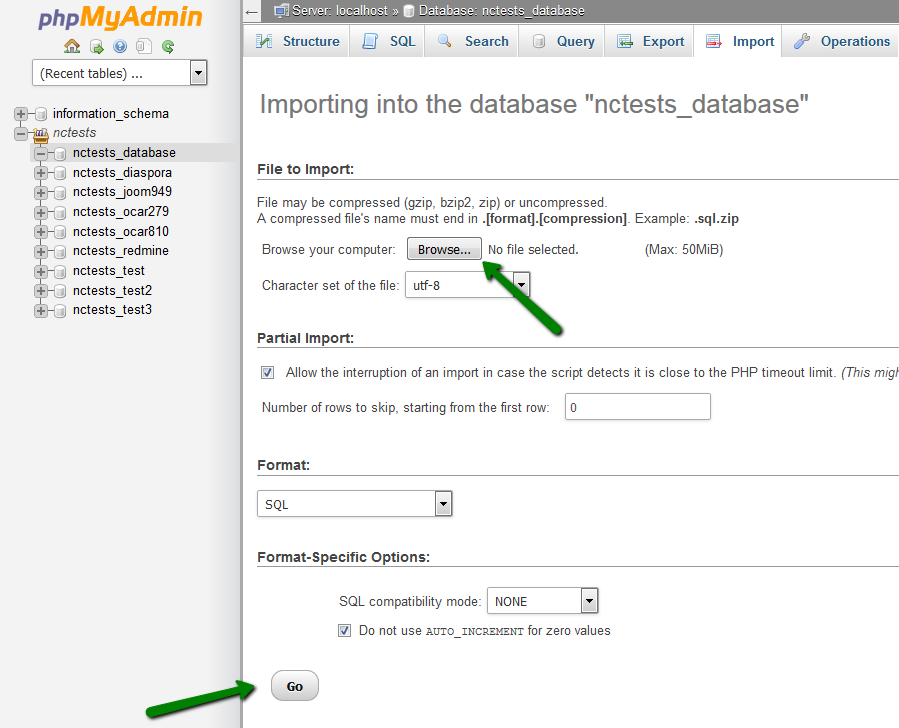
5. Click Browse and locate the .sql file from your computer. Once done, click Go:

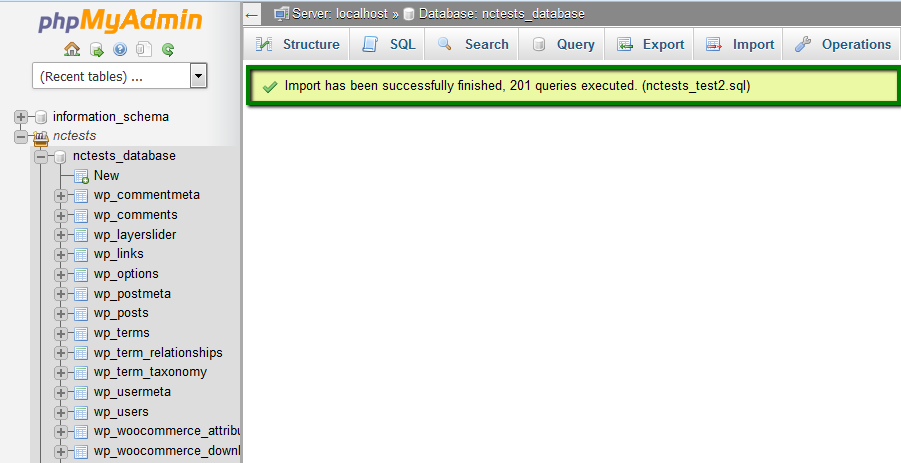
6. And you will see a notification that your database was successfully imported:

Database export

1. Log into your cPanel
2. Navigate to phpMyAdmin menu:

3. Select the database that you will need import to:

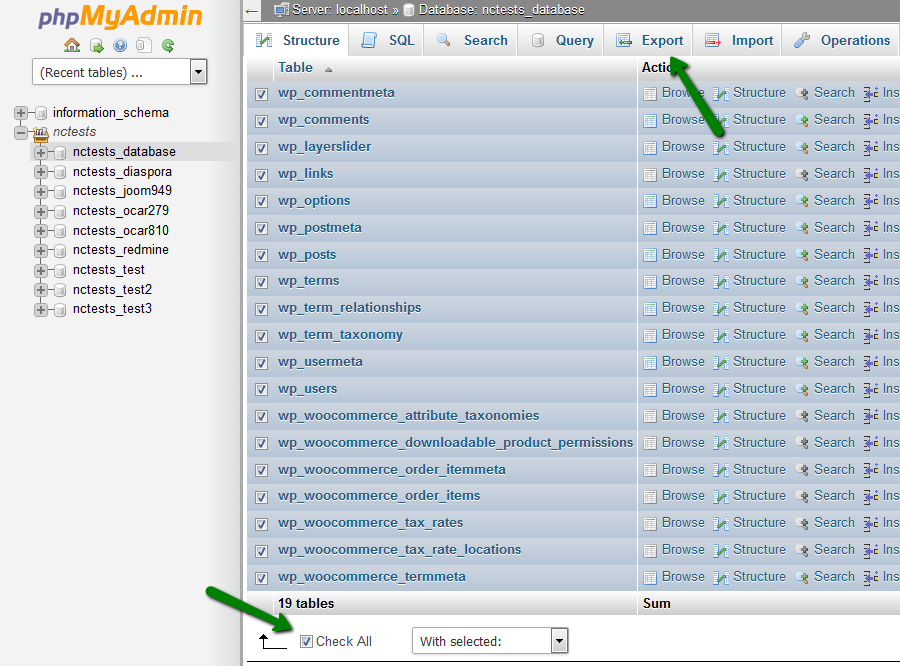
4. Choose the tables that you need to export or click Check All. Click Export to proceed:

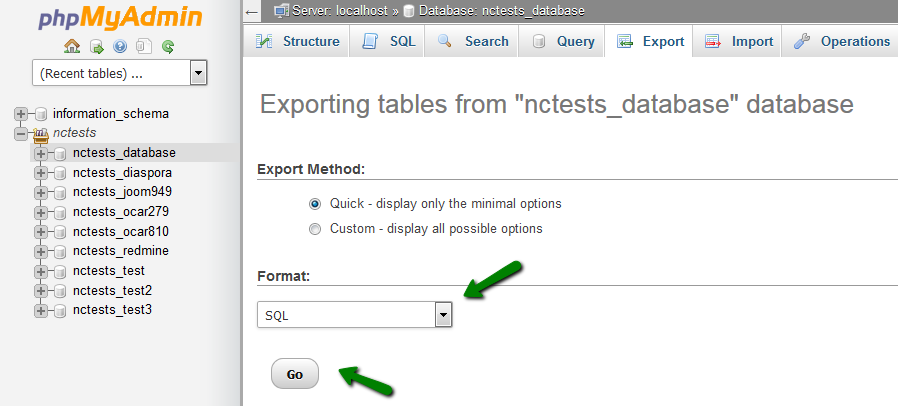
5. Select the required file from the drop-down menu in Format and click the Go button:

Access denied create database db_name error. How to fix it?

If you received this error message, you can resolve the issue by following the next steps:

1. Open the dump of your database using any text editor on your computer (for instance, Notepad or WordPad).
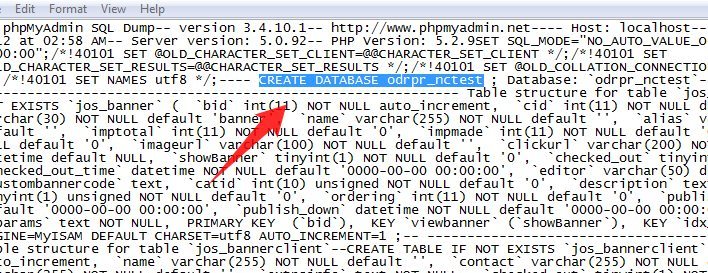
2. Find the line: CREATE DATABASE db_name (it can usually be found at the beginning) and remove it.
*db_name – your database name:

how_to_import_and_export_database_in_cpanel_access_denied_create_database_db_name_error_and_how_to_fix it(10).jpg

3. Save it and import it using the instructions provided above.

That’s it!