Yearly Archive December 27, 2019

How to change PHP version and update PHP extensions on Shared servers

How to change PHP version and update PHP extensions on Shared servers

In some cases, the correct functioning of your website depends on a PHP version installed on the server.
This guide describes how to change php version on Shared servers (Stellar, Stellar Plus plans and old Value, Professional, Ultimate plans). For Business SSD servers, use this guide.

Thanks to the PHP Selector function, it is possible to select the necessary PHP version as well as enable/disable certain PHP modules and functions.

To check what PHP version is currently in use, refer to this article.

Change PHP version and/or manage extensions

1. Log into your cPanel account.
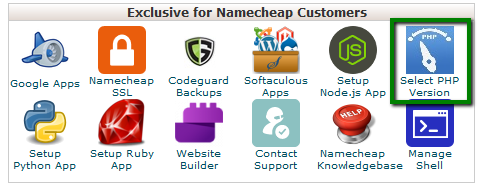
2. Scroll down to the Select PHP Version:
For cPanel Basic Theme:
How to change PHP version and update PHP extensions on Shared servers

How to change PHP version and update PHP extensions on Shared servers

For cPanel Retro Theme:

How to change PHP version and update PHP extensions on Shared servers

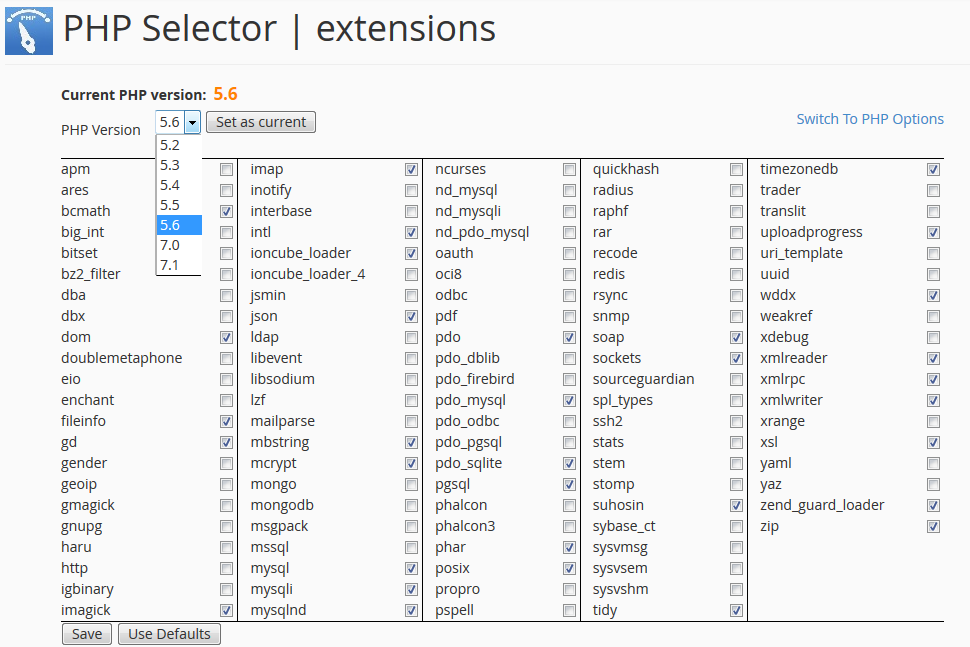
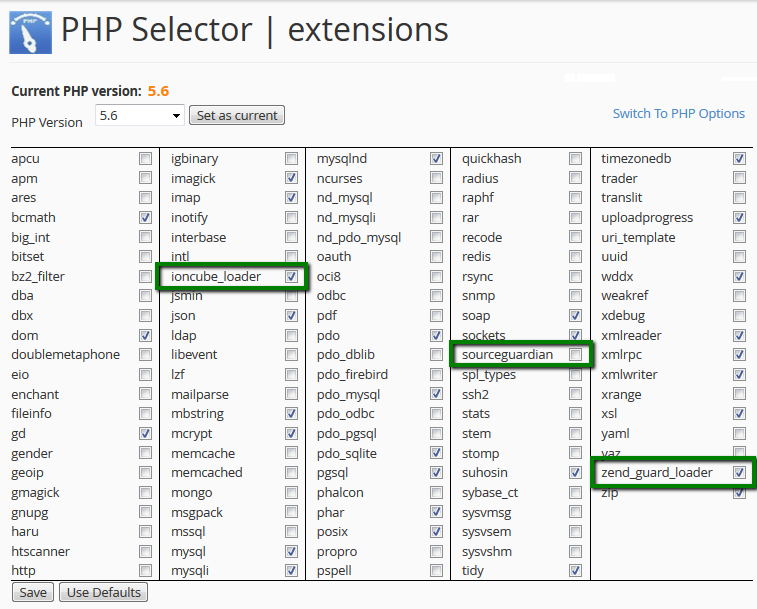
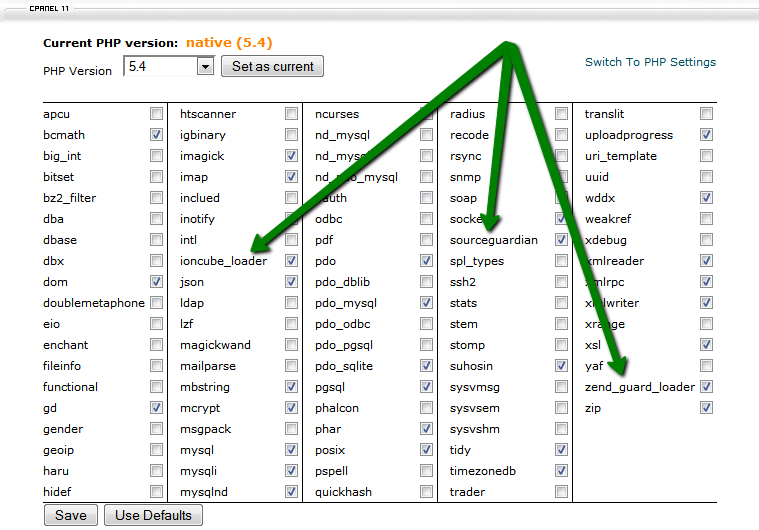
3. Here you will see the list of available modules and extensions.

If you do not need to change the PHP version and just want to turn on/off specific extensions, you can do this by checking/unchecking the corresponding boxes.

Use the PHP Version drop-down box to select the required version, click on Set as current in order to apply the changes.

NOTE: The ‘native’ PHP version does not allow changing any options. You can set the desired values using a php.ini file:

How to change PHP version and update PHP extensions on Shared servers

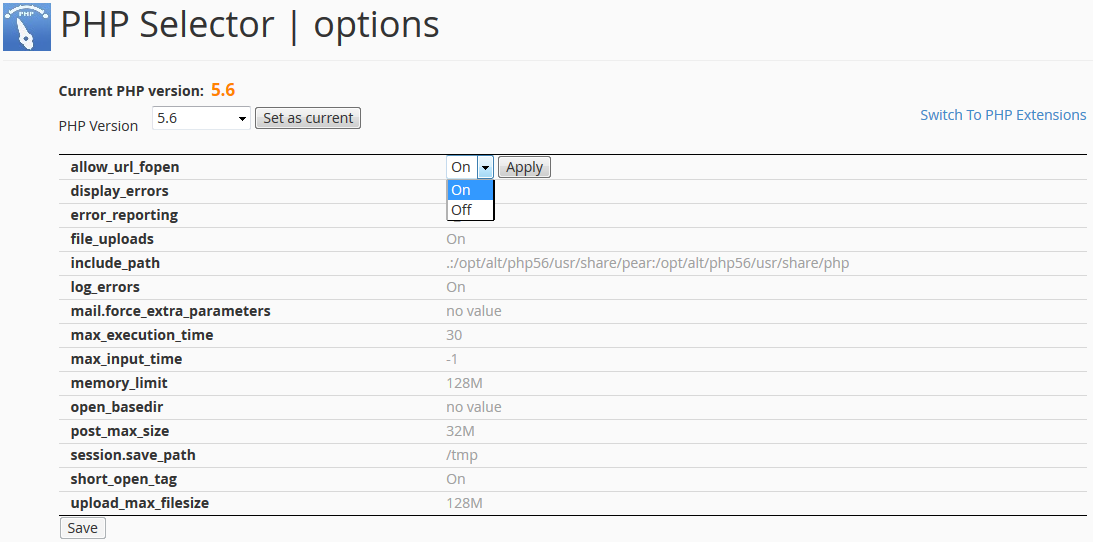
4. To change individual settings within the PHP version in question, click on Switch to PHP Options.

By clicking on one of the options in grey, you will be presented with a drop-down list to change specific settings. Hit Apply to implement the settings:

How to change PHP version and update PHP extensions on Shared servers

NOTE 1: It is recommended to update your website scripts and use PHP 5.6. If the latest software you run for your websites is not yet compiled for PHP 5.6, please contact the script vendor for a compatibility patch.

NOTE 2: If you used a php.ini file for editing your account PHP configuration before, you will need to replicate the custom values using PHP Selector tool.

NOTE 3: In order to increase the max upload size, make sure to modify both post_max_size and upload_max_filesize values.

NOTE 4: max_execution_time can be increased up to 300 seconds.

Change PHP version for addon domain

Sometimes your website may need to use a different PHP version from the one assigned to your domain on your cPanel account.

To set a different PHP version for an addon domain, you need to add a special code to your .htaccess file. To do this, follow the steps below.

1. Find the .htaccess file for the addon domain in question. The steps for how to find it can be located here.

2. Add the following line to your .htaccess file:

<FilesMatch ".(?:html|php)$">
SetHandler application/x-lsphpXX
</FilesMatch>

where XX is the PHP version you wish to set. It can be 52, 53, 54, 55, 56, 70, 71,72, or 73.

For example:

How to change PHP version and update PHP extensions on Shared servers

3. Click “Save changes”.

NOTE: When a different PHP version is set for the addon domain, there are no PHP extensions enabled by default. To make a website work correctly, you will need to upload a php.ini file to the folder of the addon domain. You can check this article (see point 6) to help you with uploading files to the hosting account.You can download the php.ini file for different PHP versions from the Attachments section at the end of this guide. Do not forget to rename the file to php.ini once it is uploaded to the hosting account.

Alternatively, you can run the command below via SSH:

cp /opt/alt/default_php_ini/phpXX.ini /home/cPanel_username/path_to_the_folder/php.ini
  • XX is PHP version you wish to set (it can be 52, 53, 54, 55, 56, 70, 71, 72 or 73),
  • cPanel_username should be replaced with your actual cPanel username, and
  • path_to_the_folder is a path to the folder of the addon domain.

For example:

How to change PHP version and update PHP extensions on Shared servers

You can find details on how to access a hosting account via SSH here.

The process is similar if you wish to set a different PHP version for a subdomain.

What server is my account hosted on?

What server is my account hosted on?

When setting up different FTP, mail, MySQL programs, etc., you need to specify the server hostname. You can check what server your account is hosted on in different ways.

1. Log into cPanel by typing into a browser http://yourdomain.tld/cpanel:

Also, you can use the cPanel login button in the Namecheap Dashboard.
You will be redirected to the cPanel login page with the hostname in the link:

In this example, the hostname is server126.web-hosting.com

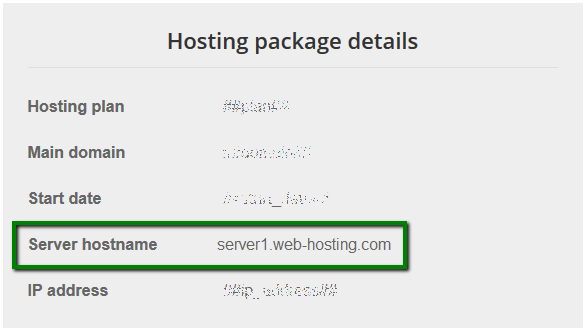
2. You can look up the hostname in Hosting Welcome Guide >> Hosting package details section:

NOTE: Alternatively, to set up an application, you can use your account IP address as a hostname.

That’s it!

Access Definition

Access Definition

Access is simply being able to get to what you need. Data access is being able to get to (usually having permission to use) particular data on a computer. Web access means having a connection to the World Wide Web through an access provider or an online service provider such as America Online.

For data access, access is usually specified as read-only access and read/write access.

What is a Dedicated Server?

What is a Dedicated Server?

What is a Dedicated Server?

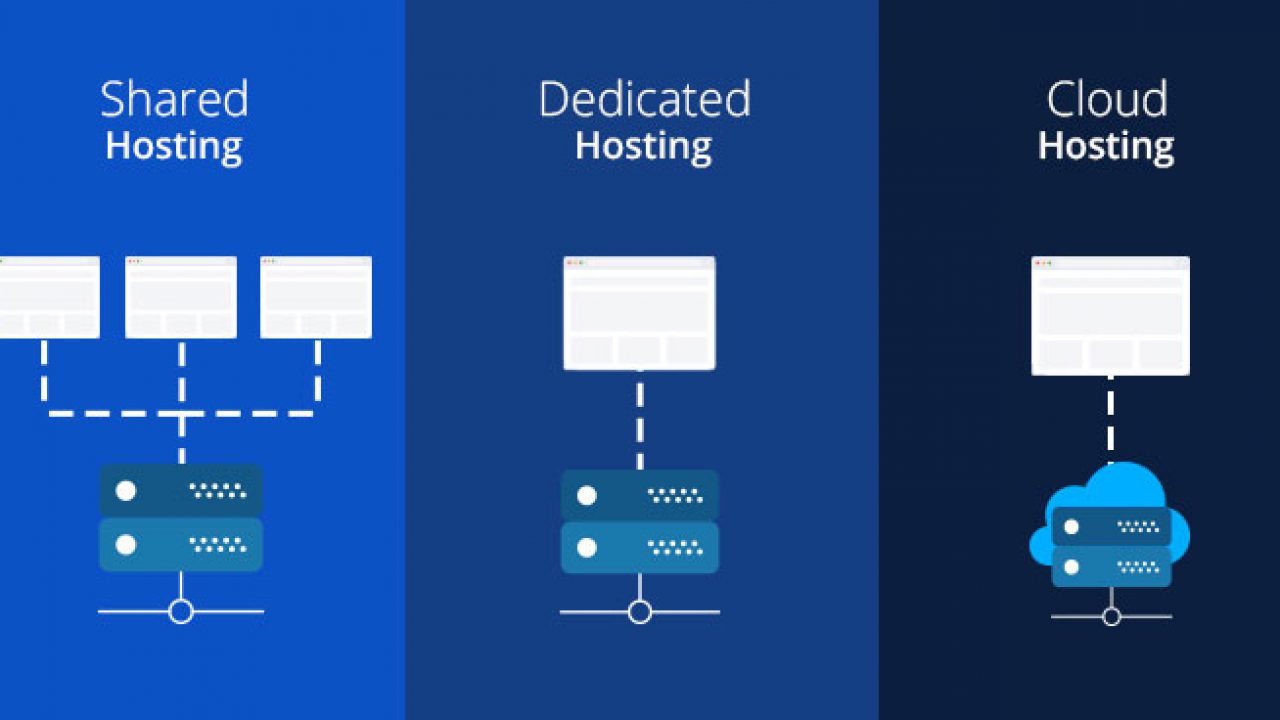
What is a dedicated server? Glad you asked! This page outlines what a dedicated server is, and explains the benefits of dedicated server hosting over shared hosting.

Dedicated server hosting refers to a type of web hosting plan where you are allocated a whole server to yourself. Therefore, a “dedicated server” refers to the “dedicated” server that you rent (or purchase) in order to host your website (or websites).

Dedicated server hosting can give you more control over your website. It can also help to ensure that other customers’ websites don’t impact on your website. Using dedicated servers is much more expensive than shared hosting, but if your site receives lots of traffic or you have other requirements (such as extra security requirements), dedicated server hosting could be for you.

With dedicated server hosting, you are able to log in to your dedicated server just as you would log in to your own computer. Once logged in, you can install and configure software as you wish.

Dedicated Server with Managed Hosting

Some dedicated server hosting plans are fully managed, meaning that your web hosting company performs regular administration duties, such as initial server setup, patching, anti-virus, security scanning, monitoring, and more.

Other dedicated server plans are self managed – you are responsible for the server setup, patching, anti-virus, etc

As you might expect, fully managed plans can be much more expensive than a self-hosted option. However, unless you have the time and inclination to look after your server 24/7, you might be better off looking for some sort of managed hosting plan.
Some dedicated server hosting plans are managed by default, others are self managed with an optional “service plan”, meaning, you pay extra for your web host to manage your server. Some of these self managed plans have various “add ons” that you can pick and choose. For example, you could add on a backup plan, a server maintenance plan, a security scanning service, etc. With these options, your web hosting company will perform these duties as outlined on a regular basis (for example, weekly or monthly) or perhaps on a one-off basis as required by yourself.

Example of Dedicated Server Hosting

To get a better idea of what’s included with dedicated server hosting, check out these dedicated servers at our partner site, ZappyHost.

What is a Dedicated Server – Another Definition

The term “dedicated server” can also mean a single computer within a network that is reserved for a specific purpose. For example, within a network, you could have a computer dedicated to printer resources, another computer dedicated to Internet connections, another computer serving as a firewall, etc. These computers would all be dedicated servers, as the whole computer is allocated for a specific task within the network.

What is a Virtual Dedicated Server?

A virtual dedicated server is a variation on the dedicated server concept. Instead of hiring the whole physical server, you hire a virtual server.

A virtual dedicated server is also referred to as a virtual private server (VPS). To learn more about VPS hosting, see What is VPS Hosting?.

What is Dedicated Hosting?

What is Dedicated Hosting?

What is Dedicated Hosting?

Dedicated hosting is a hosting configuration in which a server is devoted to a single organisation or for a single purpose, such as a website. This is in contrast to shared hosting, in which a server acts as a host to multiple clients. A dedicated hosting service is sometimes referred to as a dedicated server and can be set up in-house or externally as a service from within a data center. Let’s have a look at some of the benefits.
Customisation – Dedicated hosting grants a certain freedom and control that other hosting solutions are unable to provide. The fact that the server is dedicated to one client and there are no cohabitants means that the server (and overall hosting solution) can be tailored to the specific needs of that client. This ensures that they can select and pay for the features that they require.
Uptime – In a world where convenience is everything and consumers aren’t used to waiting, it is vital to ensure that a website, for example, is functional at all times; site downtime could lead to customers moving on to competitors. Dedicated hosting allows for high performance and stability to ensure that websites and other business functions are operational virtually 100% of the time (usually upwards of 99.4%). To this end, providers should offer server monitoring and back-up facilities alongside support services (described below) to keep functions running as seamlessly as possible.
Congestion – Server congestion is much less of an issue with a dedicated server, especially when compared to shared hosting options. With the latter, you often run the risk of congestion due to the traffic and usage levels of other websites or applications hosted on the same server, competing for bandwidth, disk space and CPU usage. The very nature of dedicated hosting ensures that this isn’t an issue. It also works the other way; if the website in question is resource heavy then dedicated hosting may be the answer to ensure that other websites aren’t disrupted.
Security – Clients using a dedicated platform will be able to deploy security measures, such as anti-virus and firewall configurations, that are more tailored to their own functions; whilst also avoiding the security vulnerabilities that can otherwise be introduced by the activities of neighbouring clients on shared hosting platforms. In addition, dedicated servers located within data centers can benefit from the physical security measures that such facilities often put in place, including, for example, biometric authentication, security guards and mantraps.
Support – Some dedicated hosting services come with a certain level of support. This is important as a high percentage of dedicated hosting customers use the service to host mission critical or important computing functions or websites. Effective support ensures that site disruption is kept to a minimum. A fully managed hosting provider, for example, may offer support 24 hours per day, 365 days a year.
Details of support levels, as well as information regarding reliability statistics can usually be found in the service level agreement (SLA). These documents can often provide an insight into the quality of a particular service and should be consulted carefully when going through the process of choosing a provider.
If opting for a dedicated service that does not come with any support, it is important to ensure the presence of the necessary knowledge to manage and maintain a server effectively.

What is SNMP and How it Works

What is SNMP and How it Works

What is SNMP and How it Works

If you’re a new network professional in the IT world, the term SNMP has likely come up a time or two. SNMP stands for “Simple Network Management Protocol.” It is an application layer protocol included in the Internet protocol suite, a set of the most commonly used communications protocols online.

SNMP originated in the 1980s at the time when organizational networks were growing in both size and complexity. Today, it is one of the most widely accepted protocols for network monitoring. Here’s a quick summary of what SNMP does, how it works, and why it matters to network professionals.

What does SNMP do?

All day, traffic is ebbing and flowing across your network as users conduct transfers, browse, perform downloads, and more. SNMP talks to your network to find out information related to this network device activity: for example, bytes, packets, and errors transmitted and received on a router, connection speed between devices, or the number of hits a web server receives.

SNMP works by sending messages, called protocol data units (PDUs), to devices within your network that “speak” SNMP. These messages are called SNMP Get-Requests. Using these requests, network administrators can track virtually any data values they specify. All of the information SNMP tracks can be provided to a product that asks for it. That product can either display or store the data, depending on an administrator’s preferences.

The Architecture of SNMP

In order to effectively monitor network activity, SNMP relies on an architecture consisting of the following:

  • Managed devices: From printers and workstations to resources like routers and switches, there are many devices within an organization’s network that have to be managed and monitored. Managed devices can be configured with SNMP nodes that allow them to interface with other network components.
  • Agent: Overall SNMP management relies on a system of local device information being collected and transmitted. This happens via agents, programs that are tied to local devices with the purpose of collecting, storing, and signaling the presence of data from these environments.
  • Network management station: This is the base that is shared between agents and SNMP managers, and it provides the memory and processing functionality to fuel network management.

Together, these components gather information to bring back to the network requester.

The Power of SNMP

Collecting this data can help IT professionals keep their finger on the pulse of all their managed devices and applications. Every device within the network can be queried in real time with SNMP, TCP, and other types of probes for their performance metrics. When thresholds for certain values are exceeded, software can alert system administrators of the issue, allowing them to drill in to the data and troubleshoot a solution.

For organizations’ IT departments looking to harness the power of SNMP, it’s imperative to have network monitoring software that is up for the task. Intermapper uses SNMP probes to query network devices for their management information base (MIB) variables. As a leading network monitoring software choice, Intermapper has 100s of built-in network probes to give you a wide variety of data about your network performance. Users also have the ability to create their own custom probes. The ability to create custom probes enables SNMP-speaking devices to deliver device status updates in a way that enhances the overall quality of network monitoring and management.

How to – PHP Loaders

How to – PHP Loaders


What are PHP Loaders and what is their role?

As you may know, PHP files are plain text files that are not encrypted in any way, which basically means that if someone gains access to a PHP-based application or website, all the inner code structure will be available for modification. To prevent this, encoders were specifically designed to transform the human-readable code into unreadable sophisticated bytecode protected from unwanted interference and changes.

At the same time, PHP Loaders were designed to perform decryption of such secured files directly on the server, performing additional optimization during the deployment process. In simple words, PHP Loader is a PHP extension responsible for reading and executing PHP files encoded with a corresponding encoding product. A simplified presentation of the working principle of such products can be found below:

Currently, we provide three most popular PHP Loaders to decrypt protected applications on our shared servers: IonCube LoaderZend Guard Loader and Source Guardian.

NOTE: Depending on the encoder used to encrypt the files, a corresponding PHP Loader should be chosen in order to run applications smoothly on our servers and prevent any incompatibility issues during the deployment process.

How can I enable PHP loaders:

for cPanel Basic theme
for cPanel Retro theme


for cPanel Basic theme:

If you have a Regular Shared Hosting account with us, follow the steps below:

1. Log into the cPanel.
2. Go to the Software section >> select the PHP Version menu:

3. Enable the required loaders and Save the changes:

If you have a Business Shared Hosting account, you will need to do the following:

1. Log into the cPanel.
2. Click on the PHP Tweaks menu in the Exclusive for Namecheap Customers section:

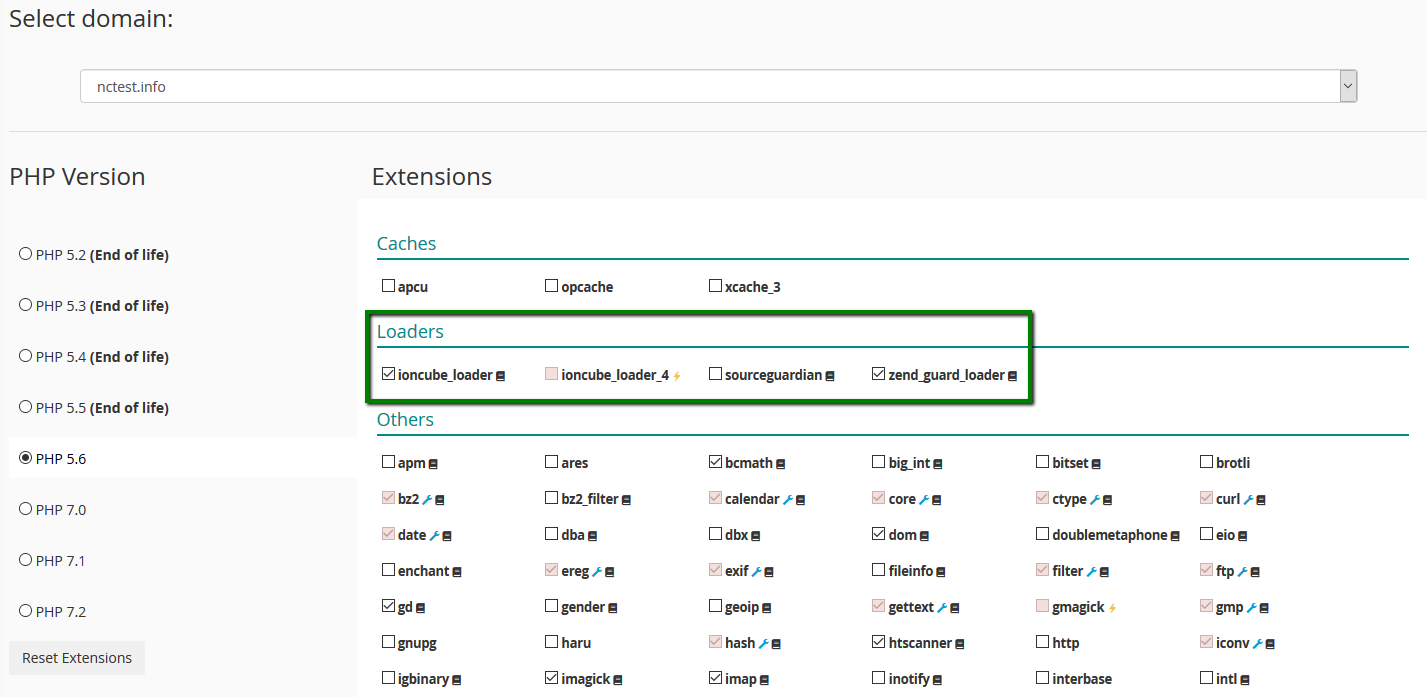
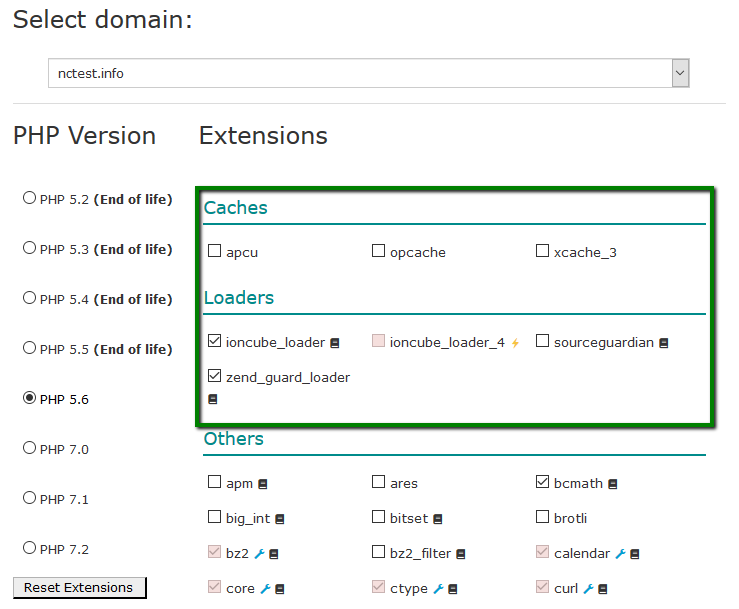
3. Choose the domain to perform changes for in the Select domain drop-down menu and enable the required PHP Loader in Loaders:

for cPanel Retro theme:

If you have a Regular Shared Hosting account with us, follow the steps below:

1. Log into cPanel.
2. Go to the Software/Services section >> select the PHP Version menu:

3. Enable the required loaders and Save the changes:

If you have a Business Shared Hosting account, you will need to do the following:

1. Log into the cPanel.
2. Click on the PHP Tweaks menu in the Exclusive for Namecheap Customers section:

3. Choose the domain to perform changes for in the Select domain section and select the required PHP Loader in Loaders:

That’s it!

How to change PHP version on Business servers

How to change PHP version on Business servers

This guide will show you how yo manage PHP settings on our Business servers (Stellar Business and old Business SSD plans).

Our Business servers are running with FCGI module and have PHP 5.2 – 5.6 and 7.0 – 7.3 versions available. To change the PHP version for your account or a separate addon domain, follow these steps:


How to manage PHP settings using the PHP Tweaks plugin


For cPanel Basic Theme:


1. Log into your cPanel.

2. Go to the Exclusive for Namecheap Customers section >> the PHP Tweaks menu:

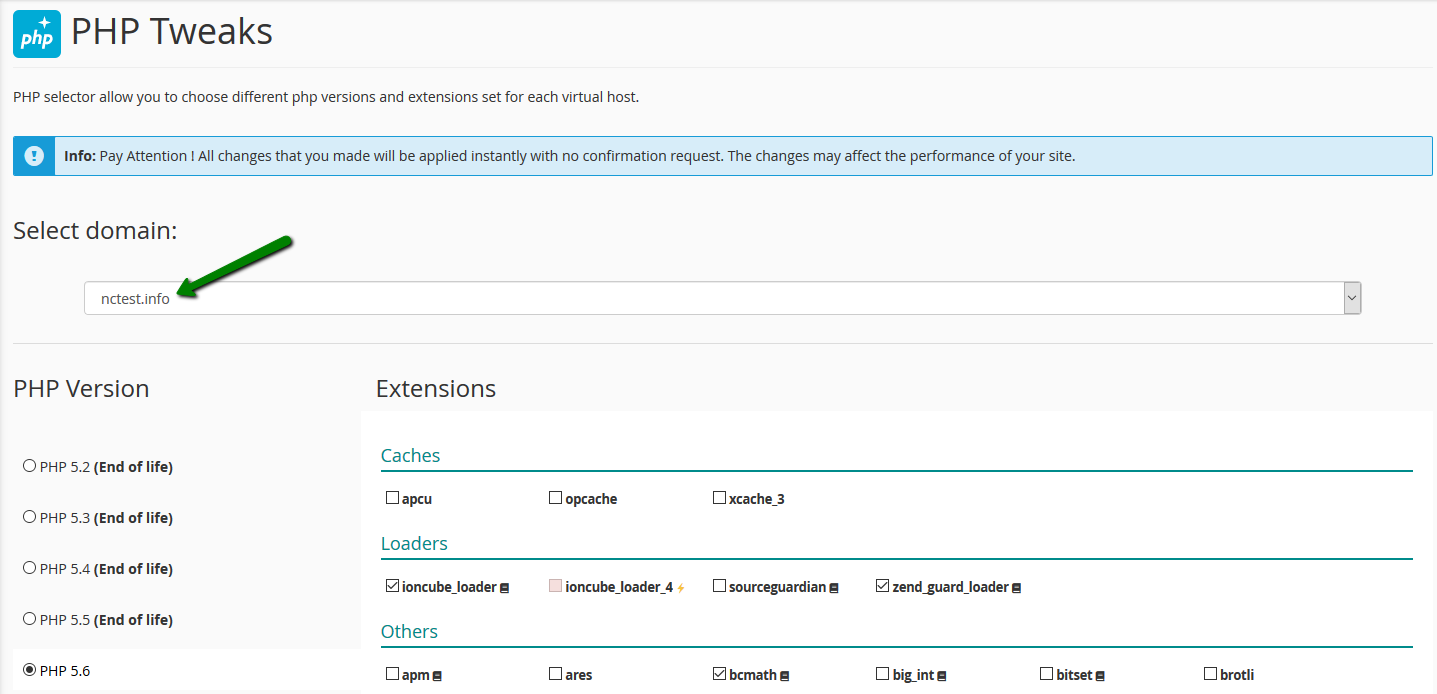
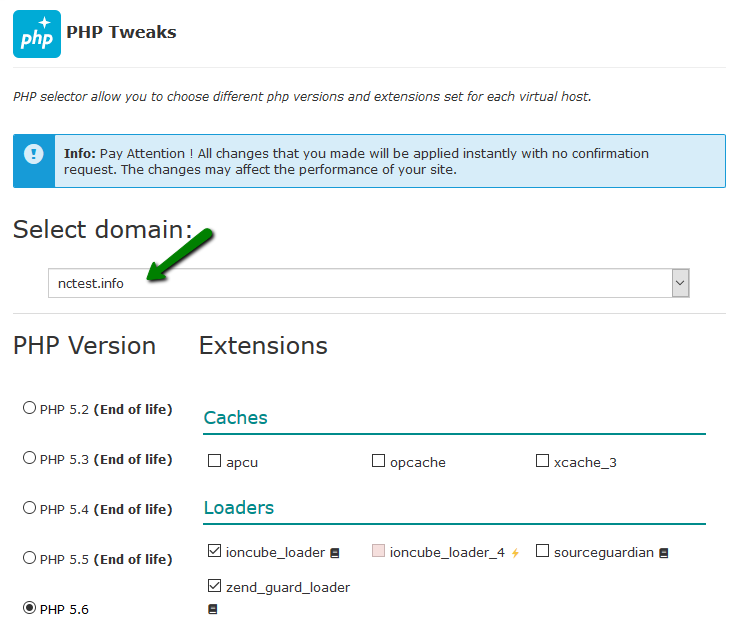
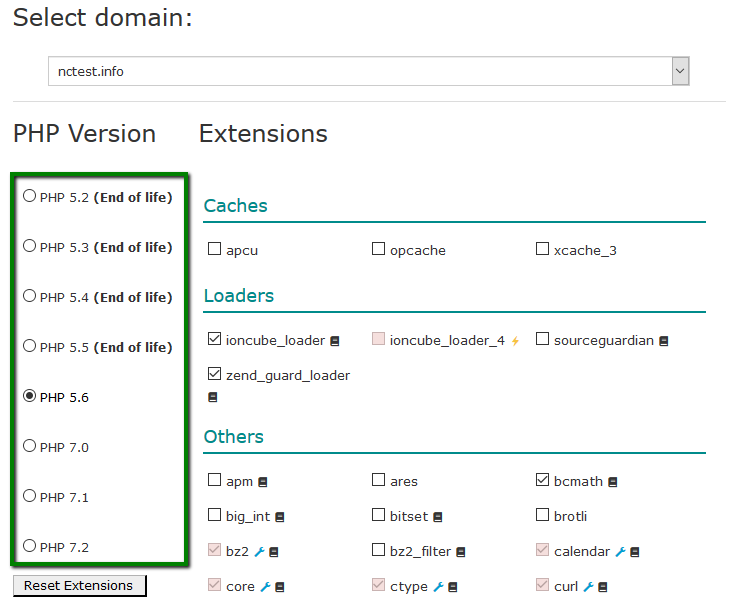
3. You can select the domain from the corresponding drop-down menu and manage the following group of settings:

The PHP version section allows you to check the version which is currently used and set the required one.

NOTE: The list of the available modules varies depending on the PHP version you select.

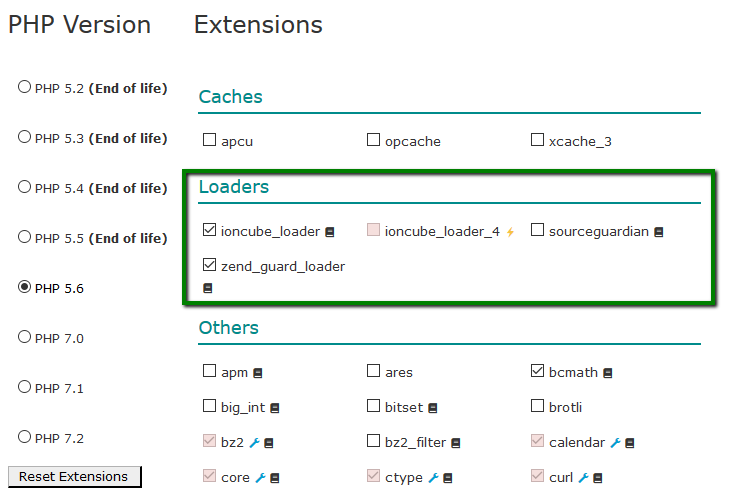
The Loaders and Caches sections allow you to choose the PHP loader for your scripts and the PHP accelerator for caching the compiled bytecode of your PHP scripts.

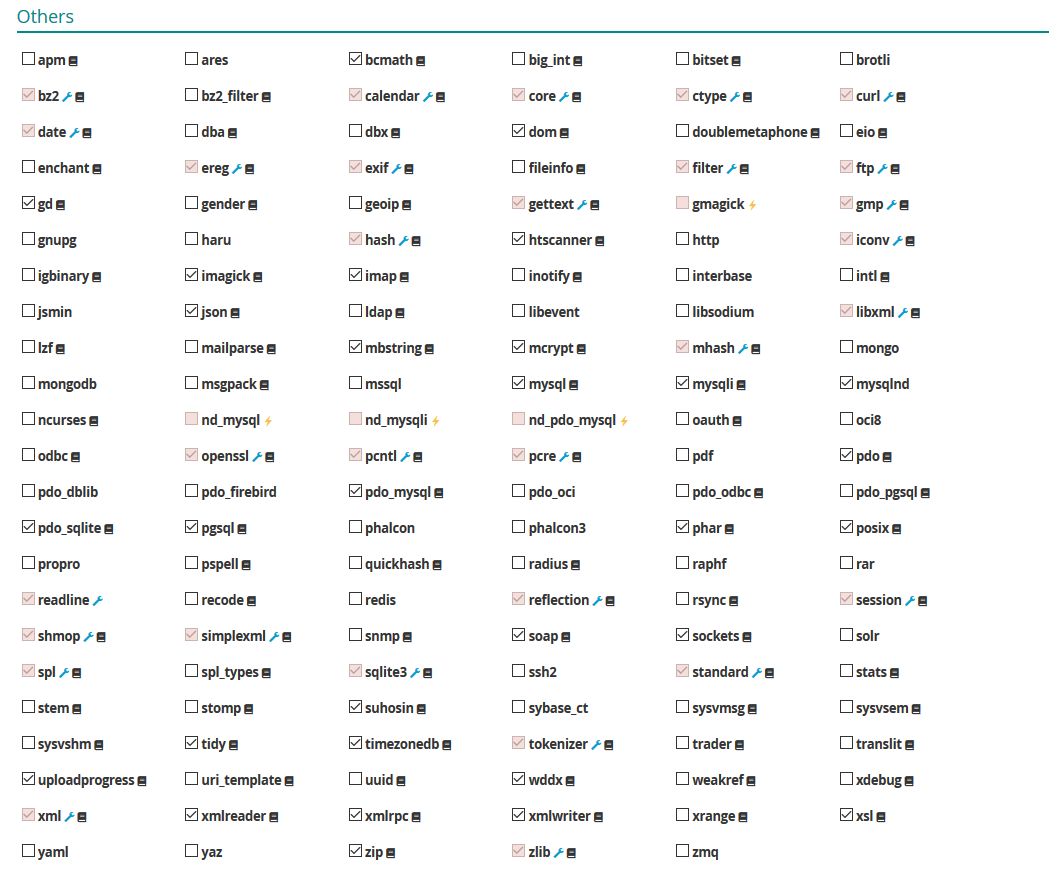
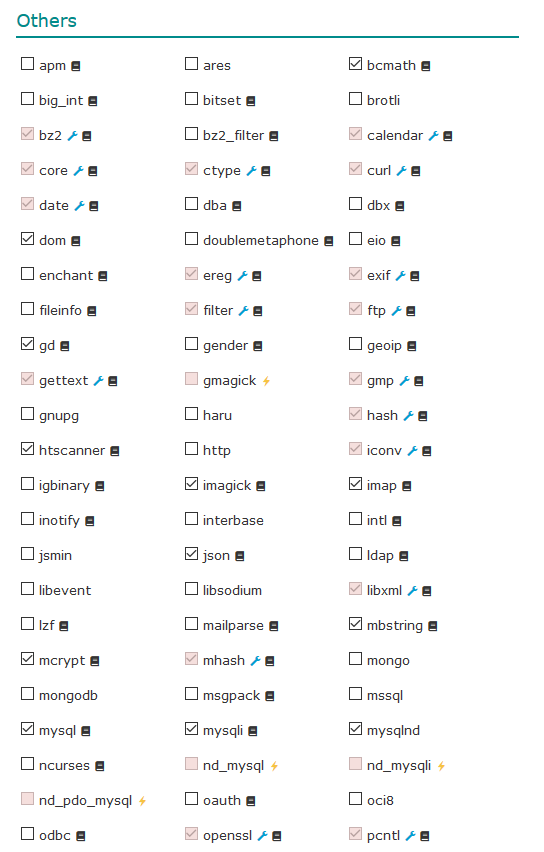
The Others section provides you with the list of additional modules and extensions which can be enabled according to your needs:

NOTE: There are the following modules conflicts:
  • nd_mysql conflicts with mysql;
  • nd_mysqli conflicts with mysqli;
  • nd_pdo_mysql conflicts with pdo_mysql;
  • gmagick conflicts with imagick.

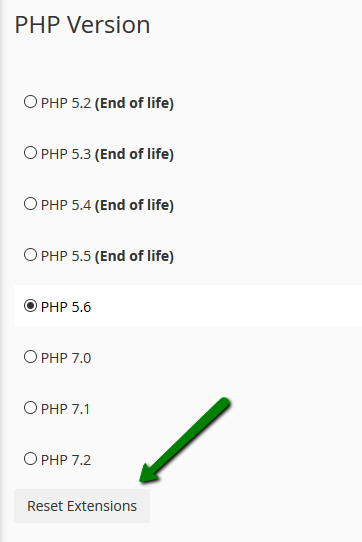
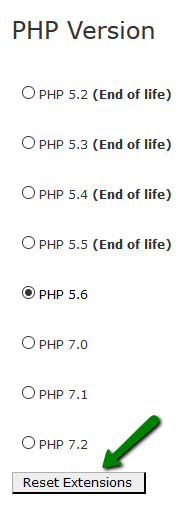
4. Should you need to reset PHP configuration you currently have, select the domain name and hit Reset Extensions. That will revert all the changes and roll your PHP settings for the domain in question back to the default state:


For cPanel Retro Theme:


1. Log into your cPanel.
2. Go to the Exclusive for Namecheap Customers section >> the PHP Tweaks menu:

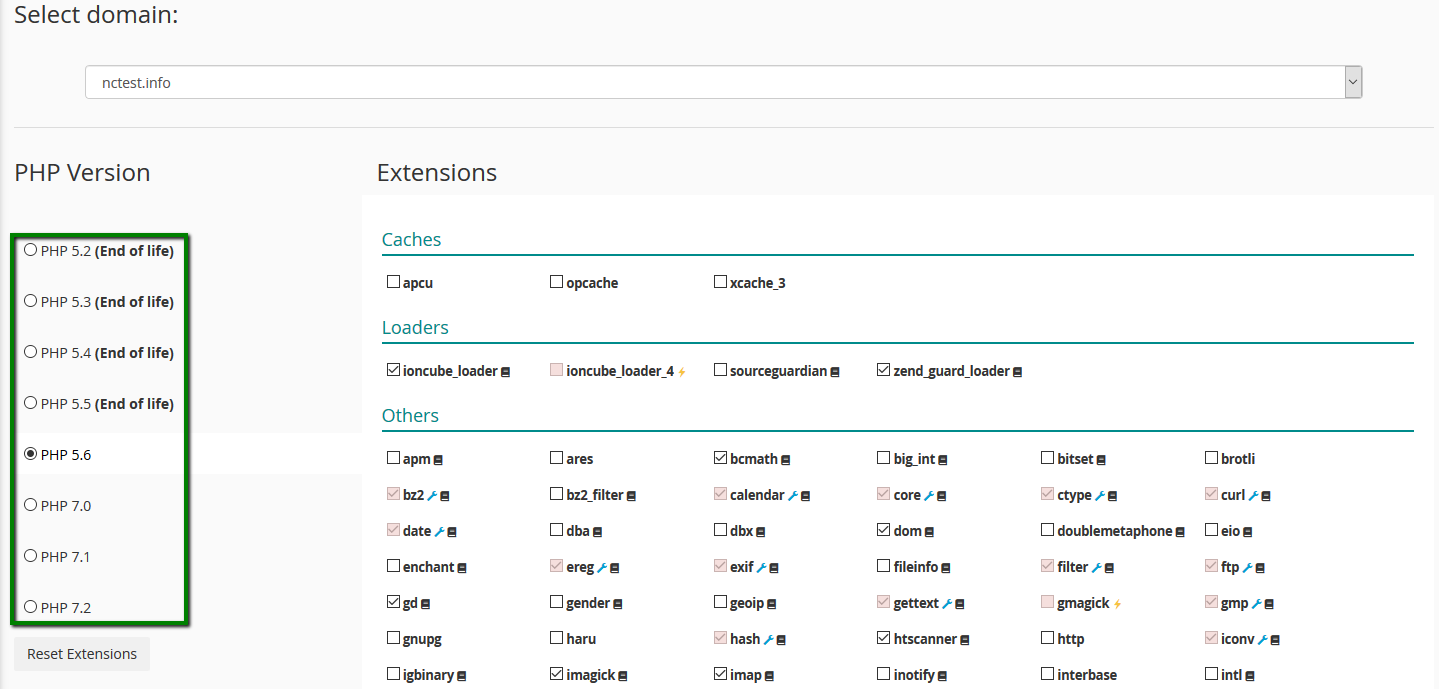
3. You can select the domain from the corresponding drop-down menu and manage the following group of settings:

The PHP version section allows you to check the version which is currently used and set the required one.

NOTE: The list of the available modules varies depending on the PHP version you select.

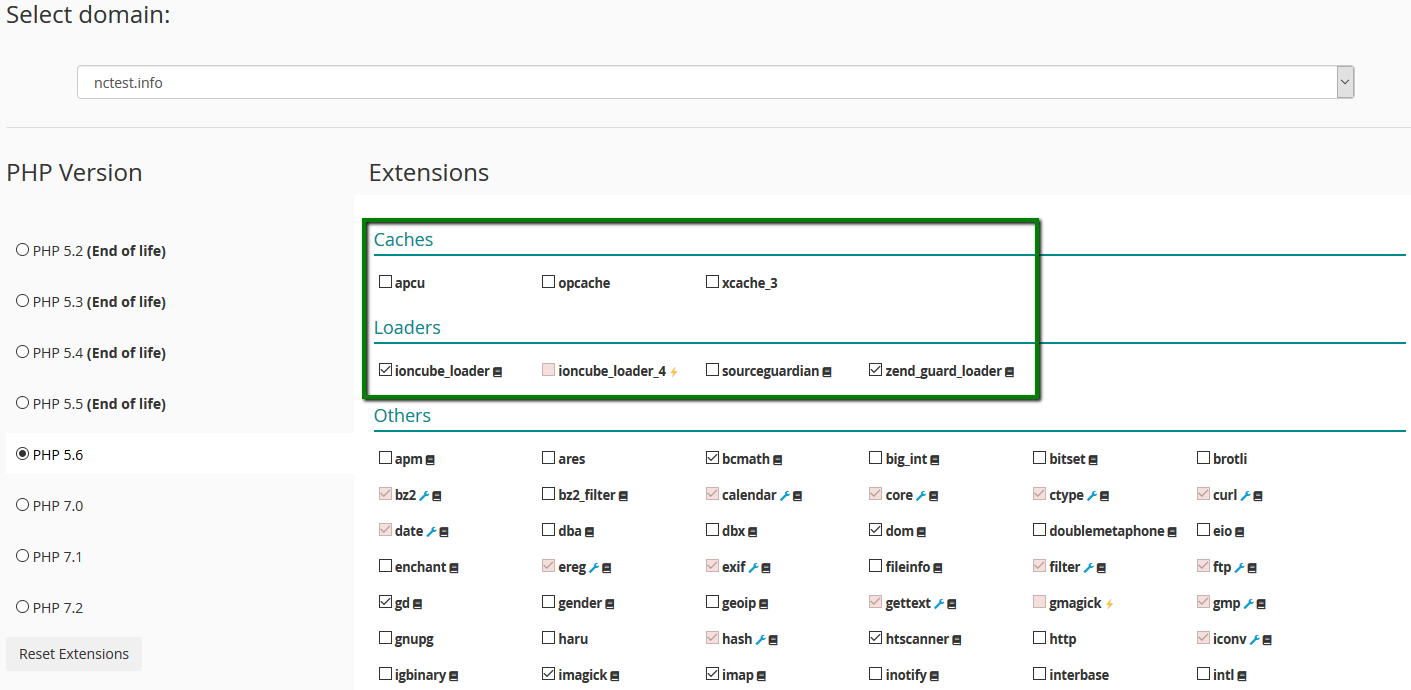
The Loaders and Caches sections allow you to choose the PHP loader for your scripts and PHP accelerator for caching the compiled bytecode of your PHP scripts.

The Others section provides you with the list of additional modules and extensions which can be enabled according to your needs:

NOTE: There are the following modules conflicts:

  • nd_mysql conflicts with mysql;
  • nd_mysqli conflicts with mysqli;
  • nd_pdo_mysql conflicts with pdo_mysql;
  • gmagick conflicts with imagick.

4. Should you need to reset PHP configuration you currently have, select the domain name and hit Reset Extensions. That will revert all the changes and roll your PHP settings for the domain in question back to the default state:

How to increase memory_limit

Note that memory_limit cannot be increased via the PHP Tweaks menu. In order to change its value, follow the steps below:

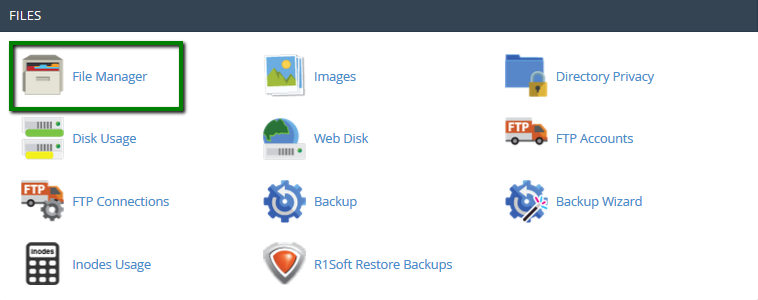
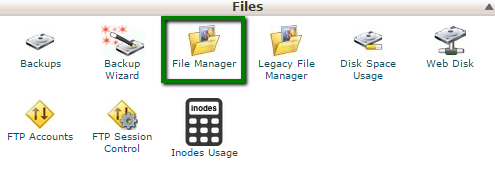
1. Log into your cPanel account and navigate to the Files section >> the File manager menu:
For cPanel Basic Theme:

For cPanel Retro Theme:

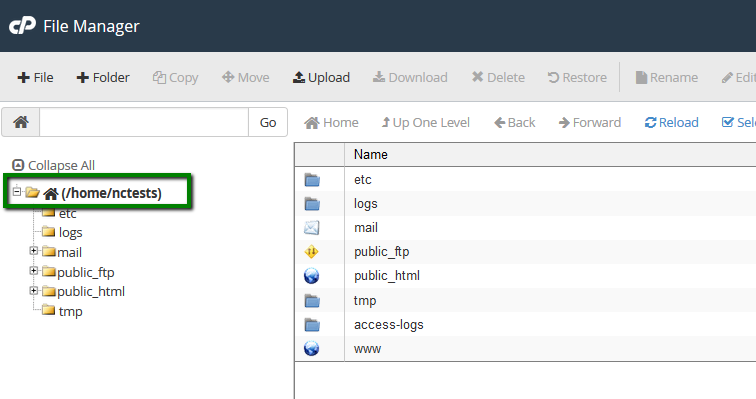
Navigate to the /home/cPanel_user directory:

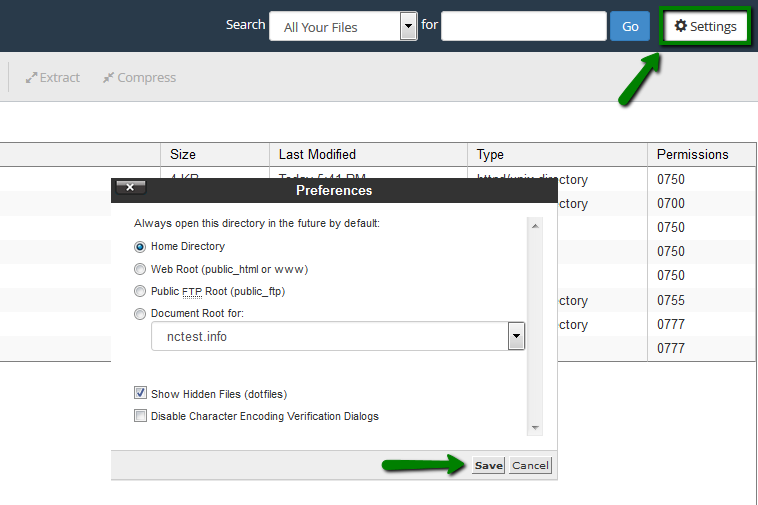
Make sure that you enabled the Show Hidden Files (dotfiles) option in the Settings menu:

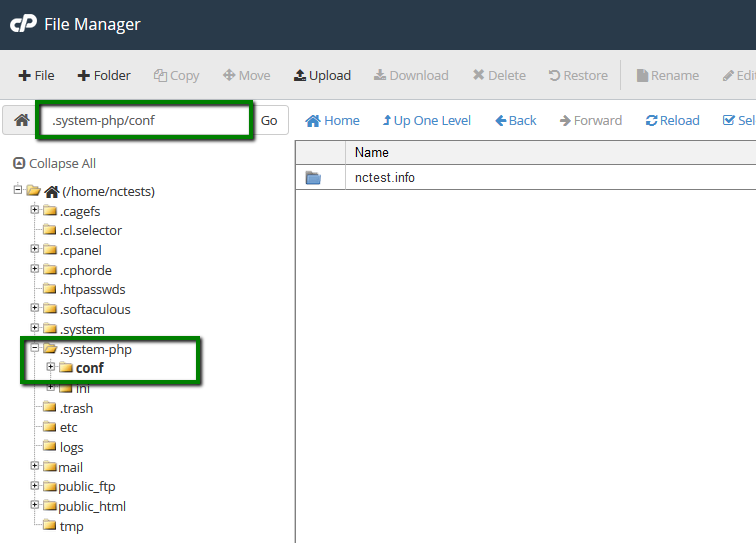
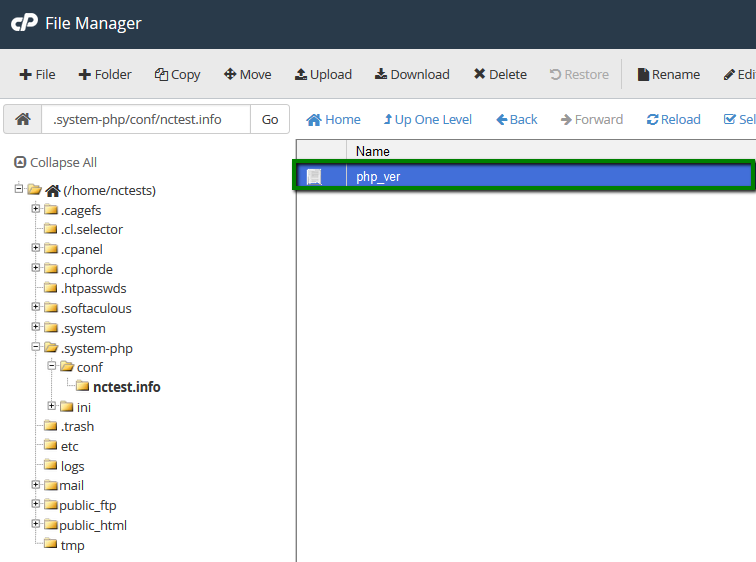
2. Navigate to the following directory /home/cPanel_user/.system-php/conf:

3. There you will see the list of the domains hosted in your cPanel account. Move further and enter the folder of the domain you need to increase memory_limit for. By default, there is a single file called php_ver:

This file defines the PHP version set for the domain:

NOTE: If you change the value specified in the php_ver file, your current PHP version will be changed accordingly, the changes will be reflected in the PHP Tweaks menu as well.

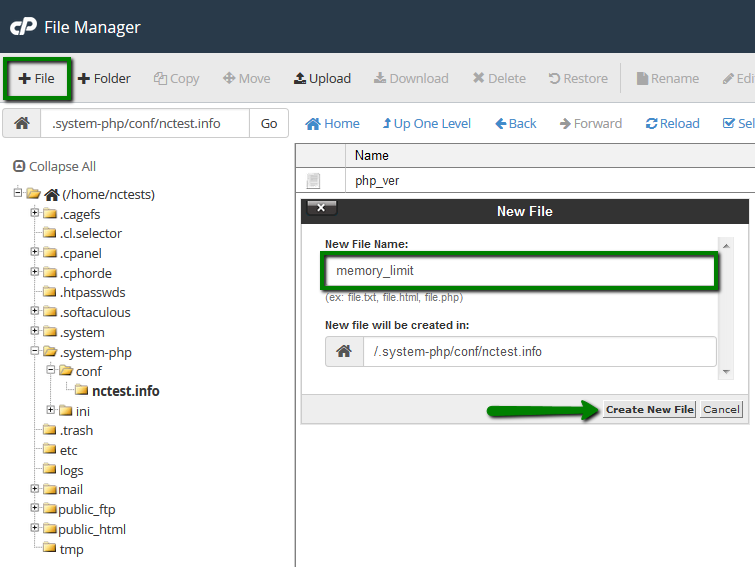
4. Now you need to create a new file called memory_limit:

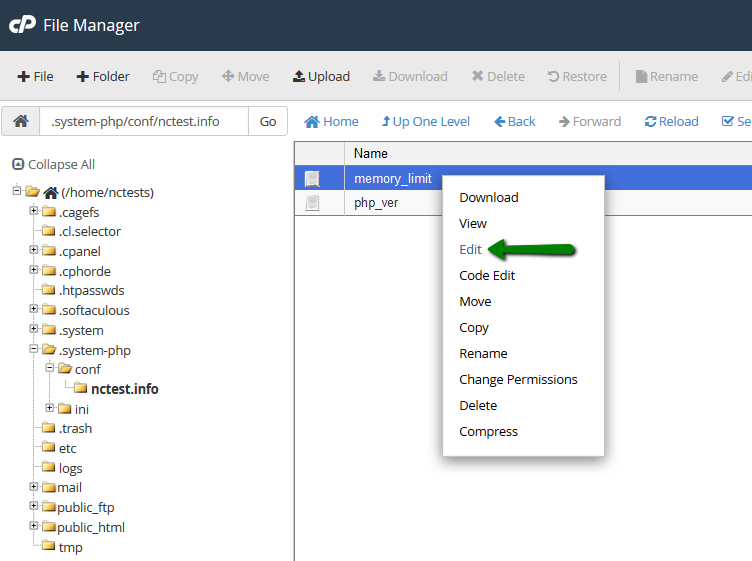
5. Once done, right-click on the file >> the Edit option:

6. Simply specify the desired value (for example, 128M) and hit Save:

How to work with a php.ini file

Apart from the PHP Tweaks plugin, you may need to alter some of the settings using a php.ini file. One of the most common requests is to increase post_max_size and upload_max_filesize limits which can be done with the help of a php.ini file. Before proceeding, download php.ini for the required PHP version here.

1. Log into your cPanel account and navigate to the Files section >> File manager menu:
For cPanel Basic Theme:

For cPanel Retro Theme:

Make sure that you enabled the Show Hidden Files (dotfiles) option in the Settings menu:

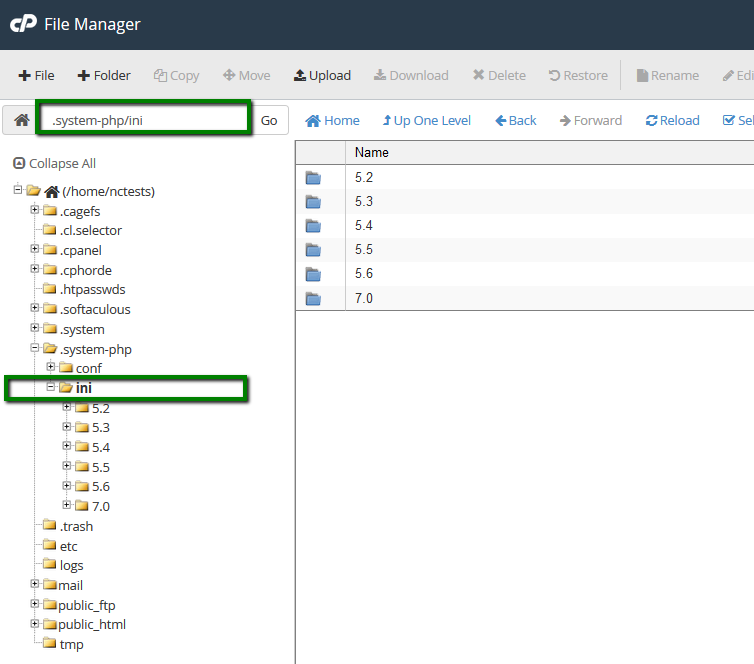
2. Navigate to the following directory /home/cPanel_user/.system-php/ini:

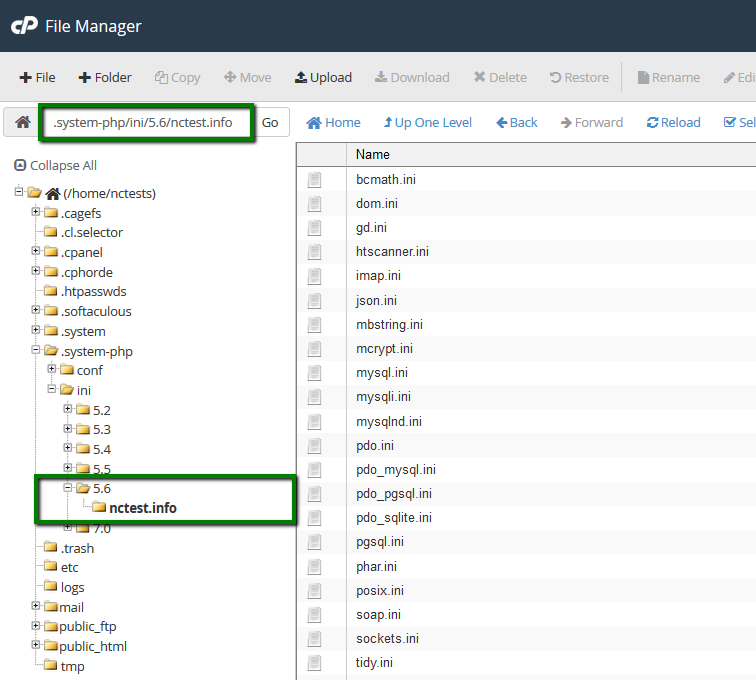
3. Here you need to select the PHP version you have set for your domain and the domain name itself. Thus, the full destination path will look like /home/cPanel_user/.system-php/ini/5.6/nctests.info:

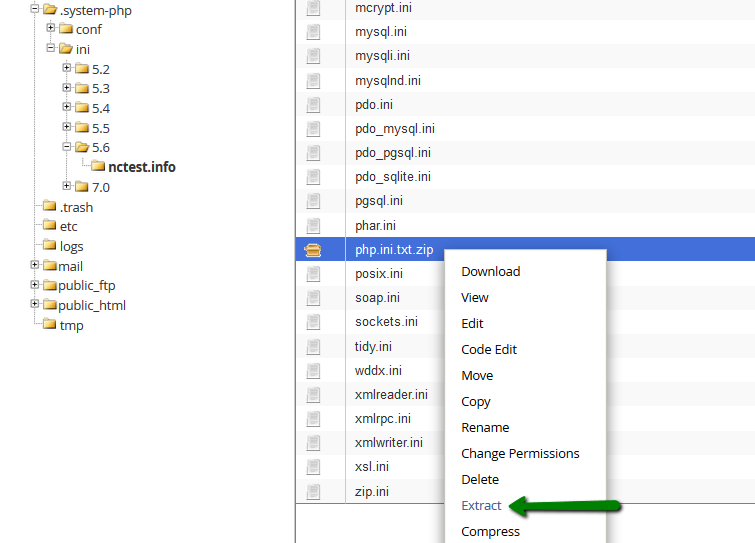
4. Now you need to upload the php.ini file that corresponds to your current PHP version. Once done, use the Extract option:

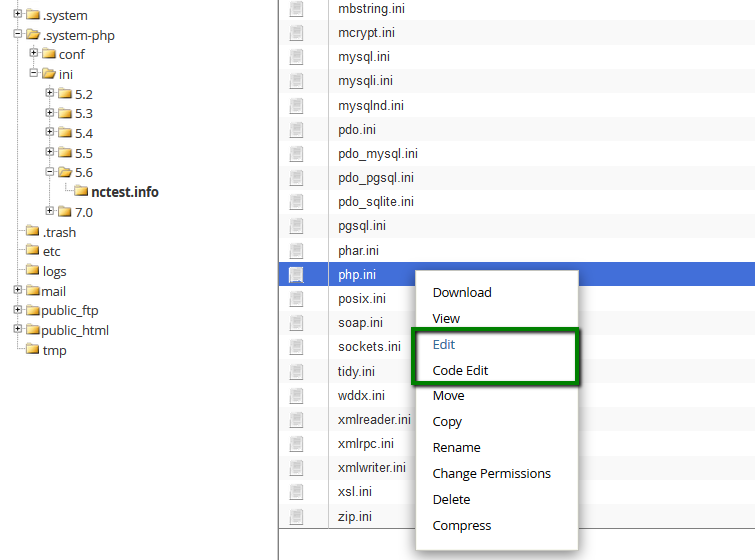
4. After that, right-click on php.ini.txt to Rename it php.ini. Then, another right click to proceed with the Edit option:

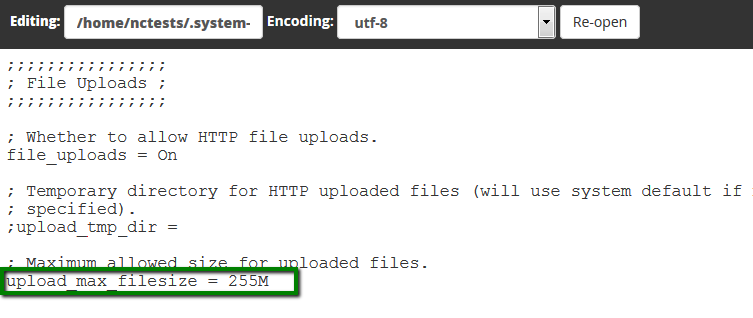
5. Here you can use Ctrl+F key match for your convenience – it will allow you to find the needed limit or value. In our case, it is upload_max_filesize:

6. Once all the required changes are performed, hit Save.

That’s it!

Telnet Definition

Telnet Definition

Telnet Definition

Telnet Definition

What is Telnet?
Telnet is a user command and an underlying TCP/IP protocol for accessing remote computers. Through Telnet, an administrator or another user can access someone else’s computer remotely. On the Web, HTTP and FTP protocols allow you to request specific files from remote computers, but not to actually be logged on as a user of that computer. With Telnet, you log on as a regular user with whatever privileges you may have been granted to the specific application and data on that computer.A Telnet command request looks like this (the computer name is made-up):

telnet library.jujuhost.com

The result of this request would be an invitation to log on with a userid and a prompt for a password. If accepted, you would be logged on like any user who used this computer every day.

Telnet is most likely to be used by program developers and anyone who has a need to use specific applications or data located at a particular host computer.

How to get an SSH client

How to get an SSH client

How to get an SSH client
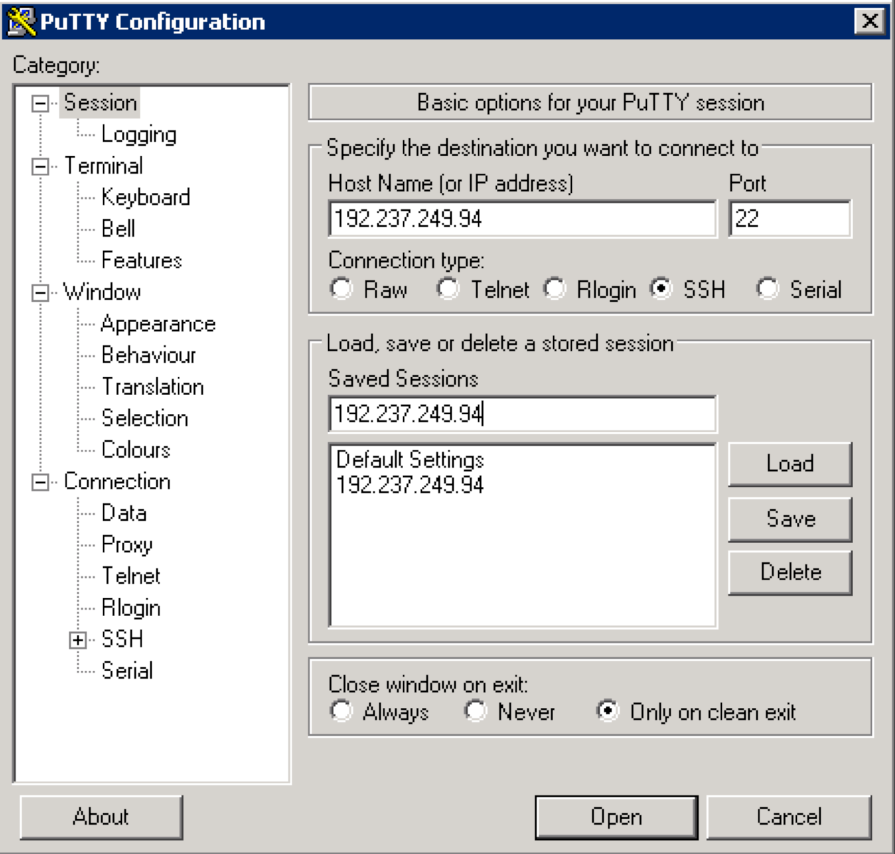
To access your account via SSH, you should download and install one of available SSH clients. You can find the list of free SSH clients in the table below. If you have Windows, we recommend to use PuTTY as your SSH client.

SSH Client Operating Systems Supported Download
PuTTY Windows and Unix
WinSCP Windows (SCP and SFTP, no SSH)
Fugu Macintosh