Category Archive Hosting

How to install WordPress using Softaculous

How to install WordPress using Softaculous

Once you order hosting service, you can start creating your own website. Using Softaculous automatic app installer you can install WordPress in a few clicks.

Below you can find step-by-step guidelines covering the process:

1. Log into your cPanel.
2. Navigate to Exclusive for Namecheap customers section > Softaculous Apps Installer menu:

How to install WordPress using Softaculous
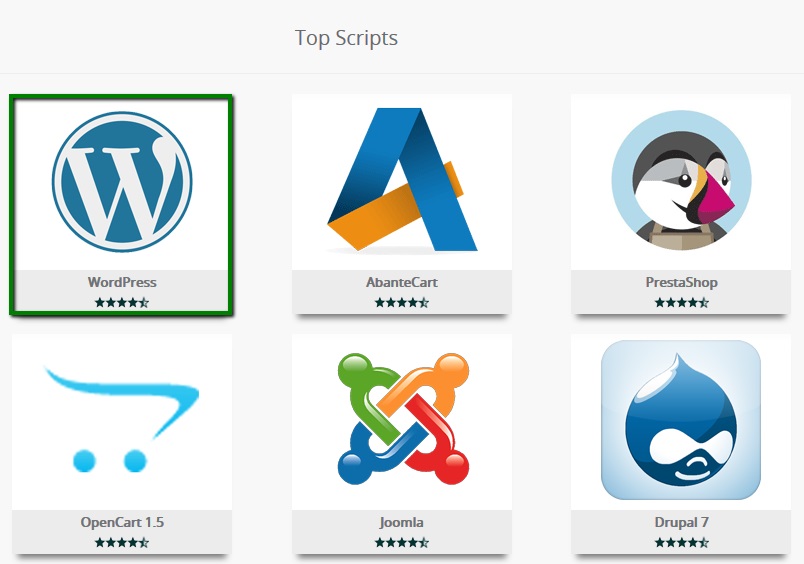
3. On the homepage, click on the WordPress icon:

How to install WordPress using Softaculous

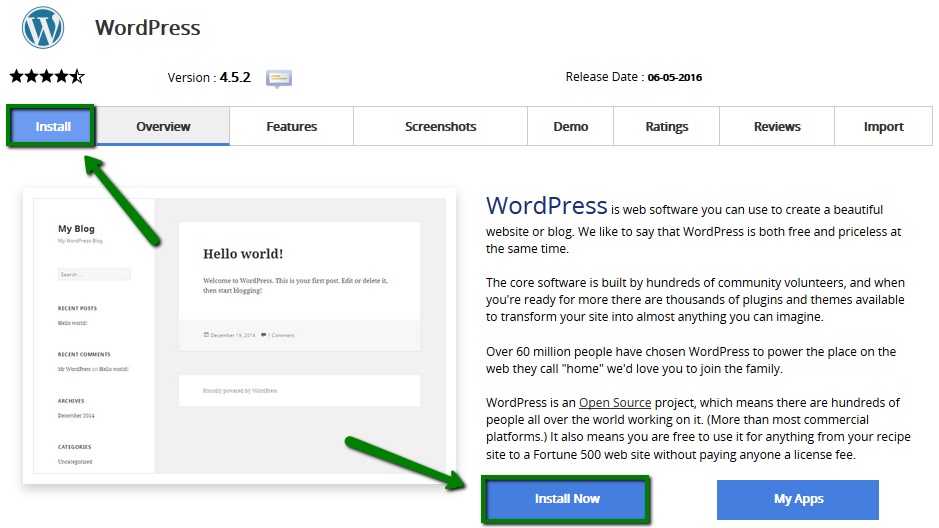
4. Switch to the Install tab to proceed:

How to install WordPress using Softaculous

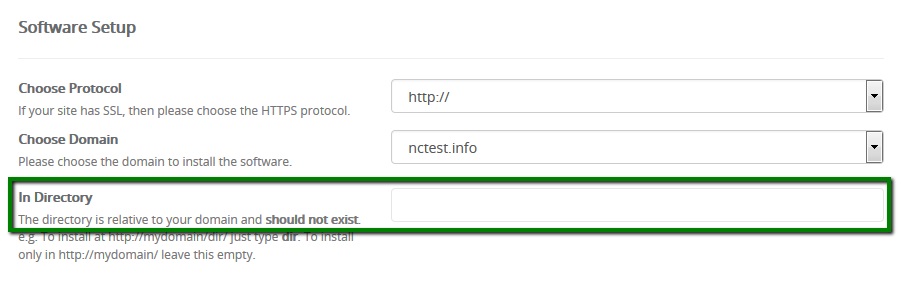
5. On the next page you will need to fill out the details of your WordPress installation.

  • Choose the domain you wish to install WordPress for
  • In the In Directory field you can specify the root folder for WordPress installation. By default, this field is empty, and it allows installing WordPress on yourdomain.com directly. If you wish to install it to a subfolder, like yourdomain.com/blog, simply type “blog” in this field.
  • Database Name can be left default.
  • Table Prefix can also be left default wp_; however, due to security reasons it is better to change it, e.g., to ncwpsite_ .
  • The Site Settings section should be filled out accordingly to your needs, though you can change it anytime later if required.

Make sure you set up secure and hard-to guess details in the Admin Account section:

How to install WordPress using Softaculous

How to install WordPress using Softaculous

How to install WordPress using Softaculous

6. When ready, scroll down and hit Install.
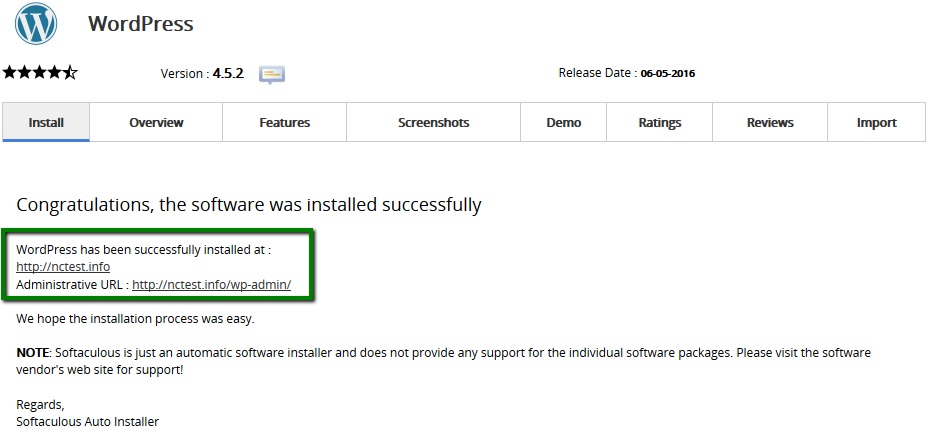
In a few moments you will see the message that WordPress has been successfully installed:

How to install WordPress using Softaculous


You can now go ahead and log into your WordPress Dashboard to start working on your website.


How to manage WordPress website with iPhone application

How to manage WordPress website with iPhone application

1. In order to be able to manage your WordPress website with an iPhone application, it is required to install the application first. To install the WordPress application, open App Store and go to the Search page. Type ‘WordPress‘ and press Get to install the app:

2. Once it is installed, open the app and press the Log in button:

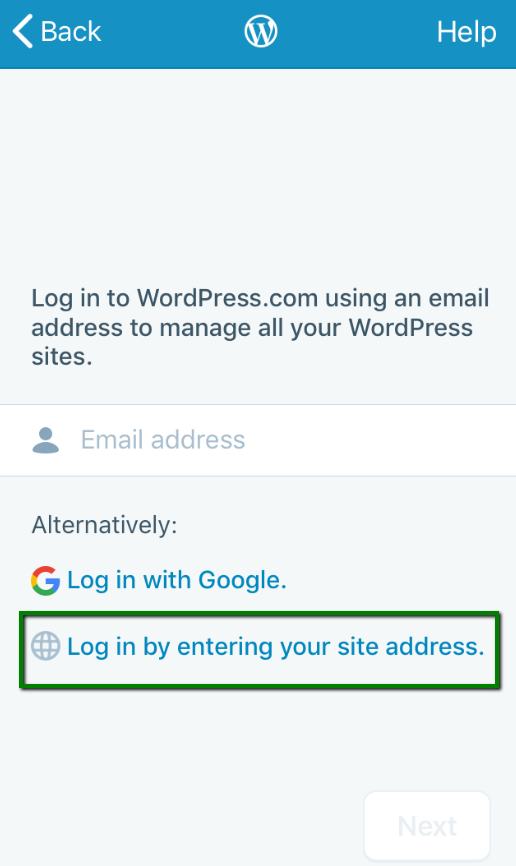
3. Choose the Log in by entering your site address option:
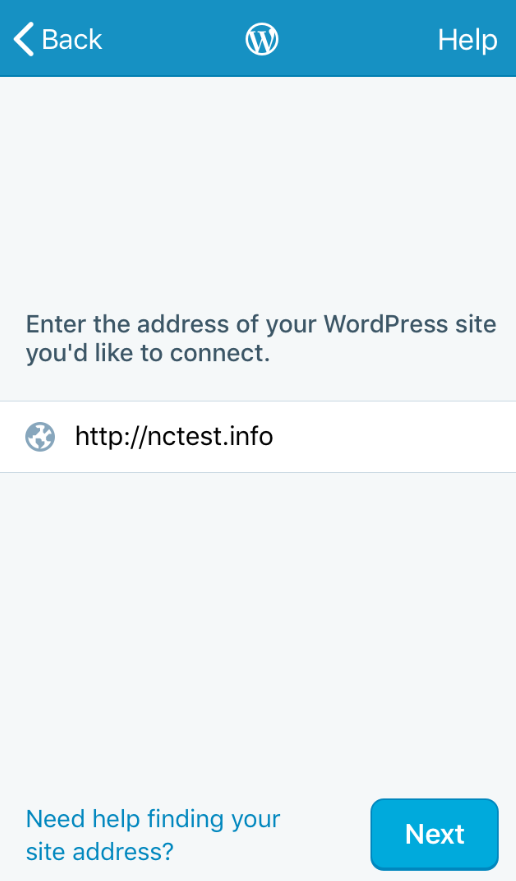
4. Enter your website’s URL:
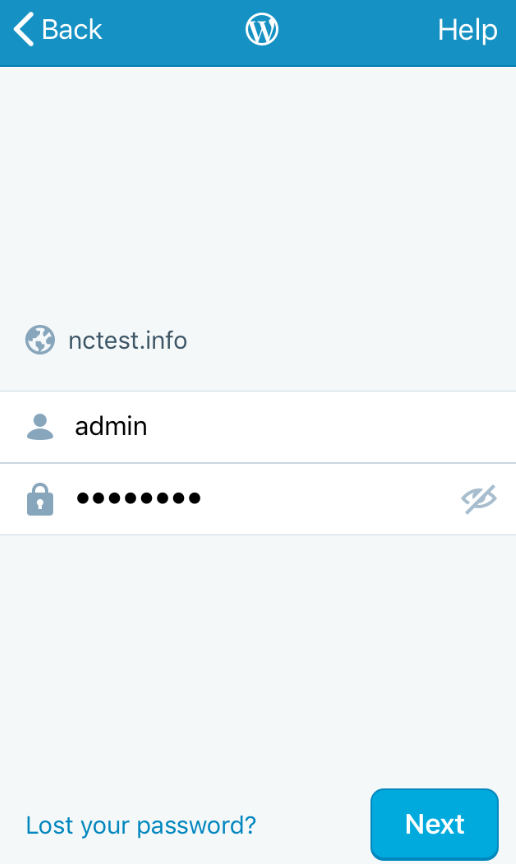
5. Next, enter your WordPress admin account access details:
6. On the next page, you will be able to add more WordPress websites or press Continue to proceed.

After pressing the ‘Continue’ button, you will be redirected to the website management page.

By pressing the ‘Stats’ button, you can install JetPack plugin to track your website’s stats. To install Jetpack, press the Set up Jetpack button:
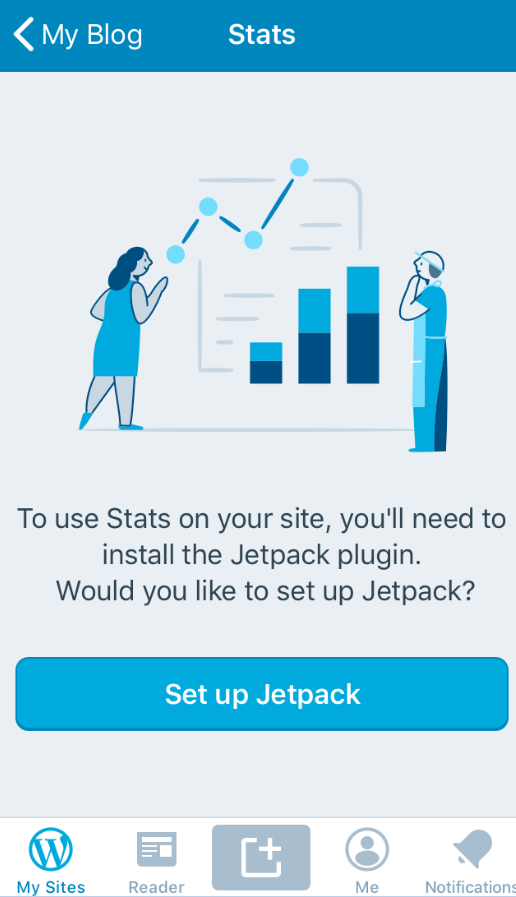
7. To set up JetPack you will need to enter your email address that is used for your account at wordpress.com (it is required for a JetPack). If you don’t have an account at wordpress.com, create one prior to setting up JetPack. Once JetPack is set up, you will be able to check different statistics for your website, such as Latest Posts Summary, Daily stats, Posting Activity and other.

8. Publish part of the app has the following options:
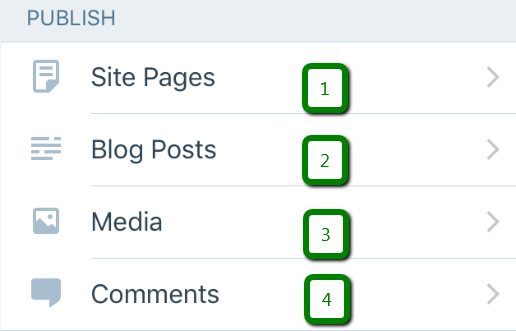
Site Pages menu allows you to:

  • create pages by pressing a “+” sign;
  • check published, drafts, scheduled and trashed pages;
  • search for pages on your website;
  • view or move pages either to Draft or Trash by pressing a “…” sign.

Blog Posts menu allows you to do the same things as in the Site Pages menu but with your posts.
A post can be published by pressing the ‘+’ sign

In Media menu you can upload your media content by pressing the ‘+’ sign or ‘Upload media’ Button. You will be able to choose one of the following options:

  • take a photo or video to upload to your website;
  • choose a photo or video from the library on your phone;
  • upload a photo from other Apps (for example from iCloud).

In Comments menu you will be able to check your comments and:

  • approve a comment;
  • send a comment to trash;
  • mark a comment as spam;
  • edit a comment.

9. Personalize section. Here you will be able to work on your themes and menus:
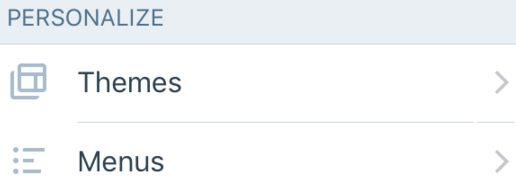
Themes menu allows to Customize, check Details and upload themes you have. Additionally, you will be able to install new themes. That can be done by pressing the “…” sign.

In the pop-up window you will see the following options:
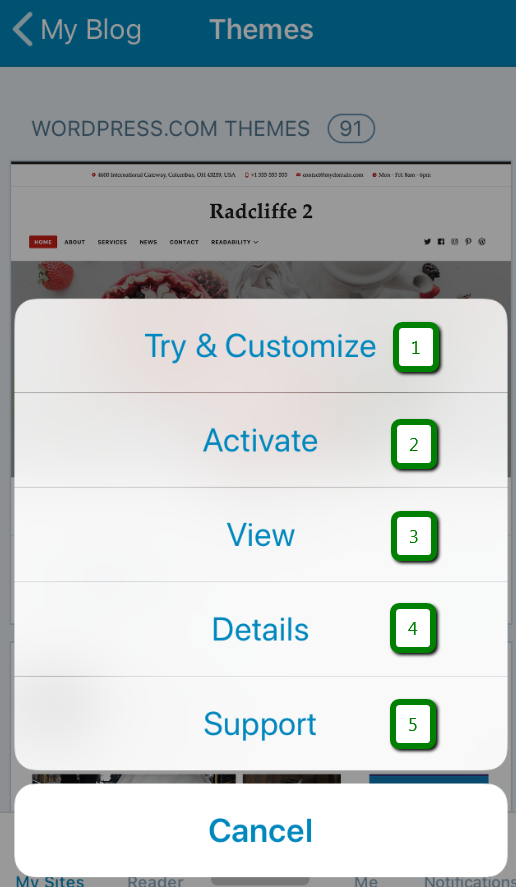
With the Try & Customize option you can ‘play around’ with the theme, test it out to see how it will look like on the website and activate it right away by pressing the corresponding button.

Activate option activates a theme.

View can be used to preview the theme.

Details to check theme details.

Support is where you can contact the theme support.

10. Configure part of the WordPress application dashboard allows you to:
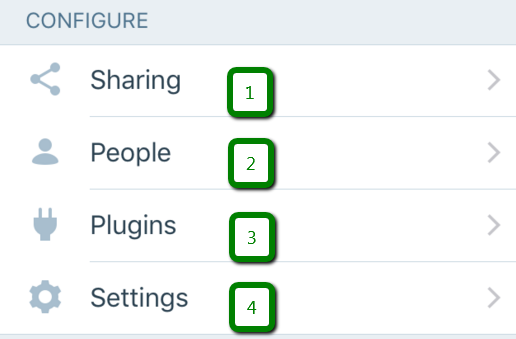
  • add and manage Sharing Buttons on a website;
  • create new users on a website by pressing the ‘+’ button which is located in the People menu.
  • manage your plugins in the corresponding menu;
  • in the Settings menu, you can:

– change website Title, Tagline, Address, Time Zone in a General section;
– create Categories, Tags, change Post, Date and Time format on the website in the Writing section;
– track space used for Media uploads;
– adjust JetPack settings if you have it installed.

11. In the External part, you can check your website and log in to the actual wp-admin account via a browser on your phone by pressing the corresponding button. The last option ‘Remove Site’ will remove it from the WordPress App on your phone, the website itself will remain untouched.

You can also find the following options in the external part:

    • My Sites. An option that allows you to manage your WordPress websites using this application. If you have more sites added to the app, you will be able to switch between them by pressing the websites’ buttons.


  • Reader. By pressing it, you will be able to read some random WordPress articles created by other users.
  • Publish post button allows publishing your posts.
  • In Me menu you can change your profile settings and application settings.
  • Notifications menu allows you to set up notifications that would be sent to your phone from your website.

That’s it!

cPanel control panel overview

cPanel control panel overview

cPanel control panel is designed for managing separate hosting accounts on the server. End users/clients are able to:

  • upload and manage files for their websites
  • edit DNS records for their domains
  • add/remove addon domains and subdomains
  • install CMS using Softaculous script installer
  • create email accounts
  • manage email settings and SPAM protection
  • check website statistics
  • manage databases and backups, etc.

More details about the structure of WHM/cPanel users depending on their permissions can be found in this article.

We have cPanel 11.70 installed on our hosting servers. You can find the latest documentation covering all its functions here.

You can find cPanel structure overview for cPanel basic style and for cPanel retro style below in this guide.

for cPanel basic style:

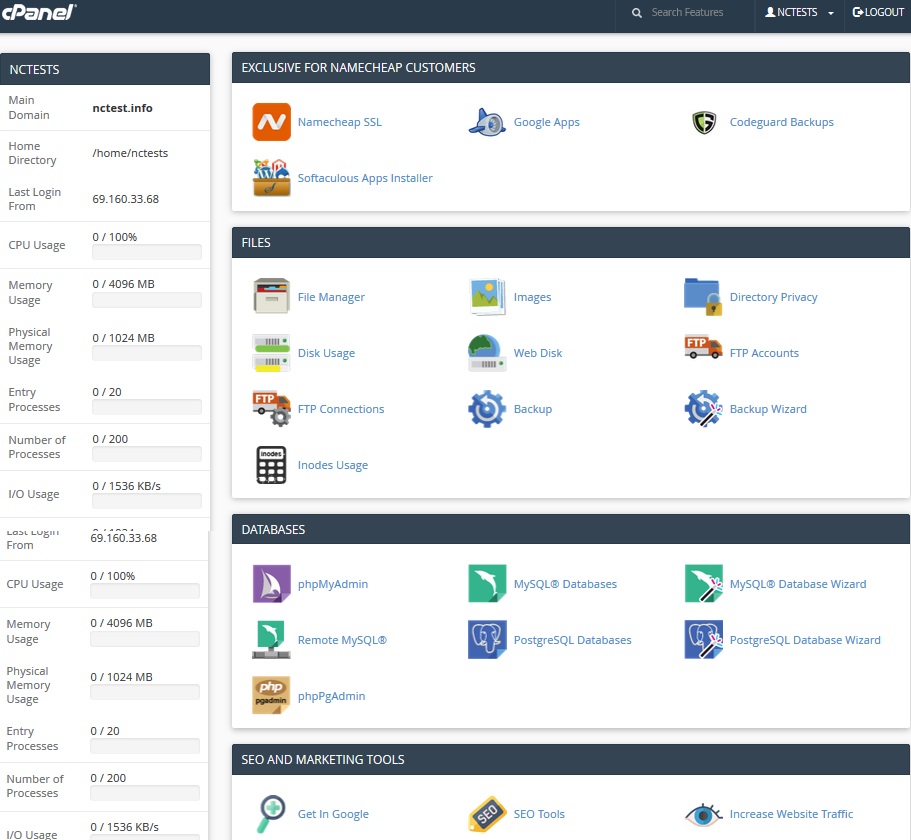
Basically cPanel has two vertical sections with different features:

Left column which provides a number of various features that are conveniently structured to specific groups based on the concrete aspect of the web-hosting service and Right column which includes different Statsinformation about the account. Additionally, you can see a header above both sections:

Header and Right Column:

Left Column:

Header and Right Column:
Search  User  Stats

Search: a search bar that allows you to find cPanel features in the quickest way. Just start entering the name of the needed tool to allocate the corresponding menu:

User: this menu provides a number of options related to your cPanel user and account itself – chaning your cPanel password, contact information, style and language as well as resetting all the current account configuration to the default state:

Stats: here you will find the general information related to your cPanel account:

Server Information menu lists hosting account package and additional server-side details, like the IP address assigned to your cPanel account, software installed on the server and the status of the core services:

Statistics column collects cPanel services and quotas as well as the current account resource usage:


Left Column:

Exclusive for Namecheap customers
Files  Databases  Email  Domains  Metrics  Security  Software  Advanced  Preferences

Exclusive for Namecheap Customers

 Google Apps: with this tool you will be able to configure Google Apps service for your domain in just a few clicks. Feel free to check this category for more information.
 Namecheap SSL: this menu allows you to use Namecheap SSL cPanel plugin, check this guide for more details.

CodeGuard Backup: this tool was designed to make the backup process as easy as possible. CodeGuard system will constantly monitor the website and keep you informed of any changes, performing full automatic backups of your files to avoid any possible downtime. More information is provided in the following articles:

How to make backups using CodeGuard
How to back up a WordPress site using CodeGuard

 Softaculous Apps Installer: this feature allows you to use Softaculous Script Installer, which includes most popular CMS, such as WordPress/Joomla/Magento etc. It is much faster than other script installers and it installs CMSes in a few clicks. Softaculous application is provided with any cPanel account on all of our shared hosting plans. You can view available scripts and their demo here. You may find these guides useful when working with Softaculous installer:

How to work with scripts in Softaculous
How to install WordPress using Softaculous

 Website Builder: this tool allows you to easily create an entire website using a drag-and-drop editor and without knowing any code or installing special software.
 Contact Support: opens a Live Chat with our customer support team.

 Namecheap Knowledgebase: this button will take you to our Knowledgebase site section.

Files

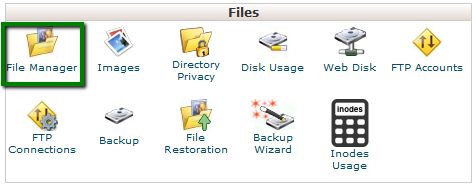
 File Manager: here you can manage the files stored in your account. These guides can be found helpful while working with this menu:

How to use File Manager in cPanel
How do I upload my site?

 Images: this tool allows you to view and modify images in your account.
 Directory Privacy: allows you to set a requirement for a username and password when users attempt to access your site from the web. It can be used when you need to limit access to a certain part of your site. You can get more details in this guide.

 Disk Usage: in this menu you will be able to check a detailed information about the disk space usage of your account. It shows disk usage totals for your account’s directories and all of its databases, not for individual files or databases. More details about Disk Space usage optimization are provided in this article.

 Web Disk: this feature is a cPanel implementation of the WebDav protocol, which allows you to manage, upload, and download your website’s files as though they were local to your personal computer. More detailed instructions about setting up WebDisk can be found in these articles:

How to set up Web Disk on Windows 7
How to set up Web Disk on Windows 8

 FTP Accounts: this option allows you to create and manage your FTP accounts. In order to create an FTP account, feel free to check this article. For FTP connection instructions, refer to this set of guides:

How to access an account via FTP
How to set up FileZilla
How to set up Cyberduck
How to set up iWeb
How to set up Adobe Muse
How to set up Dreamweaver
How to set up CoreFTP Client
How to set up CuteFTP

 FTP Connections: using this tool you can monitor the users who are currently logged into your site via FTP. Also, it’s possible to terminate an FTP connection from here.

Backup: this feature allows you to download a zipped copy of your entire account or specific parts of it, such as your home directory, databases, email forwarder configuration, or your email filters configuration. More details guidance about how to make backups in cPanel can be found here.

 Backup Wizard: a user-friendly interface for creating a backup of your entire site, a partial backup, or allowing a site restoration from the last backup saved. Note, that Restore option provided in this menu is disabled by default on all our shared servers.

 Inodes Usage: provides the statistics of your account inodes (files) usage.You will find more details about this tool here.

Databases

 phpMyAdmin: it’s the database management tool, which allows you to make different changes to MySQL databases in your account. You can find more information about how to work with databases via phpMyAdmin this guide.

 MySQL Databases: in this menu you can create and manage MySQL databases in cPanel account. You can refer to this guide for more details.

 MySQL Databases Wizard: provides the same functionality as MySQL Databases menu, in a simplified way though.

 PostgreSQL Databases: this option allows you to create and manage PostgreSQL databases in cPanel.

 PostgreSQL Databases Wizard: has the same functionality as PostgreSQL Databases menu, but allows to make all the changes in a simpler way.

 phpPgAdmin: it is the database management tool, which allows you to make different changes to PostgreSQL databases in your account.

MySQL F.A.Q.: this button will take you to the corresponding Knowledgebase section dedicated to MySQL questions.

Email

 Email Accounts: in this menu you can create and manage mailboxes associated with the domain names hosted in your account. In order to create an email account, feel free to check this guidance. More details about setting up a newly created email account with email clients can be found in the set of articles cPanel Email: Client Setup.

 Forwarders: setting up Forwarders feature provides you with an opportunity to send a copy of all emails from one email address to another. For example, you have two different email accounts and you don’t want to check both of them every time, so you could forward emails from test@yourdomain.com to test2@yourdomain2.com. Note, that the original address will still receive the forwarded emails.

 Email Routing: here you can set email routing for the domains hosted in your cPanel account, more details can be found in this guide.

 Autoresponders: this feature allows you to automatically send messages in reply to incoming emails received on a specific email account. This is pretty useful when you are on holidays or unavailable, or if you have any generic messages to send. You will find more information in this guide.

 Default Address: in this menu you can manage an email address, which is used by cPanel to fetch any message sent to email accounts which do not exist at your domain (also known as ‘catch-all address’). More details can be found here.

 Mailing Lists: with this option you can create a single address to send emails, newsletters and other updates to multiple email addresses simultaneously. Feel free to refer to this article to get more information.

 Track Delivery: this menu allows you to monitor emails delivery for your account.

 Global Email Filters: this feature allows you to configure filters of all the emails arriving to your hosted domains.

 Email Filters: with this option you can create filters for each email account for your domain. You can find more details about filtering tools in this article.

 Authentication: this tool will help you to prevent spam. Setting up DKIM and SPF records for your account equip email messages with verifiable information so that your server can automatically detect the nature of incoming and outgoing messages. The detailed guidance about using this feature can be found here.

 Address Importer: this menu allows you to use two types of files (.xls and .csv) for importing data in order to simultaneously create multiple email address or email forwarders for your account.

 Spam Filters: it is a user-friendly email utility which examines incoming mail for different spam characteristics. It uses various network tests and spam filtering to get an overall score in order to decide whether the mail should be considered as spam or not. SpamAssassin tool is provided by default with all our shared and reseller hosting plans. These articles can be found useful for setting up SpamAssasin feature:

SpamAssassin FAQs
How to configure SpamAssassin in cPanel

Encryption: this option allows you to set up GnuPG, which is a publicly-available encryption scheme that uses the public key approach. This system uses a public key to encrypt messages and you can decrypt them with the private key, which the intended recipient of the message retains.

 BoxTrapper: this tool can protect your Inbox from spam by requiring all email senders not on your Whitelist reply to a verification email before you can receive their mail.

 Calendars and Contacts: this menu helps to configure your client to connect to CalDAV for calendars and CardDAV for contacts in order to access them on your personal devices. The detailed instructions can be found in this guidance.

Email Disk Usage: this utility allows you to recover disk space by deleting old messages from your mailbox.

Professional Spam Filter: this menu allows you to configure SpamExperts, a user-friendly email filtering solution that allows to protect your account from both incoming and outgoing spam. More information about this feature is provided in this article.

 E-mail F.A.Q.: this button will take you to the corresponding Knowledgebase section dedicated to email questions.

 E-mail Client Setup: this button will take you to the corresponding Knowledgebase section dedicated to email account setup with different email clients and devices.

Domains

Site Publisher: you can use this interface to quickly create a website from a set of available templates. This allows visitors to see some basic information while you continue to develop your website.
 Addon Domains: with the help of this menu you can add more domains to the hosting account. Addon domains have the same functionality as the main domain assigned to your hosting account. More details about adding domains to cPanel are provided here.

 Subdomains: in this menu you can create subdomains and point them to different sections of your website or other IPs. Detailed instructions about this menu can be found in this article.

 Aliases: this feature allows you to ‘park’ additional domain names to your existing hosting account. They display the same website as your primary domain and share web statistics as well. You can refer to this guide when setting up a new parked domain.

 Redirects: here you can create a redirect for a specific domain/page to another domain/page and display the contents of the latter. More details can be found here.

 Zone Editor: allows you to edit the DNS zone of the domain(s) in your cPanel account. The following records can be added: A, AAAA, CNAME, SRV, TXT, MX. Feel free to check this article to get more information about setting up DNS records in cPanel.

 Domains F.A.Q.: this button will take you to the corresponding Knowledgebase section dedicated to domains’ management questions.

Metrics

 Visitors: the access log of your account provided in a table view.

 Errors: here you can check the error log for your account, showing the latest 300 lines of content related to the errors generated by any website hosted in your account.

 Bandwidth: provides you with the detailed information the bandwidth used by your account.

 Raw Access: the RAW access log for your account.

 Awstats: this tool provides you with an opportunity to monitor the access indexes on your account – users, robots, accessed pages and many, many more. You will find a more detailed explanation in this article.

 CPU and Concurrent Connection Usage: shows information on the resources consumed by your account. You can find some additional information on resource usage in this guide.

Security

 SSH Access: here you can generate an access key for your account in order to connect using SSH keys. More details about setting up SSH keys can be found in this article.

 IP Blocker: with the help of this tool you can block a range of IP addresses to prevent them from accessing your site. Feel free to refer to this guide on the matter.

 SSL/TLS: this tool will help you to install and manage your SSL Certificates. You will find a more detailed guide here.

 Hotlink Protection: in this menu you can enable hotlink protection for your website (that is to prevent someone from direct linking of your images to another website and, as a result, consuming your hosting account bandwidth). Feel free to check this guidance for additional information.

 Leech Protection: allows you to control whether users can give out or publicly post their passwords for restricted areas of your site. It can be used to redirect compromised accounts to the URL of your choice, or suspend them.

 SSL/TLS Status: use this interface to view the SSL status of your domains.

 Two-Factor Authentication: this tool lets you enable 2FA, an improved security measure that requires two forms of identification: your password and a generated security code. When 2FA is enabled, an app on your smartphone supplies a code you must enter with your password to log in. You can learn more about enabling 2FA here.

Software 

 PHP: here you can check PHP configuration settings. They cannot be customized via this menu. The system displays them for your reference only. In case you need to change PHP settings, feel free to check following articles:

How to edit php.ini on shared servers
How to change PHP version on shared servers
How to change PHP version on business servers (for older servers)
How to change PHP version on business servers (for newer servers)

 PHP PEAR Packages: this options allows you to install and maintain PHP PEAR packages for your hosting account.

 Perl Modules: here you can manage Perl modules available for your account. A Perl module is a discrete component of software for the Perl programming language. Perl is supported on all of our shared/reseller servers. This article will provide you with more details about this feature.

 RubyGems: in this menu you will find the set of functions that allow you to perform tasks in Ruby. It’s needed to install a Gem before you can use it inside a Ruby program.

 Ruby on Rails: with this menu you can use Ruby on Rails features. Ruby on Rails is a free web application framework for the Ruby programming language. It is often referred to as ‘Rails’ or ‘RoR’. We support RoR with our Stellar Plus, Stellar Business and Reseller packages (and old ProfessionalUltimateBusiness SSD, Reseller packages). The following versions are working on our servers: Ruby – 1.8.7, Rails – 2.3.18. More information can be found in this guide.

 Optimize Website: this feature allows you to enable/disable and configure the compression of your website by tweaking the way Apache handles requests, which can increase the performance of your website.

 Select PHP Version: here you can change PHP version applied to your cPanel account. You can find more information in this article.

 PHP F.A.Q.: this button will take you to our Knowledgebase site section dedicated to PHP-related questions.

Advanced

 Cron Jobs: here you can set up scripts running on a scheduled basis. For more details about setting up CronJobs refer to this guidance.

 Track DNS: using this tool you can check DNS information about any domain, or to trace the route from the server your site is on to the computer you are accessing cPanel from.

 Indexes: in this menu you can customize the way in which visitors can view a directory on the web.

 Error Pages: this feature allows you to edit the code for the default errors pages your website can display.

 Apache Handlers: here you can configure different Apache handlers for dealing with certain file formats.

 MIME Types: provides you with the information about the system predefined MIME types and the option to add a MIME Type on your own.

 Virus Scanner: this tool will allow you to scan your account for viruses with ClamAV virus scanner. ClamAV is an open source (GPL) anti-virus engine used in a variety of situations including email scanning, web scanning, and end point security. It provides a number of utilities including a flexible and scalable multi-threaded daemon, a command line scanner and an advanced tool for automatic database updates.

Preferences

 Password and Security: this menu allows you to change your cPanel main password if know the original one. Otherwise, you can reset the password following the steps in this guide.

 Change Language: this feature provides you with an opportunity to change your cPanel interface language.

 Change style: here you can change the overall look and feel of the interface by selecting one of the several preinstalled styles.

 Contact Information: in this menu you can specify an email address that will receive system email notifications.

 User Manager: allows you to manage your Subaccounts. Subaccounts use the same login and password information for email, FTP, and Web Disk.

for cPanel retro style:

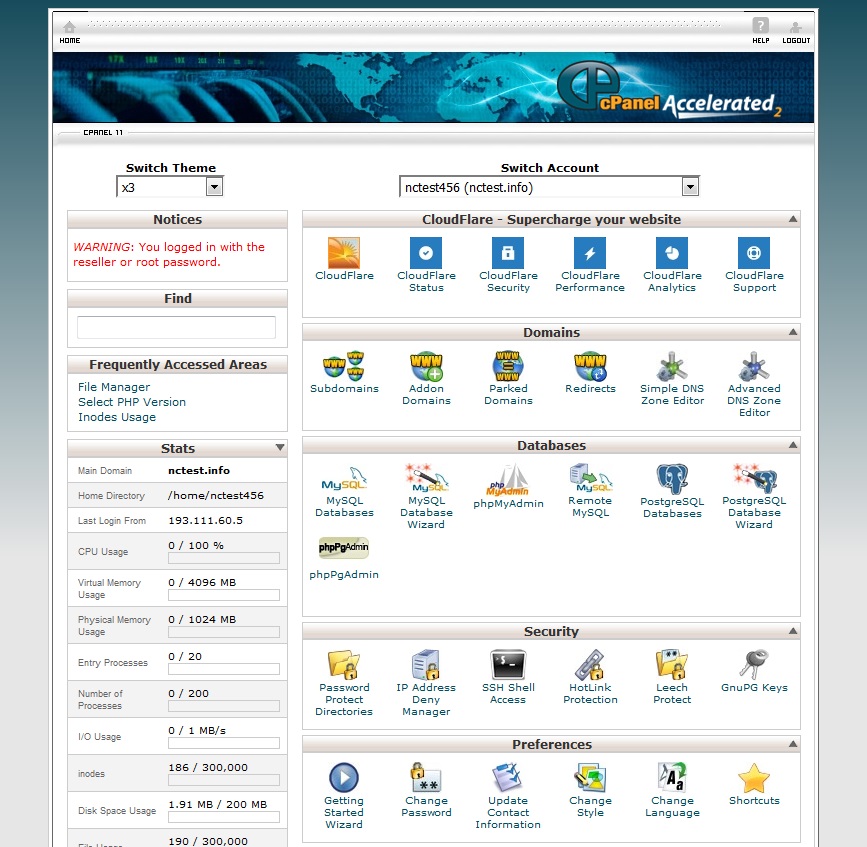
Basically cPanel has two vertical sections with different features:

Left column which includes different Stats information about the account, the possibility to switch cPanel theme, the search bar and frequently accessed menus and Right column which provides a number of various features that are conveniently structured to specific groups based on the concrete aspect of the web hosting service.


Below you can find a list of each menu for your convenience:

Left Column:

Right Column:

Left Column

In this column you will find following options:

Find: it is a search bar that allows to find cPanel features in the quickest way. Just start entering the name of the needed tool to allocate the corresponding menu:

Stats: here you will find all the information related to the statistics of your hosting account. At the bottom of this section you will find Expand Stats button, which allows you to review the full statistics:

If you see the expanded stats menu, you will find Collapse Stats button at the bottom of this section in order to switch to the short menu version:

Here is an overview of all indexes:

  • Main Domain: the primary domain name associated with your hosting account.
  • Home Directory: the path the home directory of your account on the server where your websites’ folders and files reside.
  • Last Login: the last IP address your cPanel has been accessed from.
  • Disk Usage: the amount of server disk space provided with your cPanel account. This index displays disk space used by your websites’ content, databases, emails, etc.
  • File Usage: the current number of files (inodes) and your cPanel account’s inode limit.
  • Addon Domains: the current number of already added addon domains and the total number allowed for your cPanel account.
  • MySQL Databases: the current number of MySQL or MariaDB databases created your cPanel account.
  • Subdomains: the current number of already created subdomains and the total number allowed for your cPanel account.
  • Email Accounts: the current number of already created email accounts and the total number of email accounts allowed for your cPanel account.
  • FTP Accounts: the current number of already created FTP accounts and the total number allowed for your cPanel account.
  • MySQL Disk Usage: the amount of disk space used by your MySQL or MariaDB databases.
  • PostgreSQL Disk Usage: the amount of disk space used by your PostgreSQL databases.
  • Bandwidth: the current amount of data transferred to and from your cPanel account for the month and the total amount of your cPanel account’s monthly bandwidth limit.
  • Aliases: the current number of already created alias domains and the total number allowed for your cPanel account.
  • Mailing Lists: the current number of already created mailing lists and the total number allowed for your cPanel account.
  • Autoresponders: the current number of created email autoresponders and the maximum number allowed.
  • Forwarders: the amount of email forwarders created and the maximum number allowed.
  • Email filters: the number of email filters created vs. the maximum number allowed.
  • PostgreSQL Databases: the current number of PostgreSQL databases created in your cPanel account.
  • CPU Usage: this value specifies how much of the allocated CPU resources you are currently using. The amount of CPU resources we provide to each account is the percentage of the server’s resources.
  • Entry Processes: this is the number of processes that enter your account. For example, every PHP page that is accessed by a user will usually generate a single entry process.
  • Physical Memory Usage: the actual memory allocated for your account. Virtual memory is usually a file on a disk drive that the operating system uses to store information (swap-to-from) when the real memory becomes full, for instance the page (swap) file on a Linux system. Therefore, if you try to publish a big post, it might take all physical memory to do so, but after some time it will be normalized.
  • I/O Usage: this index represents how much I/O (or disk activity) your account is using. Any task which makes use of the servers disk drive (such as reading or writing to the server) will consume I/O. More details about resource limits can be found here.
  • Number of Processes: this limit is similar to the above but includes all the processes generated by the account rather than the specific PHP, SSH or cron jobs.


Right Column

Preferences

This group of features provides you with the general information on cPanel management and allows you to make basic changes to your cPanel account.

 Password & Security: this menu allows you to change your cPanel main password if know the original one. Otherwise, you can reset the password following the steps in this guide.
 Change Language: this feature provides you with an opportunity to change your cPanel interface language.
 Change style: here you can change the overall look and feel of the interface by selecting one of the several preinstalled styles.

 Contact Information: in this menu you can specify an email address that will receive system email notifications.

 User Manager: allows you to manage your Subaccounts. Subaccounts use the same login and password information for email, FTP, and Web Disk.

Email

This group of features allows you to create email accounts for your domain names and manage email settings.

 Email Accounts: in this menu you can create and manage mailboxes associated with the domain names hosted in your account. In order to create an email account, feel free to check this guidance. More details about setting up a newly created email account with email clients can be found in the set of articles cPanel Email: Client Setup.
 Forwarders: setting up Forwarders feature provides you with an opportunity to send a copy of all emails from one email address to another. For example, you have two different email accounts and you don’t want to check both of them every time, so you could forward emails from test@yourdomain.com to test2@yourdomain2.com. Note, that the original address will still receive the forwarded emails.
 Email Routing: here you can set email routing for the domains hosted in your cPanel account, more details can be found in this guide.
 Autoresponders: this feature allows you to automatically send messages in reply to incoming emails received on a specific email account. This is pretty useful when you are on holidays or unavailable, or if you have any generic messages to send. You will find more information in this guide.


 Default Address: in this menu you can manage an email address, which is used by cPanel to fetch any message sent to email accounts which do not exist at your domain (also known as ‘catch-all address’). More details can be found here.
 Mailing Lists: with this option you can create a single address to send emails, newsletters and other updates to multiple email addresses simultaneously. Feel free to refer to this article to get more information.
 Track Delivery: this menu allows you to monitor emails delivery for your account.
 Global Email Filters: this feature allows you to configure filters of all the emails arriving to your hosted domains.
 Email Filters: with this option you can create filters for each email account for your domain. You can find more details about filtering tools in this article.
 Authentication: this tool will help you to prevent spam. Setting up DKIM and SPF records for your account equip email messages with verifiable information so that your server can automatically detect the nature of incoming and outgoing messages. The detailed guidance about using this feature can be found here.


 Address Importer: this menu allows you to use two types of files (.xls and .csv) for importing data in order to simultaneously create multiple email address or email forwarders for your account.
 Spam Filters: it is a user-friendly email utility which examines incoming mail for different spam characteristics. It uses various network tests and spam filtering to get an overall score in order to decide whether the mail should be considered as spam or not. SpamAssassin tool is provided by default with all our shared and reseller hosting plans. These articles can be found useful for setting up SpamAssasin feature:

SpamAssassin FAQs
How to configure SpamAssassin in cPanel

Encryption: this option allows you to set up GnuPG, which is a publicly-available encryption scheme that uses the public key approach. This system uses a public key to encrypt messages and you can decrypt them with the private key, which the intended recipient of the message retains.
BoxTrapper: this tool can protect your Inbox from spam by requiring all email senders not on your Whitelist reply to a verification email before you can receive their mail.
 Calendars and Contacts: this menu helps to configure your client to connect to CalDAV for calendars and CardDAV for contacts in order to access them on your personal devices. The detailed instructions can be found in this guidance.
Email Disk Usage: this utility allows you to recover disk space by deleting old messages from your mailbox.

 Professional Spam Filter: this menu allows you to configure SpamExperts, a user-friendly email filtering solution that allows to protect your account from both incoming and outgoing spam. More information about this feature is provided in this article.

 E-mail F.A.Q.: this button will take you to the corresponding Knowledgebase section dedicated to email questions.
 E-mail Client Setup: this button will take you to the corresponding Knowledgebase section dedicated to email account setup with different email clients and devices.

Domains

 Site Publisher: you can use this interface to quickly create a website from a set of available templates. This allows visitors to see some basic information while you continue to develop your website.
Addon Domains: with the help of this menu you can add more domains to the hosting account. Addon domains have the same functionality as the main domain assigned to your hosting account. More details about adding domains to cPanel are provided here.

 Subdomains: in this menu you can create subdomains and point them to different sections of your website or other IPs. Detailed instructions about this menu can be found in this article.

 Aliases: this feature allows you to ‘park’ additional domain names to your existing hosting account. They display the same website as your primary domain and share web statistics as well. You can refer to this guide when setting up a new parked domain.

 Redirects: here you can create a redirect for a specific domain/page to another domain/page and display the contents of the latter. More details can be found here.

 Zone Editor: allows you to edit the DNS zone of the domain(s) in your cPanel account. The following records can be added: A record, AAAA record, CNAME record, SRV record, TXT record. Feel free to check this article to get more information about setting up DNS records in cPanel.
 Domains F.A.Q.: this button will take you to the corresponding Knowledgebase section dedicated to domains’ management questions.


Files

 File Manager: here you can manage the files stored in your account. These guides can be found helpful while working with this menu:

How to use File Manager in cPanel
How do I upload my site?

Images: this tool allows you to view and modify images in your account.
 Directory Privacy: allows you to set a requirement for a username and password when users attempt to access your site from the web. It can be used when you need to limit access to a certain part of your site. You can get more details in this guide.
 Disk Usage: in this menu you will be able to check a detailed information about the disk space usage of your account. It shows disk usage totals for your account’s directories and all of its databases, not for individual files or databases. More details about Disk Space usage optimization are provided in this article.
 Web Disk: this feature is a cPanel implementation of the WebDav protocol, which allows you to manage, upload, and download your website’s files as though they were local to your personal computer. More detailed instructions about setting up WebDisk can be found in these articles:

How to set up Web Disk on Windows 7
How to set up Web Disk on Windows 8

 FTP Accounts: this option allows you to create and manage your FTP accounts. In order to create an FTP account, feel free to check this article. For FTP connection instructions, refer to this set of guides:

How to access an account via FTP
How to set up FileZilla
How to set up Cyberduck
How to set up iWeb
How to set up Adobe Muse
How to set up Dreamweaver
How to set up CoreFTP Client
How to set up CuteFTP

 FTP Connections: using this tool you can monitor the users who are currently logged into your site via FTP. Also, it’s possible to terminate an FTP connection from here.
 Backup: this feature allows you to download a zipped copy of your entire account or specific parts of it, such as your home directory, databases, email forwarder configuration, or your email filters configuration. More details guidance about how to make backups in cPanel can be found here.

 Backup Wizard: a user-friendly interface for creating a backup of your entire site, a partial backup, or allowing a site restoration from the last backup saved. Note, that Restore option provided in this menu is disabled by default on all our shared servers.

 Inodes Usage: provides the statistics of your account inodes (files) usage.You will find more details about this tool here.

Metrics

 Visitors: the access log of your account provided in a table view.
 Errors: here you can check the error log for your account, showing the latest 300 lines of content related to the errors generated by any website hosted in your account.
 Bandwidth: provides you with the detailed information the bandwidth used by your account.

 Raw Access: the RAW access log for your account

 Awstats: this tool provides you with an opportunity to monitor the access indexes on your account – users, robots, accessed pages and many, many more. You will find a more detailed explanation in this article.

 CPU and Concurrent Connection Usage: shows information on the resources consumed by your account.

Security

 SSH Access: here you can generate an access key for your account in order to connect using SSH keys. More details about setting up SSH keys can be found in this article.
IP Blocker: with the help of this tool you can block a range of IP addresses to prevent them from accessing your site. Feel free to refer to this guide on the matter.
 SSL/TLS: this tool will help you to install and manage your SSL Certificates. You will find a more detailed guide here.
 Hotlink Protection: in this menu you can enable hotlink protection for your website (that is to prevent someone from direct linking of your images to another website and, as a result, consuming your hosting account bandwidth). Feel free to check this guidance for additional information.
 Leech Protection: allows you to control whether users can give out or publicly post their passwords for restricted areas of your site. It can be used to redirect compromised accounts to the URL of your choice, or suspend them.
SSL/TLS Status: use this interface to view the SSL status of your domains.

 Two-Factor Authentication: this tool lets you enable 2FA, an improved security measure that requires two forms of identification: your password and a generated security code. When 2FA is enabled, an app on your smartphone supplies a code you must enter with your password to log in. You can learn more about enabling 2FA here.

Databases

 phpMyAdmin: the database management tool, which allows you to make different changes to MySQL databases in your account. You can find more information about how to work with databases via phpMyAdmin this guide.
 MySQL Databases: in this menu you can create and manage MySQL databases in cPanel account.

 MySQL Databases Wizard: provides the same functionality as MySQL Databases menu, in a simplified way though. More details about how to use both menus can be found here.

 PostgreSQL Databases: this option allows you to create and manage PostgreSQL databases in cPanel.
 PostgreSQL Databases Wizard: has the same functionality as PostgreSQL Databases menu, but allows to make all the changes in a simpler way.
 phpPgAdmin: the database management tool, which allows you to make different changes to PostgreSQL databases in your account.
MySQL F.A.Q.: this button will take you to the corresponding Knowledgebase section dedicated to MySQL questions.

Software and Services

 PHP: here you can check PHP configuration settings. They cannot be customized via this menu. The system displays them for your reference only. In case you need to change PHP settings, feel free to check following articles:

How to edit php.ini on shared servers
How to change PHP version on shared servers
How to change PHP version on business servers (for older servers)

 PHP PEAR Packages: this options allows you to install and maintain PHP PEAR packages for your hosting account.

 Perl Modules: here you can manage Perl modules available for your account. A Perl module is a discrete component of software for the Perl programming language. Perl is supported on all of our shared/reseller servers. This article will provide you with more details about this feature.

 RubyGems: in this menu you will find the set of functions that allow you to perform tasks in Ruby. It’s needed to install a Gem before you can use it inside a Ruby program.

 Ruby on Rails: with this menu you can use Ruby on Rails features. Ruby on Rails is a free web application framework for the Ruby programming language. It is often referred to as ‘Rails’ or ‘RoR’. We support RoR with our Stellar Plus, Stellar Business and Reseller packages (and old ProfessionalUltimateBusiness SSD, Reseller packages). The following versions are working on our servers: Ruby – 1.8.7, Rails – 2.3.18. More information can be found in this guide.
 Optimize Website: this feature allows you to enable/disable and configure the compression of your website by tweaking the way Apache handles requests, which can increase the performance of your website.
 Select PHP Version: here you can change PHP version applied to your cPanel account. You can find more information in this article.
 PHP F.A.Q.: this button will take you to our Knowledgebase site section dedicated to PHP-related questions.


Advanced

 Cron Jobs: here you can set up scripts running on a scheduled basis. For more details about setting up CronJobs refer to this guidance.
Track DNS: using this tool you can check DNS information about any domain, or to trace the route from the server your site is on to the computer you are accessing cPanel from.
 Indexes: in this menu you can customize the way in which visitors can view a directory on the web.
 Error Pages: this feature allows you to edit the code for the default errors pages your website can display.

 Apache Handlers: here you can configure different Apache handlers for dealing with certain file formats.

 MIME Types: provides you with the information about the system predefined MIME types and the option to add a MIME Type on your own.

 Virus Scanner: this tool will allow you to scan your account for viruses with ClamAV virus scanner. ClamAV is an open source (GPL) anti-virus engine used in a variety of situations including email scanning, web scanning, and endpoint security. It provides a number of utilities including a flexible and scalable multi-threaded daemon, a command line scanner and an advanced tool for automatic database updates.

Exclusive for Namecheap Customers

 Google Apps: with this tool you will be able to configure Google Apps service for your domain in just a few clicks. Feel free to check this category for more information.

 Namecheap SSL: this menu allows you to use Namecheap SSL cPanel plugin, check this guide for more details.

 CodeGuard Backup: this tool was designed to make the backup process as easy as possible. CodeGuard system will constantly monitor the website and keep you informed of any changes, performing full automatic backups of your files to avoid any possible downtime. More information is provided in the following articles:

How to make backups using CodeGuard
How to back up a WordPress site using CodeGuard

  Softaculous Apps Installer: this feature allows you to use Softaculous Script Installer, which includes most popular CMS, such as WordPress/Joomla/Magento etc. It is much faster than other script installers and it installs CMSes in a few clicks. Softaculous application is provided with any cPanel account on all of our shared hosting plans. You can view available scripts and their demo here. You may find these guides useful when working with Softaculous installer:

How to work with scripts in Softaculous
How to install WordPress using Softaculous

 Website Builder: this tool allows you to easily create an entire website using a drag-and-drop editor and without knowing any code or installing special software.
 Contact Support: opens a Live Chat with our customer support team.

 Namecheap Knowledgebase: this button will take you to our Knowledgebase site section.

How to install Composer on shared servers

How to install Composer on shared servers

Composer is a tool for dependency management in PHP. It allows you to declare the libraries your project depends on, and it will manage (install/update) them for you. Composer is not a package manager in the same sense as Yum or Apt are. Yes, it deals with ‘packages’ or libraries, but it manages them on a per-project basis, installing them in a directory (e.g., vendor) inside your project. By default, it will never install anything globally. Thus, it is a dependency manager.

To install Composer:

1. SSH access should be enabled for your hosting account with us. Follow the steps provided in this article to switch SSH access on.

2. To access your account via SSH, download and install one of the available SSH clients. You can find the list of free SSH clients here. In case you are using a Unix-based OS (Linux or OSX), you can easily run the Terminal application and connect to the server using the command:

ssh username@servername -pPORT

ssh – command for logging into the remote server
username – your cPanel username
servername– name of the server where your hosting account is located (you can find it using this tutorial)
PORT – connection port – 21098 for a Shared Hosting servers, 22 – for a VPS/Dedicated server 

3. Open your SSH client, put your domain name or the IP address of the server into the Host Name field, enter 21098 or 22 into the Port field, choose SSH as your connection type and press the Open button:

How to install Composer on shared servers
4. If you receive PuTTY Security Alert, press Yes:
How to install Composer on shared servers

When prompted, enter your cPanel username and password (when you enter the password, it is automatically hidden for security purposes):

How to install Composer on shared servers

5. Composer requires PHP 5.5+ version, so we need to check whether the needed version is set up. Type the php -v command in PuTTY (or in Terminal) and you will get the following output:

How to install Composer on shared servers

6. If you need to change PHP version, log in to your cPanel, navigate to Software and Services section >> Select PHP Version menu:

How to install Composer on shared servers

7. Select 5.5-7.2 version from the drop-down menu and then click on the Set as current button:

How to install Composer on shared servers

NOTE: Composer requires allow_url_fopen. It is enabled by default for all php versions on our shared servers. Still, you may check if it is On by going to Switch to PHP Settings in Select PHP version menu:

How to install Composer on shared servers

You can also find additional information about PHP selector here.

8. Next, navigate to the folder you want to install Composer in. In our example, we will install Composer in public_html:

cd public_html

How to install Composer on shared servers

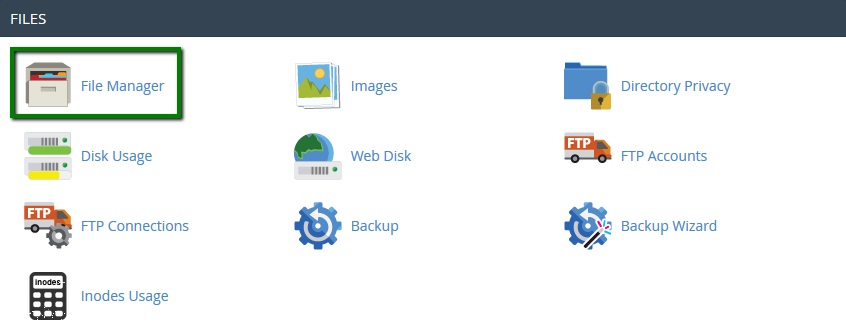
9. Now, you will need to find or create the php.ini file and some values to it. Log in to cPanel and navigate File Manager menu:

How to install Composer on shared servers

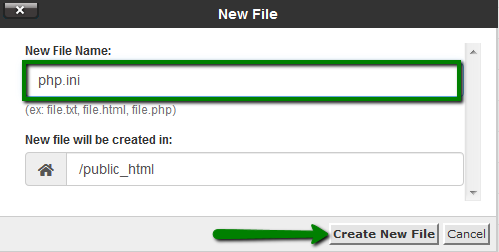
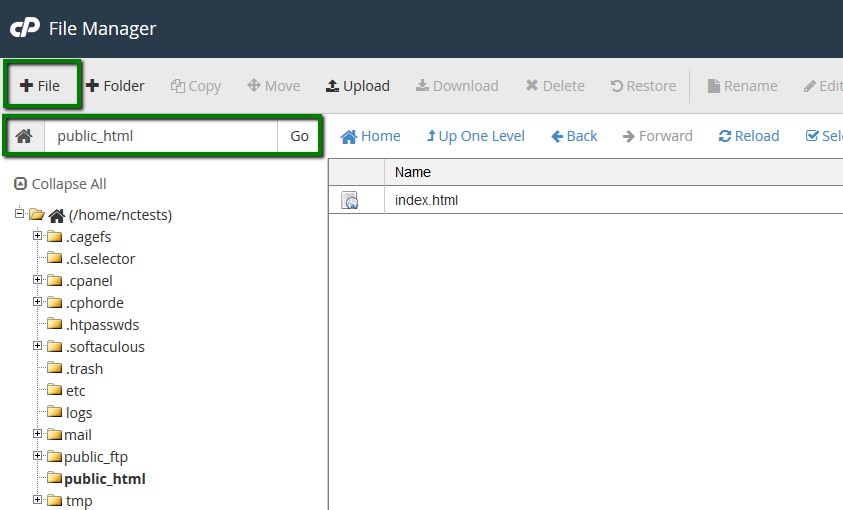
10. Go to the folder your Composer will be installed in and create a new file named php.ini using the +File button:

How to install Composer on shared servers

11. Open it by right-clicking the created php.ini file >>  Edit:

How to install Composer on shared servers

12. Then add the following values to the file and hit the Save Changes button:

max_execution_time = 300
max_input_time = 300
memory_limit = 512M
suhosin.executor.include.whitelist = phar
detect_unicode = Off

How to install Composer on shared servers

13. When all the preparations are done, you are ready to install Composer. Open PuTTY window where you have logged into your cPanel account and fill in the following command:

php -r “readfile(‘https://getcomposer.org/installer’);” | php -c php.ini

This will execute the Composer installation:

How to install Composer on shared servers

To run composer commands use:
php composer.phar

How to install Composer on shared servers

In case you get a notification Some settings on your machine make Composer unable to work properly, make sure that the PHP version is 5.5 or higher and all the changes in the php.ini file are saved.


How to Connect to cPanel on Mobile Devices

How to Connect to cPanel on Mobile Devices

The cPanel app allows you to connect to your cPanel and WHM accounts on-the-go using your mobile device.

Its main features are:

  • Access to the three core cPanel services (WHM, cPanel, and WebMail)
  • Fingerprint, passcode, or pattern login to verify your identity
  • Mobile-optimized interface to let you perform hosting tasks
  • Management of multiple connections

The cPanel app is available from the Google Play Store and iOS App Store.
For the purposes of this article, we’ll describe the cPanel App for Android. The steps are the same for both systems, though the interfaces may look slightly different.

To connect with the app, you will need:

  • The cPanel/WHM username and password included in Your Hosting Welcome Guide. If you don’t have those details or don’t remember your cPanel/WHM password, a member of our Support Teamwould be happy to resend the email or help you reset your password
  • Server hostname – the name of the server on which your hosting account is located. This can be obtained either in Your Hosting Welcome Guide in the Hosting package details section or via cPanel >> Server information.

To install the app:

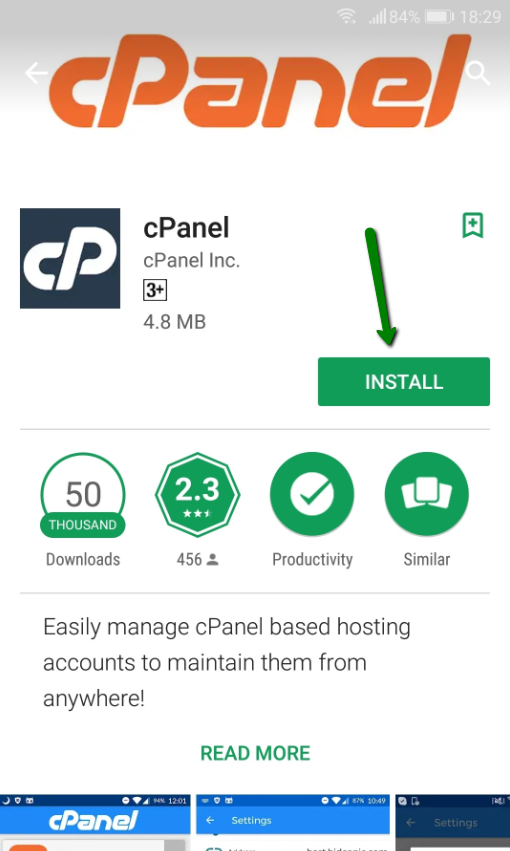
1. Go to the Google Play Store on your Android device, search for cPanel, and click Install:
2. Once installed, open the app. Click on the Plus button to add a new account:

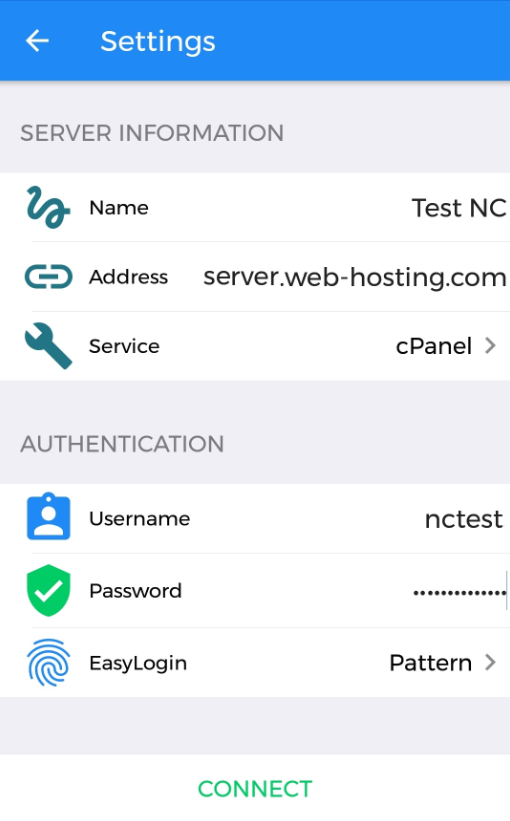
3. Enter the connection details as follows:

Server information:

  • Name: any name you chose
  • Addressserver hostname (or the domain name, if it is pointing to the hosting account)
  • Service: select cPanel or WHM

Authentication:

  • Username: your cPanel/WHM username
  • Password: your cPanel/WHM password
  • EasyLogin: This allows you to use either password, PIN-code, pattern, or a fingerprint instead of your username and password for faster login.
4. Once you fill in all the details, tap Connect.

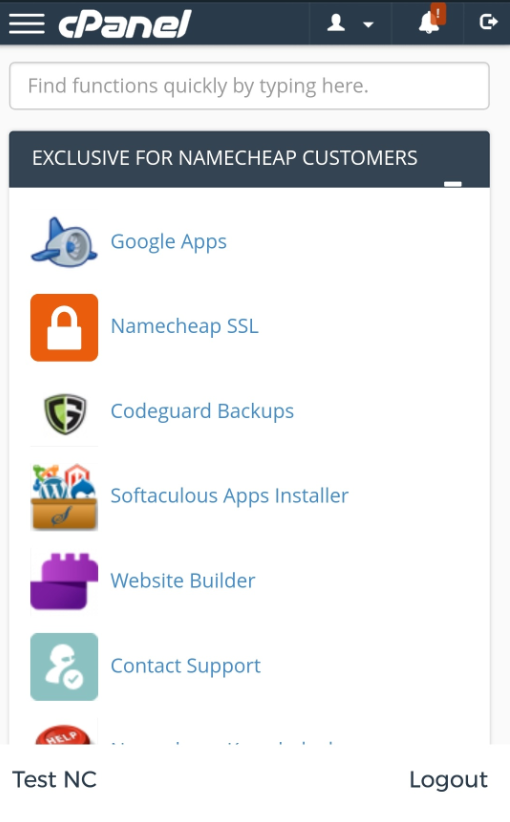
5. After the connection is established, you will be taken to the main cPanel/WHM dashboard:


To log into the cPanel/WHM account you added earlier, open the cPanel app and select the account name. Log in with the login method (PIN, pattern, etc.) set for the account.

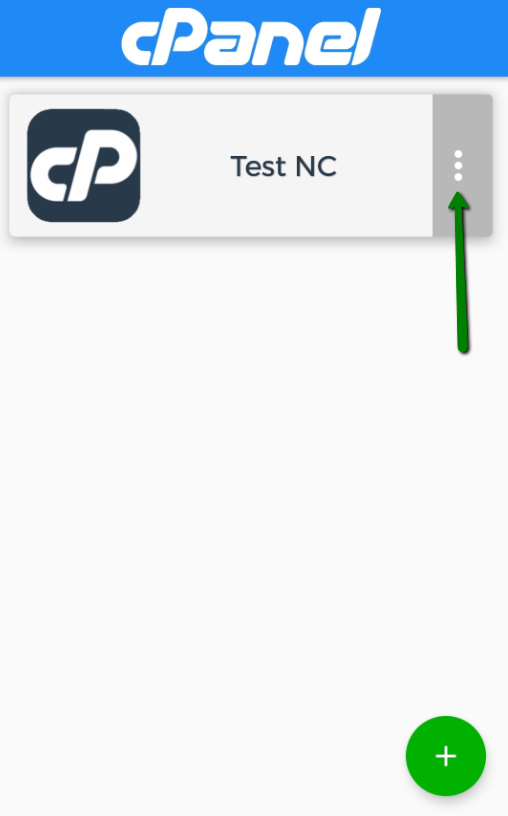
From the app’s main window, you can also modify the account settings by pressing the three horizontal dots:
That’s it!

How to check PHP version and configuration

How to check PHP version and configuration

There are two ways to check PHP version set for the account. By default, we have PHP 5.6 set on our shared servers.
To check what PHP version is selected for your account go to cPanel Software section > Select PHP version menu:

How to check PHP version and configuration
You will see the current PHP version above PHP extensions:

How to check PHP version and configurationAnother way to check PHP version is PHPinfo() function, commonly used to check the current state of PHP configuration. It can also be used for debugging purposes as it contains all EGPCS (Environment, GET, POST, Cookie, Server) data.

for cPanel Basic theme:

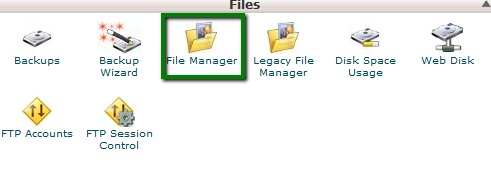
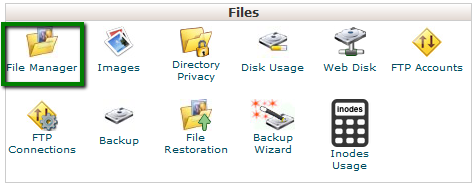
1. Log into your cPanel account, go to Files section > File Manager menu:

How to check PHP version and configuration

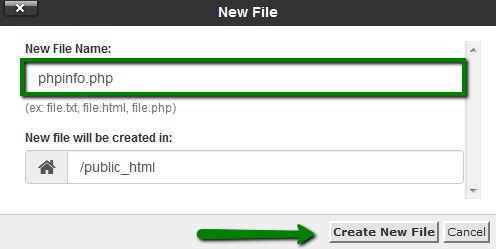
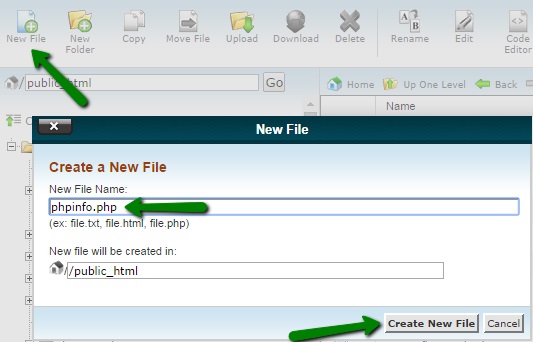
2. Navigate to public_html directory, click on New File and create a phpinfo.php file:

How to check PHP version and configuration

How to check PHP version and configuration

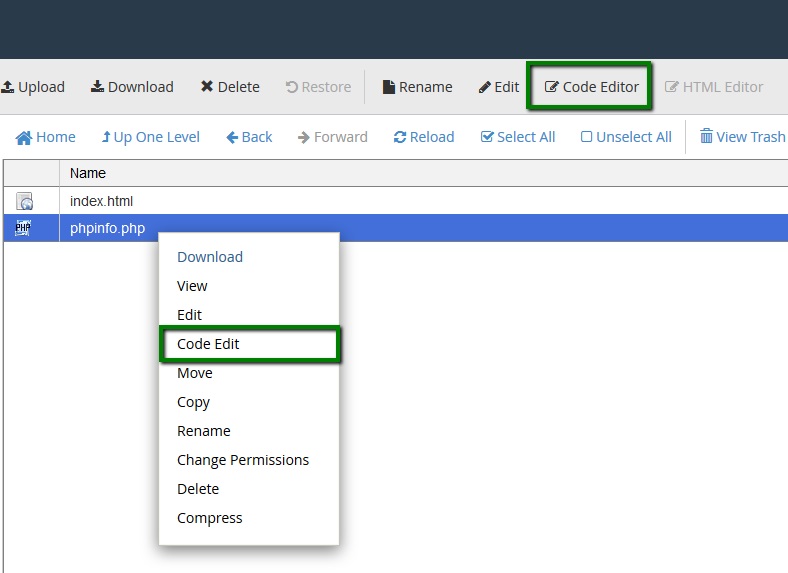
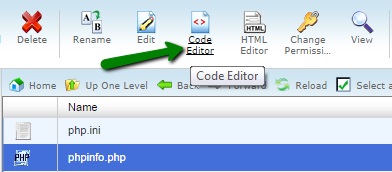
3. Find the newly created file in the list and click on Code Editor:

How to check PHP version and configuration

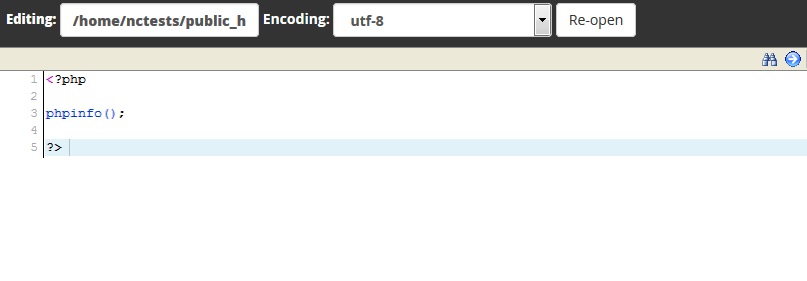
4. Add the lines of the code provided below to the file and click on Save Changes:

<?php
phpinfo();
?>

How to check PHP version and configuration

5. To see the detailed information about PHP configuration of your account, open http://yourdomain.com/phpinfo.php link in your browser, replacing yourdomain.com with your main domain name.

NOTE: For security reasons, do not forget to delete the file once you check all the necessary information.

for cPanel Retro theme:

1. Log into your cPanel account, go to the section Files File Manager menu:

How to check PHP version and configuration

2. Navigate to the public_html directory, click on New File and create a phpinfo.php file:

How to check PHP version and configuration

3.Find the newly created file in the list and click on Code Editor:

How to check PHP version and configuration

4. Add the lines of the code provided below to the file and click on Save Changes:


<?php
phpinfo();
?> 

How to check PHP version and configuration

5. To see the detailed information about PHP configuration of your account, open http://yourdomain.com/phpinfo.php link in your browser, replacing yourdomain.com with your main domain name.

NOTE: 
For security reasons, do not forget to delete the file once you check all the necessary information.

That’s it!

How to edit php.ini on Shared servers

How to edit php.ini on Shared servers

This guide describes how to edit the php.ini file on shared servers (Stellar and Stellar Plus plans, as well as old Value, Professional, and Ultimate plans).

If your account is hosted on the Business server (Stellar Business or old Business SSD plans), use this guide.
With the help of PHP Selector implemented on our Shared Hosting servers, you can easily modify basic PHP settings via your cPanel >> the Software section >> Select PHP Version menu. You can find detailed guidelines here.


However, advanced PHP settings are missing from the Select PHP Version tool and must be manually configured in the php.ini file. You can either create the file or upload the existing one to your account.

How to create a php.ini file

How to upload and edit an existing php.ini file

How to create a php.ini file

1. Log into your cPanel account, go to the Files section >> the File Manager menu.

For cPanel Basic Theme:


How to edit php.ini on Shared servers

For cPanel Retro Theme:

How to edit php.ini on Shared servers

2. Navigate to the root directory of the domain, click on New File, and create a file named php.ini:

How to edit php.ini on Shared servers

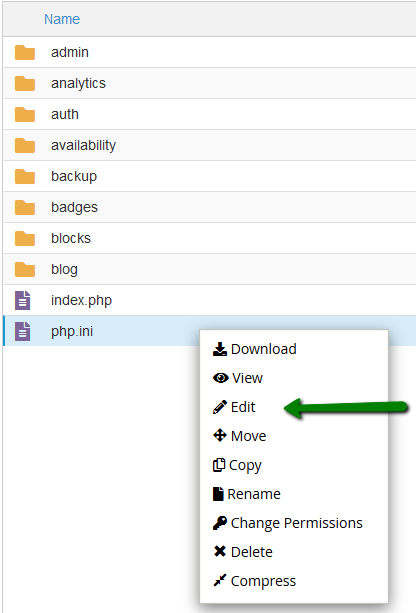
3. Find the newly created file in the list, right-click, and choose Edit:

How to edit php.ini on Shared servers

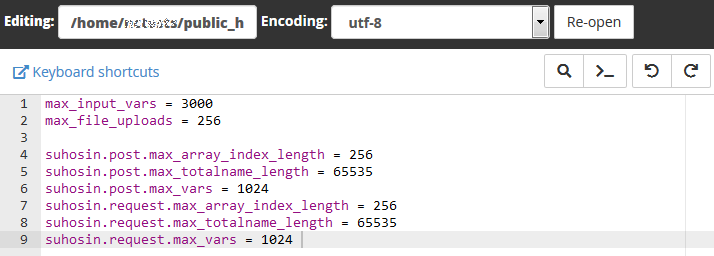
4. Add the required PHP settings and click on Save Changes in the top right corner:

How to edit php.ini on Shared servers

When all updates are completed, make sure to add lsapi_phpini directive.
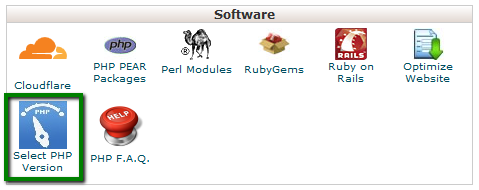
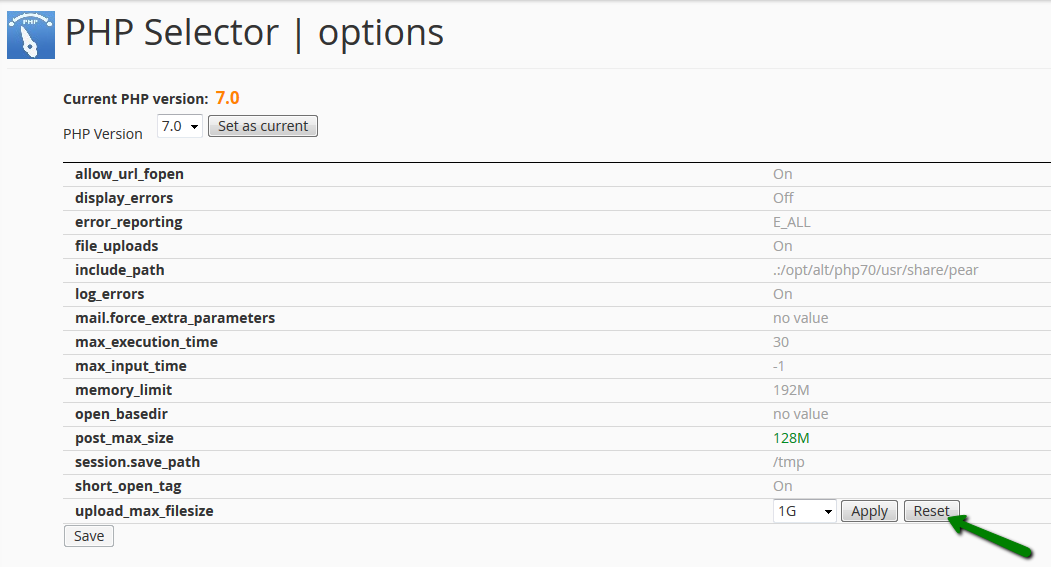
To check the current PHP version and configuration, refer to this article.If you wish to change values for the PHP settings (e.g., max_execution_timememory_limitpost_max_sizeupload_max_filesize, etc.), you must reset the values in the Select PHP version menu. This way, it will be possible to overwrite PHP settings using php.ini.1. Log into your cPanel account, go to Software section >> Select PHP version menu.For cPanel Basic Theme:

How to edit php.ini on Shared servers

For cPanel Retro Theme:

How to edit php.ini on Shared servers

2. Go to the Switch to PHP Options menu:

3. Reset the option in question:

4. You may then apply changes to the required value in the php.ini file:

How to upload and edit an existing php.ini file

1. Log into your cPanel account, go to the Files section >> the File Manager menu.

For cPanel Basic Theme:

For cPanel Retro Theme:

2. Navigate to the root directory of the domain name in question, upload the php.ini file that corresponds to your current PHP version. Feel free to download php.ini for different PHP versions below in the Attachments section at the end of the guide.

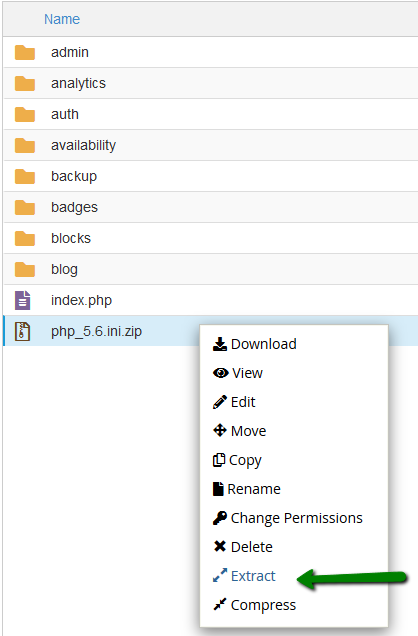
3. Once done, use the Extract option:

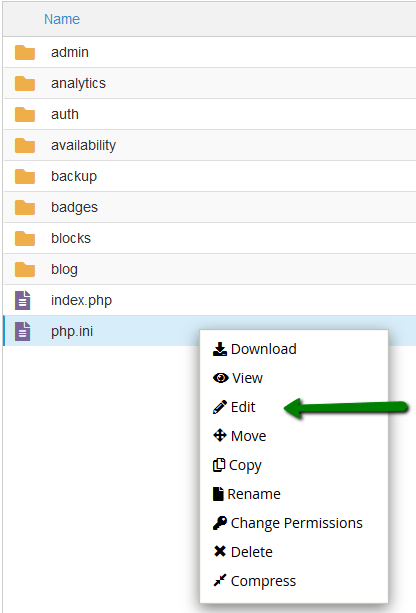
4. After that, right-click on php.ini.txt to Rename it php.ini, then another right-click to use the Edit option:

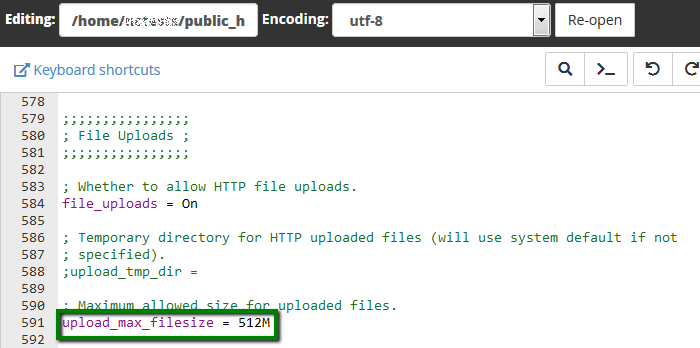
5. Here, you can use the search option and find the needed limit or value. In this example, it is upload_max_filesize.


6. Once all the required changes are made, click Save.

In order for the php.ini to work, add lsapi_phpini directive.

That’s it!

LSPHP directive for php.ini on shared servers

LSPHP directive for php.ini on shared servers

LSPHP  is a php handler that combines mod_lsapi+PHP.

For the settings from the chosen php.ini file to work, specific directive should be added to your .htaccess file:

lsapi_phpini /home/USER/public_html/php.ini 

NOTE: Make sure you replace USER with your cPanel username.

This option specifies which path to pass on to the PHP-interpreter and which folder to execute php.ini from.

Follow the instructions below to proceed with the setup:

for cPanel paper_lantern theme
for cPanel x3 theme

for cPanel paper_lantern theme:

1. To add these lines to .htaccess file, go to cPanel > Files section > File Manager menu:

2. Navigate to public_html directory:

3. Click on Settings in the right top corner and enable Show Hidden Files (dotfiles) in the pop-up window, that will allow you to see .htaccess file:

4. If there is no .htaccess file in the document root, you need to create it using File option:

5. Right-click on .htaccess file > Edit or use Edit option located in the toolbar:

6. Add the lines provided below into .htaccess file and Save Changes.

lsapi_phpini /home/USER/public_html/php.ini 

If you have done it right, the designed php.ini will take immediate effect.

7. If you need to load php.ini for/from subdirectory, make sure you edit ConfigPath accordingly.

for cPanel x3 theme:

1. To add these lines to the .htaccess file, go to cPanel >  the Files section > the File Manager menu:

2. Choose the Web root and Show Hidden Files options and hit Go:

3. Right-click on .htaccess file > Edit:

4. Add the lines provided below the existing rules and Save Changes.
 
lsapi_phpini /home/USER/public_html/php.ini 

If you have done it right, the designed php.ini will take immediate effect:

5. In case there is no .htaccess file in the document root, you need to create one via the New File option and edit it following the guidelines above:

That’s it!
PHP modules and extensions on shared hosting servers

PHP modules and extensions on shared hosting servers

How to change PHP version on shared servers

PHP is an open-source scripting language that is mainly used to create dynamic web pages. Its code can be embedded into HTML code which simplifies web page creation. A site designer can ‘jump’ between PHP and HTML without inserting tons of codes to output HTML. The syntax of the language was ‘borrowed’ from C, Java and Perl, though some new features were added. PHP is supported by most of web servers and operating systems.

PHP extensions are used for different purposes with only a few exceptions: Every function in PHP is included into one extension or another. A major number of these extensions are a part of standard extensions – over 400 of them. There is also a PECL repository which offers over 100 additional modules.

Here are the main reasons to use PHP modules/extensions:

  • to extend PHP functionality for a very particular usage (mathematics, statistics, geometry, etc.)
  • to have a higher performance and efficiency compared to a pure PHP implementation
  • to leverage the swiftness obtained from programming in another previously grasped language

You can check the PHP extensions and modules available on our Shared servers in the table below.

If you wish to check the PHP version and PHP extensions enabled for your account, follow this guide for more details. In case some necessary PHP extension or module from the table above is not enabled, feel free to contact our support team via Helpdesk to assist you with this question.

The PHP version (along with PHP extensions) can be changed in a different way depending on the server your account is hosted on:

  • If you have either a Shared (Stellar, Stellar Plus or old ValueProfessionalUltimate plan) or Resellerhosting plan, you may use the PHP selector menu in cPanel.
  • If you have a Stellar Business (or old Business SSD) hosting plan, you may use the PHP tweaks menu in cPanel.

Here is a brief explanation of each PHP module and extension:

apm: alternative PHP Monitor is used to collect error events and statistics and send them to one of its drivers.

ares: binding for the ares (MIT) or c-ares (CURL) library.

bcmath: for arbitrary precision mathematics, PHP offers Binary Calculator which supports numbers of any size and precision, represented as strings.

bcompiler: bcompiler enables you to encode your scripts in phpbytecode, enabling you to protect the source code. bcompiler can be used in the following situations: to create an .exe file of a PHP-GTK application (in conjunction with other software); to create closed source libraries; to provide clients with the software expiry time (prior to payment); to deliver close source applications; to use on embedded systems, where disk space is a priority. bcompiler can improve performance by about 30% when used with uncompressed bytecodes only.

big_int: big_int library provides a set of functions for calculations with arbitrary length integers and bitsets.

bloomy: this extension implements a Bloom filter, which is a space-efficient probabilistic data structure used to test whether an element is a member of a set.

bitset: bitsets manipulation library

bz2: the bzip2 functions are used to transparently read and write bzip2 (.bz2) compressed files.

bz2_filter: bzip2 compress/decompress stream filter implementation. Performs inline compression/decompression using the bzip2 algorithm on any PHP I/O stream. The data produced by this filter, while compatible with the payload portion of a bz2 file, does not include headers or tailers for full bz2 file compatibility. To achieve this format, use the compress.bzip2:// fopen wrapper built directly into PHP.

calendar: the calendar extension presents a series of functions to simplify converting between different calendar formats.

core: this is a filter which makes it possible to run arbitrary PHP code to modify the attributes of an user.

crack: this module allows you to use the CrackLib library to test the ‘strength’ of a password. The ‘strength’ of a password is tested based on its length, use of upper and lower case as well as checked against the specified CrackLib dictionary. CrackLib will also give helpful diagnostic messages that will help ‘strengthen’ the password.

ctype: the functions provided by this extension check whether a character or string falls into a certain character class according to the current locale.

curl: PHP supports libcurl, a library created by Daniel Stenberg, that allows you to connect and communicate with different types of servers with different types of protocols. libcurl currently supports http, https, ftp, gopher, telnet, dict, file, and ldap protocols. libcurl also supports HTTPS certificates, HTTP POST, HTTP PUT, FTP uploading, HTTP-form based upload, proxies, cookies, and user+password authentication.

date: the PHP date() function is used to format a date and/or time.

dba: these functions build the foundation for accessing Berkeley DB style databases.

dbase: these functions allow you to access records stored in dBase–format (dbf) databases.

dbx: the dbx module is a database abstraction layer (db ‘X’, where ‘X’ is a supported database). The dbx functions allow you to access all supported databases using a single calling convention.

dom: the DOM extension allows you to operate on XML documents through the DOM API with PHP 5.

doublemetaphone: the Double Metaphone algorithm by Lawrence Philips allows a word to be broken down into its phonemes.

eio: this extension provides asyncronous POSIX I/O by means of libeio C library.

enchant: PHP binding for the Enchant library. Enchant steps to provide uniformity and conformity on top of all spelling libraries and implement certain features that may be lacking in any individual provider library.

ereg: searches for a string specified by pattern, returning true if the pattern is found, and false if otherwise. The search is case-sensitive in regard to alphabetical characters.

exif: with the exif extension, you are able to work with image meta data. For example, you may use exif functions to read meta data of pictures taken from digital cameras by working with information stored in the headers of the JPEG and TIFF images.

fileinfo: the functions in this module try to guess the content type and encoding of a file by looking for certain magic byte sequences at specific positions within the file. While this is not a bulletproof approach, the used heuristics do a very good job.

filter: this extension filters data by either validating it or sanitizing it. This is especially useful when the data source contains unknown (or foreign) data, like user supplied input. For example, this data may come from an HTML form.

ftp: the functions in this extension implement client access to files servers speaking the File Transfer Protocol (FTP) as defined in RFC959. This extension is meant for detailed access to an FTP server providing a wide range of control to the executing script.

functional: a set of functional primitives for PHP.

gd: PHP is not limited to creating just HTML output. It can also be used to create and manipulate image files in a variety of different image formats, including GIF, PNG, JPEG, WBMP, and XPM. Even more convenient, PHP can output image streams directly to a browser. For these purposes PHP is compiled with the GD library.

gender: gender PHP extension is a port of the gender.c program originally written by Joerg Michael. The main purpose is to find out the gender of firstnames. The name dictionary contains >40000 firstnames from 54 countries.

geoip: allows you to find the location of an IP address. City, State, Country, Longitude, Latitude, and other information as all, such as ISP and connection type can be obtained with the help of GeoIP.

gettext: gettext functions implement an NLS (Native Language Support) API which can be used to internationalize your PHP applications.

gnupg: this module allows you to interact with GnuPG – a complete and free implementation of the OpenPGP standard as defined by RFC4880 (also known as PGP). GnuPG allows to encrypt and sign your data and communication, features a versatile key management system as well as access modules for all kinds of public key directories. GnuPG, also known as GPG, is a command line tool with features for easy integration with other applications. Version 2 of GnuPG also provides support for S/MIME and Secure Shell (ssh). gnupg extension allows you to use the following functions: add a key for decryption/encryption, a key for signing; removes all keys which were set for decryption/encryption before, all keys which were set for signing before; decrypts/encrypts a given text; returns an array with information about all keys that matches the given pattern; toggle armored output; verifies a signed text.

haru: PECL/haru extension provides bindings to the libHaru library.

hash: message Digest (hash) engine. Allows direct or incremental processing of arbitrary length messages using a variety of hashing algorithms.

homeloader: is used for the user specific PEAR repositories.

hidef: allows definition of user defined constants in simple ini files, which are then processed like internal constants, without any of the usual performance penalties.

htscanner: htscanner extension gives the possibility to use .htaccess-like file to configure PHP per directory, just like apache’s htaccess.

huffman: huffman compression belongs to a family of algorithms with a variable codeword length. That means that individual symbols (characters in a text file for instance) are replaced by bit sequences that have a distinct length. So symbols that occur a lot in a file are given a short sequence while other that are used seldom get a longer bit sequence.

iconv: module contains an interface to iconv character set conversion facility. With this module, you can turn a string represented by a local character set into the one represented by another character set, which may be the Unicode character set.

idn: used for domain name conversion.

igbinary: is a drop in replacement for the standard php serializer. Instead of time and space consuming textual representation, igbinary stores php data structures in a compact binary form.

imagick: is a native php extension to create and modify images using the ImageMagick API. ImageMagick is a software suite to create, edit, and compose bitmap images. It can read, convert and write images in a variety of formats (over 100) including DPX, EXR, GIF, JPEG, JPEG–2000, PDF, PhotoCD, PNG, Postscript, SVG, and TIFF.

imap: this function enables the possibility to operate with the IMAP protocol, as well as the NNTP, POP3 and local mailbox access methods.

inclued: traces through and dumps the hierarchy of file inclusions and class inheritance at runtime.

inotify: the inotify extension exposes the inotify functions inotify_init(), inotify_add_watch() and inotify_rm_watch(). inotify_init() returns a stream resource, usable with standard stream functions, like stream_select(), stream_set_blocking() and fclose(). inotify_read() replaces the C way of reading inotify events.

intl: internationalization extension (further is referred as Intl) is a wrapper for ICU library, enabling PHP programmers to perform UCA-conformant collation and date/time/number/currency formatting in their scripts.

ioncube_loader: is a PHP loader used to encrypt PHP files and speed up web pages that are being displayed.

ixed.5.x: is the name of the loaders which are required for encoded scripts protected by SourceGuardian. SourceGuardian 11 is the most advanced PHP Encoder on the market, complete with a ground-up rewrite, a powerful GUI and protection covering the latest version of PHP. You can encode your scripts using Windows, Mac OS X and Linux, all with a powerful GUI or using a command line interface. SourceGuardian PHP Encoder protects your PHP scripts by compiling the PHP source code into a bytecode format, followed by encryption layers.

jsmin: PHP extension for minifying JavaScript.

json: this extension implements JavaScript Object Notation (JSON) data-interchange format. The decoding is handled by a parser based on the JSON_checker by Douglas Crockford.

ldap: is the Lightweight Directory Access Protocol used to access ‘Directory Servers’. The Directory is a special kind of a database that holds information in a tree structure. The concept is similar to your hard disk directory structure, except that in this context, the root directory is ‘The world’ and the first level subdirectories are ‘countries’. Lower levels of the directory structure contain entries for companies, organizations or places, while yet lower still we find directory entries for people, and perhaps equipment or documents.

libevent: libevent is a library that provides a mechanism to execute a callback function when a specific event occurs on a file descriptor or after a timeout has been reached.

libxml: these functions/constants are available as of PHP 5.1.0, and the following core extensions rely on this libxml extension: DOM, libxml, SimpleXML, SOAP, WDDX, XSL, XML, XMLReader, XMLRPC and XMLWriter.

lzf: is a very fast compression algorithm, ideal for saving space with only slight speed cost. It can be optimized for speed or space at the time of compilation.

magickwand: this module enables PHP access to the ImageMagick MagickWand API. The MagickWand API is the recommended interface between the C programming language and the ImageMagick image processing libraries. Unlike the MagickCore C API, MagickWand uses only a few opaque types.

mailparse: mailparse is an extension for parsing and working with email messages. Mailparse is stream based, which means that it does not keep in–memory copies of the files it processes – so it is very resource efficient when dealing with large messages.

mbstring: mbstring provides multibyte specific string functions that help you deal with multibyte encodings in PHP. In addition to that, mbstring handles character encoding conversion between the possible encoding pairs.

mcrypt: this is an interface to the mcrypt library, which supports a wide variety of block algorithms such as DES, TripleDES, Blowfish (default), 3-WAY, SAFER-SK64, SAFER-SK128, TWOFISH, TEA, RC2 and GOST in CBC, OFB, CFB and ECB cipher modes.

mhash: this function is intended to work with mhash. Mhash can be used to create checksums, message digests, message authentication codes, and more. This is an interface to the mhash library. Mhash supports a wide variety of hash algorithms such as MD5, SHA1, GOST, and many others. For a complete list of supported hashes, refer to the constants page. The general rule is that you can access the hash algorithm from PHP with MHASH_hashname. For example, to access TIGER you use the PHP constant MHASH_TIGER.

mongo: this extension is deprecated; instead, the MongoDB extension should be used.

mongodb: the MongoDB PHP driver should work on nearly any system: Windows, Mac OS X, Unix, and Linux; little- and big-endian machines; 32- and 64-bit machines; PHP 5.3 through 5.6 (versions prior to 1.6 also support PHP 5.2). Unlike the mongo extension, this extension supports both PHP and HHVM and is developed atop the libmongoc and libbson libraries. It provides a minimal API for core driver functionality: commands, queries, writes, connection management, and BSON serialization. Userland PHP libraries that depend on this extension may provide higher level APIs, such as query builders, individual command helper methods, and GridFS. Application developers should consider using this extension in conjunction with the MongoDB PHP library, which implements the same higher level APIs found in MongoDB drivers for other languages. This separation of concerns allows the driver to focus on essential features for which an extension implementation is paramount for performance.

msgpack: this extension provides API for communicating with MessagePack serialization.

mssql: this function allows you to access MS SQL Server database. It has the following features: adds a parameter to a stored procedure or a remote stored procedure, close MS SQL Server connection, open MS SQL server connection, moves internal row pointer, executes a stored procedure on a MS SQL server database, fetch a result row as an associative array, a numeric array, or both, returns an associative array of the current row in the result, returns the next batch of records, get field information, fetch row as object, converts a 16 byte binary GUID to a string, initializes a stored procedure or a remote stored procedure, open persistent MS SQL connection etc.

mysql: these functions allow you to access MySQL database servers. This extension is deprecated as of PHP 5.5.0, and has been removed as of PHP 7.0.0. Instead, either the mysqli or PDO_MySQL extension should be used.

mysqli: the mysqli extension allows you to access the functionality provided by MySQL 4.1 and above.

mysqlnd: MySQL Native Driver is a replacement for the MySQL Client Library (libmysqlclient). The MySQL database extensions MySQL extension, mysqli and PDO MYSQL all communicate with the MySQL server. With MySQL Native Driver there is now an alternative, as the MySQL database extensions can be compiled to use MySQL Native Driver instead of the MySQL Client Library.

ncurses: (new curses) is a free software emulation of curses in System V Rel 4.0 (and above). It uses terminfo format, supports pads, colors, multiple highlights, form characters and function key mapping.

nd_mysql: MySQL native driver for PHP (mysqlnd) is a drop-in replacement for the MySQL Client Library (libmysql) for the PHP script language. The mysqlnd library is highly optimized for and tightly integrated into PHP. The MySQL Client Library cannot offer the same optimizations because it is a general-purpose client library. The mysqlnd library is using PHP internal C infrastructure for seamless integration into PHP. In addition, it is using PHP memory management, PHP Streams (I/O abstraction) and PHP string handling routines. The use of PHP memory management by mysqlnd allows, for example, memory savings by using read-only variables (copy on write) and makes mysqlnd apply to PHP memory limits

nd_mysqli: this extension is referred to as MySQL improved. It was developed to take advantage of the new features available in MySQL since version 4.1.3.

nd_pdo_mysql: MySQL Native Driver is a replacement for the MySQL Client Library (libmysqlclient). MySQL Native Driver is part of the official PHP sources as of PHP 5.3.0. The MySQL database extensions MySQL extension, mysqli and PDO MYSQL all communicate with the MySQL server. In the past, this was done by the extension using the services provided by the MySQL Client Library. The extensions were compiled against the MySQL Client Library in order to use its client-server protocol. With MySQL Native Driver there is now an alternative, as the MySQL database extensions can be compiled to use MySQL Native Driver instead of the MySQL Client Library. MySQL Native Driver is written in C as a PHP extension. Using the MySQL Native Driver offers a number of advantages over using the MySQL Client Library. The older MySQL Client Library was written by MySQL AB (now Oracle Corporation) and so was released under the MySQL license. This ultimately led to MySQL support being disabled by default in PHP. However, the MySQL Native Driver has been developed as part of the PHP project, and is therefore released under the PHP license. This removes licensing issues that have been problematic in the past. Also, in the past, you needed to build the MySQL database extensions against a copy of the MySQL Client Library. This typically meant you needed to have MySQL installed on a machine where you were building the PHP source code. Also, when your PHP application was running, the MySQL database extensions would call down to the MySQL Client library file at run time, so the file needed to be installed on your system. With MySQL Native Driver that is no longer the case as it is included as part of the standard distribution. So you do not need MySQL installed in order to build PHP or run PHP database applications. Because MySQL Native Driver is written as a PHP extension, it is tightly coupled to the workings of PHP. This leads to gains in efficiency, especially when it comes to memory usage, as the driver uses the PHP memory management system. It also supports the PHP memory limit. Using MySQL Native Driver leads to comparable or better performance than using MySQL Client Library, it always ensures the most efficient use of memory. One example of the memory efficiency is the fact that when using the MySQL Client Library, each row is stored in memory twice, whereas with the MySQL Native Driver each row is only stored once in memory.

oauth: this extension provides OAuth 1.0a consumer and provider bindings. OAuth is an authorization protocol built on top of HTTP which allows applications to securely access data without having to store usernames and passwords.

oci8: these functions allow you to access Oracle Database 12c, 11g, 10g, 9i and 8i. They support SQL and PL/SQL statements. Basic features include transaction control, binding of PHP variables to Oracle placeholders, and support for large object (LOB) types and collections. Oracle’s scalability features such as Database Resident Connection Pooling (DRCP) and result caching are also supported.

odbc: in addition to normal ODBC support, the Unified ODBC functions in PHP allow you to access several databases that have borrowed the semantics of the ODBC API to implement their own API.

openssl: this module uses the functions of OpenSSL for generation and verification of signatures and for sealing (encrypting) and opening (decrypting) data. OpenSSL offers many features that this module currently doesn’t support.

pcntl: process control support in PHP implements the Unix style of process creation, program execution, signal handling and process termination. PCNTL now uses ticks as the signal handle callback mechanism, which is much faster than the previous mechanism. This change follows the same semantics as using “user ticks”. You use the declare() statement to specify the locations in your program where callbacks are allowed to occur. This allows you to minimize the overhead of handling asynchronous events. In the past, compiling PHP with pcntl enabled would always incur this overhead, whether or not your script actually used pcntl. There is one adjustment that all pcntl scripts prior to PHP 4.3.0 must make for them to work which is to either to use declare() on a section where you wish to allow callbacks or to just enable it across the entire script using the new global syntax of declare().

pcre: the PCRE library is a set of functions that implement regular expression pattern matching using the same syntax and semantics as Perl 5, with just a few differences.

pdf: the PDF functions in PHP can create PDF files using the PDFlib library from PDFlib GmbH

pdo: the PHP Data Objects (PDO) extension defines a lightweight, consistent interface for accessing databases in PHP. Each database driver that implements the PDO interface can expose database–specific features as regular extension functions.

pdo_dblib: is a driver that implements the PHP Data Objects (PDO) interface to enable access from PHP to Microsoft SQL Server and Sybase databases through the FreeTDS library.

pdo_firebird: a driver that implements the PHP Data Objects (PDO) interface to enable access from PHP to Firebird database.

pdo_mysql: is a driver that implements the PHP Data Objects (PDO) interface to enable access from PHP to MySQL 3.x, 4.x and 5.x databases. PDO_MYSQL will take advantage of native prepared statement support present in MySQL 4.1 and higher.

pdo_odbc: connecting to ODBC or DB2 databases

pdo_pgsql: this extension provides an PostgreSQL driver for PDO.

pdo_sqlite: PDO_SQLITE is a driver that implements the PHP Data Objects (PDO) interface to enable access to SQLite 3 databases.

pgsql: PostgreSQL database is an Open Source product. Postgres, developed originally in the UC Berkeley Computer Science Department, pioneered many of the object-relational concepts now becoming available in some commercial databases.

phalcon: phalcon is a high-performance web application framework for PHP based on the model-view-controller (MVC) pattern. Unlike most PHP frameworks, Phalcon is implemented as an extension written in C in order to optimize performance. This is intended to boost execution speed and reduce resource usage with the goal of handling more requests per second than comparable frameworks written primarily in PHP.

phar: the phar extension provides a way to put entire PHP applications into a single file called a ‘phar’ (PHP Archive) for easy distribution and installation. In addition to providing this service, the phar extension also provides a file-format abstraction method for creating and manipulating tar and zip files through the PharData class, much as PDO provides a unified interface for accessing different databases. Phar archives are best characterized as a convenient way to group several files into a single file.

posix: this module contains an interface to those functions defined in the IEEE 1003.1 (POSIX.1) standards document which are not accessible through other means.

propro: a reusable split-off of pecl_http’s property proxy API.

pspell: a reusable split-off of pecl_http’s property proxy API. These functions allow you to check the spelling of a word and offer suggestions.

quickhash: the quickhash extension contains a set of specific strongly-typed classes to deal with specific set and hash implementations.

raphf: a reusable split-off of pecl_http’s persistent handle and resource factory API.

radius: this package is based on the libradius (Remote Authentication Dial In User Service) of FreeBSD. It allows clients to perform authentication and accounting by means of network requests to remote servers. This PECL extension adds full support for Radius Authentication (RFC 2865) and Radius Accounting (RFC 2866). This package is available for Unix (tested on FreeBSD and Linux) and for Windows.

rar: PHP extension for reading RAR archives using bundled unRAR library. This extension gives you possibility to read Rar archives but doesn’t support writing Rar archives, because this is not supported by the UnRar library and is directly prohibited by its license.

readline: the readline function implements an interface to the GNU Readline library. These are functions that provide editable command lines. An example being the way Bash allows you to use the arrow keys to insert characters or scroll through command history. Because of the interactive nature of this library, it will be of little use for writing Web applications, but may be useful when writing scripts used from a command line.

recode: this module contains an interface to the GNU Recode library. The GNU Recode library converts files between various coded character sets and surface encodings.

reflection: PHP 5 comes with a complete reflection API that adds the ability to reverse’engineer classes, interfaces, functions, methods and extensions. Additionally, the reflection API offers ways to retrieve doc comments for functions, classes and methods.

rsync: this algorithm is using a rolling check-sum and a md4 check’sum for blocks of the file to generate a signature file. The signature file is used to generate a diff from the file on the remote site. This diff can be used on the local site to patch the file.

session: session support in PHP consists of a way to preserve certain data across subsequent accesses. This enables you to build more customized applications and increase the appeal of your website.

shmop: shmop is an easy to use set of functions that allows PHP to read, write, create and delete Unix shared memory segments.

simplexml: the SimpleXML extension provides a very simple and easily usable toolset to convert XML to an object that can be processed with normal property selectors and array iterators.

snmp: Simple Network Management Protocol (SNMP) is a widely used protocol for monitoring the health and welfare of network equipment (for example, routers), computer equipment and even devices like UPSs. The SNMP extension provides a very simple and easily usable toolset for managing remote devices via the Simple Network Management Protocol. As it is a wrapper around the underlying Net-SNMP (or UCD-SNMP on older systems) library, all basic concepts are the same and the PHP functions change their behaviour depending on the Net-SNMP configuration files and environment variables. Beginning with PHP 5.4, an OO API is available. SNMP have the following features: retrieve information from an SNMP-capable device, either using single requests or multiple requests, manipulate configuration information on an SNMP-capable device, retrieve a fixed collection of information from an SNMP-capable device, convert between numerical and textual forms of MIB OIDs, and display MIB content and structure.

soap: the SOAP extension can be used to write SOAP Servers and Clients.

sockets: the socket extension implements a low–level interface to the socket communication functions based on the popular BSD sockets, providing the possibility to act as a socket server as well as a client.

sourceguardian: this PHP encoder protects your PHP code by compiling the PHP source code into a binary bytecode format, which is then supplemented with an encryption layer.

spl: the Standard PHP Library (SPL) is a collection of interfaces and classes that are meant to solve common problems. SPL provides a set of standard datastructure, a set of iterators to traverse over objects, a set of interfaces, a set of standard Exceptions, a number of classes to work with files and it provides a set of functions like spl_autoload_register().

spl_types: this extension aims at helping people making PHP a stronger typed language and can be a good alternative to scalar type hinting. It provides different typehandling classes as such as integer, float, bool, enum and string.

sqlite: this is an extension for the SQLite Embeddable SQL Database Engine. SQLite is a C library that implements an embeddable SQL database engine. Programs that link with the SQLite library can have SQL database access without running a separate RDBMS process. SQLite is not a client library used to connect to a big database server. SQLite is the server. The SQLite library reads and writes directly to and from the database files on disk.

sqlite3: support for SQLite version 3 databases.

ssh2: bindings to the libssh2 library which provide access to resources (shell, remote exec, tunneling, file transfer) on a remote machine using a secure cryptographic transport.

standard: the standard set of classes.

stats: this is the statistics extension. It contains few dozens of functions useful for statistical computations.

stem: a PHP extension that provides word stemming.

stomp: this extension allows php applications to communicate with any Stomp compliant Message Brokers through easy object oriented and procedural interfaces.

suhosin: is an advanced protection system for PHP installations. It was designed to protect servers and users from known and unknown flaws in PHP applications and the PHP core. Suhosin comes in two independent parts, that can be used separately or in combination. The first part is a small patch against the PHP core, that implements a few low–level protections against buffer overflows or format string vulnerabilities and the second part is a powerful PHP extension that implements numerous other protections.

sybase_ct: module which gets number of affected rows in last query, closes a Sybase connection, opens a Sybase server connection, moves internal row pointer, sets the deadlock retry count, fetch row as array, fetch a result row as an associative array, gets a result row as an enumerated array, returns the last message from the server

sysvmsg: shared memory support.

sysvsem: shared memory functions.

sysvshm: extension for shared memory.

tidy: tidy is a binding for the Tidy HTML clean and repair utility which allows you to not only clean and otherwise manipulate HTML documents, but also traverse the document tree.

timezonedb: timezone Database to be used with PHP’s date and time functions

tokenizer: the tokenizer functions provide an interface to the PHP tokenizer embedded in the Zend Engine. Using these functions you may write your own PHP source analyzing or modification tools without having to deal with the language specification at the lexical level.

trader: the trader extension is a free open source stock library based on TA–Lib. It’s dedicated to trading software developers requiring to perform technical analysis of financial market data.

translit: this module allows to transliterate non-latin character sets to latin.

uploadprogress: an extension to track progress of a file upload.

uri_template: implementation of URI Template specification for PHP.

uuid: this extension allows to generate a unique ID.

wddx: the Web Distributed Data Exchange (WDDX) is a XML-based technology that allows Web applications created with any platform to easily exchange data with one another over the Web.

weakref: the WeakRef class provides a gateway to objects without preventing the garbage collector from freeing those objects. It also provides a way to turn a weak reference into a strong one.

xdebug: the Xdebug extension helps you debugging your script by providing a lot of valuable debug information.

xml: XML (eXtensible Markup Language) is a data format for structured document interchange on the Web.

xmlreader: the XMLReader extension is an XML Pull parser. The reader acts as a cursor going forward on the document stream and stopping at each node on the way.

xmlrpc: XML-RPC is a remote procedure call (RPC) protocol which uses XML to encode its calls and HTTP as a transport mechanism. XML-RPC also refers generically to the use of XML for remote procedure call, independently of the specific protocol. This article is about the protocol named ‘XML-RPC’.

xmlwriter: this extension represents a writer that provides a non-cached, forward-only means of generating streams or files containing XML data.

xrange: xrange is a compiled extension that provides numeric iteration primitives to PHP on top of SPL. It includes a lean numeric range generator/iterator, modeled after Python’s xrange() function. It’s intended to provide an alternative for all numeric iteration and looping.

xsl: the XSL extension implements the XSL standard, performing XSLT transformations using the libxslt library

yaf: the Yet Another Framework (Yaf) extension is a PHP framework that is used to develop web applications.

yaml: this extension implements the YAML Ain’t Markup Language (YAML) data serialization standard. Parsing and emitting are handled by the LibYAML library. YAML is a human friendly data serialization standard for all programming languages.

yaz: this extension offers a PHP interface to the YAZ toolkit that implements the Z39.50 Protocol for Information Retrieval. With this extension you can easily implement a Z39.50 origin (client) that searches or scans Z39.50 targets (servers) in parallel.

zend guard loader: Zend Guard is the most widely accepted PHP encoding and obfuscation product on the market which protects your application from unlicensed use and reverse engineering.

zend_optimizer: allows PHP to run files encoded by Zend Guard which greatly enhances the performance of PHP applications. The Zend Optimizer goes over the code generated by the standard Zend run-time compiler and optimizes it for faster execution.

zip: this extension enables you to transparently read or write ZIP compressed archives and the files inside them.

zlib: this module enables you to transparently read and write gzip (.gz) compressed files, through versions of most of the filesystem functions which work with gzip-compressed files (and uncompressed files, too, but not with sockets).