Category Archive Hosting

How to get an SSH client

How to get an SSH client

How to get an SSH client
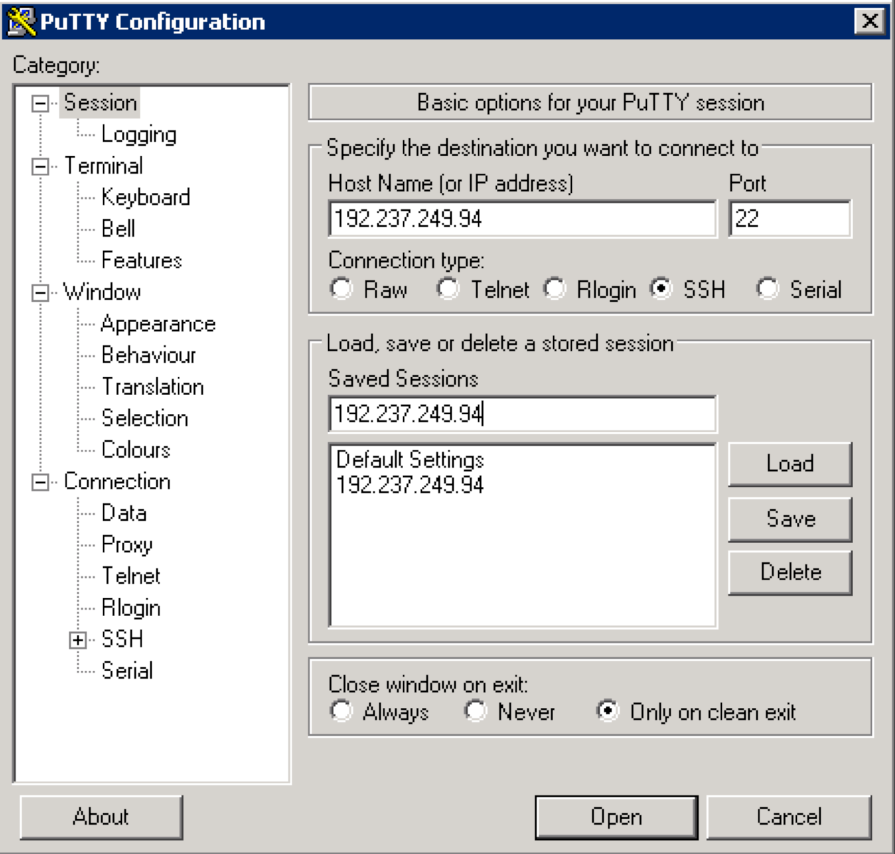
To access your account via SSH, you should download and install one of available SSH clients. You can find the list of free SSH clients in the table below. If you have Windows, we recommend to use PuTTY as your SSH client.

SSH Client Operating Systems Supported Download
PuTTY Windows and Unix
WinSCP Windows (SCP and SFTP, no SSH)
Fugu Macintosh


How to connect via SSH using keys

How to connect via SSH using keys

Your SSH session can be authenticated either with the username and password or with a pair of private/public keys. It is recommended to use the latter, as it is considered to be a more secure and convenient solution:

For cPanel Basic Theme

For cPanel Retro Theme


For cPanel Basic Theme:

1. Manage SSH Keys

2. Create a new pair of SSH keys

3. Import of the existing keys

4. Use Putty and SSH key pair to connect


1. Manage SSH Keys

In cPanel you can manage SSH keys in the SSH access menu.

Click on Manage SSH keys:

On the next page, you can either import the existing pair of keys or generate a new one.

2. Create a new pair of SSH keys

2.1. Public and private keys generation

In order to generate a new SSH key pair click on the Generate a new Key option:

On the generator page, specify the password (passphrase), Key Name, Key Type and Size.
The maximum allowed DSA key size is 1024 which is not enough to guarantee its security nowadays. That’s why we suggest using only RSA with 2048 bits:

Once everything is set, click Generate Key.

Now you should see both private and public keys you created.

2.2. Public key authorization

In order to authorize SSH access to your hosting account by the private key you created, click on the Manage option:

On the next page, click on the Authorize button:

2.3. Acquiring a key pair

You can view and download keys you have in cPanel by clicking on the View/Download button in the Private Keys section:

Click on Download Key (it will be saved in a simple text document on your side) or just copy/paste the provided key if needed. You can also convert your key into PuTTY’s ppk format using the Convert option:

3. Import of the existing keys

If you already have a key pair generated by other means, you can import the public key using the Import Keyoption:

Next, fill in the required details:

  • Choose a name for this key (defaults to id_dsa): type in id_rsa;
  • Paste the Private Key in this box: leave it empty (this field is only used in cases, where you want to have SSH access from your cPanel account to other servers via the keys);
  • Passphrase: input the passphrase;
  • Paste the public key into the following text box: on your local computer open your public key file (e.g./User/name/.ssh/id_rsa.pub) > copy and paste the content of that file into the field;
  • Click Import

Once done, do not forget to authorize your imported public key in the same way as in step 2.2.

4. Use Putty and SSH key pair to connect

In this example, we will use the Putty SSH client and key pair generated by cPanel in order to access the server via SSH:

4.1. Download the Private key as it is shown in step 2.3.

4.2. In the PuTTy folder, run puttygen.exe; in the top menu select the File tab and click on Load private keyand select your private key file (make sure All files (*.*) filter is used so you can see your downloaded private key file):

You will be asked for the passphrase you specified during the key generation in step 2.1. After entering it you should receive a successful import message:

In case you do not wish to set a passphrase for the key, you can empty the Key passphrase and Confirm passphrase fields.
Now click on Save private key and save your key as a .ppk file which will be needed later:

4.3. Run the PuTTy client (putty.exe), select Connection > SSH > Auth and in the Authentication parameterssection, click on Browse to select the saved .ppk file:

Once done, get back to the Session section and input the server name (IP address) and specify SSH port (it should be 21098 for all shared servers accounts) and click Open:

In the console window, you will be asked for the login and passphrase:

For cPanel Retro Theme:

1. Manage SSH Keys

2. Create a new pair of SSH keys

3. Import of the existing keys

4. Use Putty and SSH key pair to connect


1. Manage SSH Keys


In cPanel you can manage SSH keys in the SSH access menu:

Click on Manage SSH keys

On the next page, you can either import the existing pair of keys or generate a new one.

2. Create a new pair of SSH keys

2.1. Public and private keys generation

In order to generate a new SSH key pair click on the Generate a New Key option:

On the generator page, specify the password (passphrase), Key Name, Key Type and Size.
The maximum allowed DSA key size is 1024 which is not enough to guarantee its security nowadays. That’s why we suggest using only RSA with 2048 bits:

Once everything is set, click Generate Key.

Now you should see both private and public keys you created.

2.2. Public key authorization

In order to authorize SSH access to your hosting account by the private key you created, click on the Manage option:

On the next page, click on the Authorize button:

2.3. Acquiring a key pair

You can view and download keys you have in cPanel by clicking on the View/Download button in the Private Keys section:

Click on Download Key (it will be saved in a simple text document on your side) or just copy/paste the provided key if needed. You can also convert your key into PuTTY’s ppk format using the Convert option:

3. Import of the existing keys

If you already have a key pair generated by other means, you can import them using the Import Key option:

Next, fill in the required details:

  • Choose a name for this key (defaults to id_dsa): type in id_rsa;
  • Paste the Private Key in this box: leave it empty (this field is only used in cases, where you want to have SSH access from your cPanel account to other servers via the keys);
  • Passphrase: input the passphrase;
  • Paste the public key into the following text box: on your local computer open your public key file (e.g./User/name/.ssh/id_rsa.pub) > copy and paste the content of that file into the field;
  • Click Import

Once done, do not forget to authorize your imported public key in the same way as in step 2.2.

4. Use Putty and SSH key pair to connect

In this example, we will use the Putty SSH client and key pair generated by cPanel in order to access the server via SSH:

4.1. Download the Private key as it is shown in step 2.3.

4.2. In the PuTTy folder, run puttygen.exe; in the top menu select the File tab and click on Load private keyand select your private key file (make sure All files (*.*) filter is used so you can see your downloaded private key file):

You will be asked for the passphrase you specified during the key generation in step 2.1. After entering it you should receive a successful import message:

In case you do not wish to set a passphrase for the key, you can empty the Key passphrase and Confirm passphrase fields.
Now click on Save private key and save your key as a .ppk file which will be needed later:

4.3. Run the PuTTy client (putty.exe), select Connection > SSH > Auth and in the Authentication parameterssection, click on Browse to select the saved .ppk file:

Once done, get back to the Session section and input the server name (IP address) and specify SSH port (it should be 21098 for all shared servers accounts) and click Open:

In the console window, you will be asked for the login and passphrase:

That’s it!

What is SSH?

What is SSH?

What is SSH?

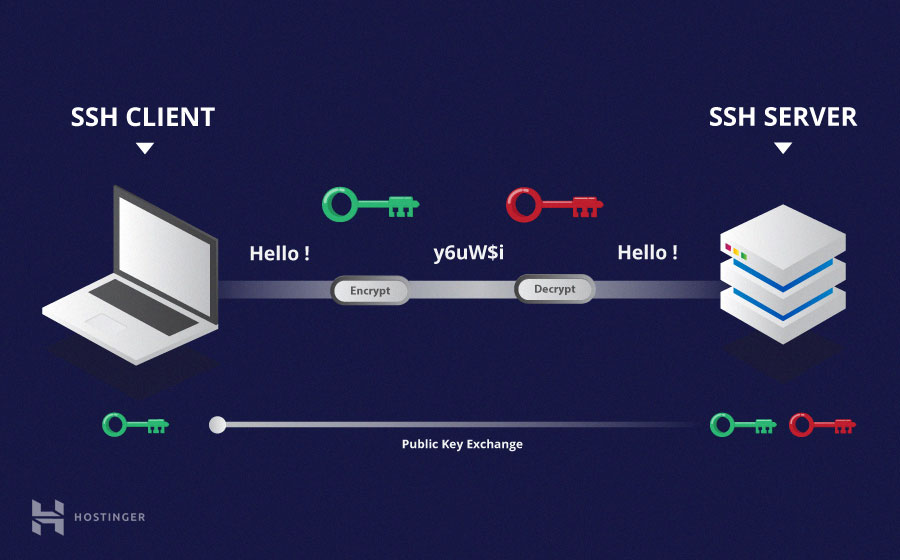
Secure Shell or SSH is a network protocol that allows data to be exchanged using a secure channel between two networked devices. The two major versions of the protocol are SSH-1 and SSH-2.

Shell is a program to log into another computer over a network to execute commands on a remote machine and to move files from one machine to another. It provides strong authentication and secure communications over insecure channels.

SSH was designed as a replacement for Telnet and other insecure remote shells (rlogin, rsh, rcp, and rdist), which send information, notably passwords, in plain text, rendering them susceptible to packet analysis. The encryption used by SSH is intended to provide confidentiality and integrity of data over an unsecured network, such as the Internet.

Reseller Hosting – Getting Started

Reseller Hosting – Getting Started

In this article you will find all the basic information on where to start from with our Reseller Hosting Service.
The following items are to be explained here:

1. Package Information

  • Welcome Guide Email
  • Email with Addons

2. Preparing the Domain Name

  • How to manage Personal Nameservers

3. Preparing the Reseller Account. Description of WHM main functions

  • How to use Feature Manager in WHM
  • How to create a new package in WHM
  • How to create a new cPanel Account in WHM
  • How to change a password/contact email address for a cPanel account in WHM
  • How to change a package for a particular cPanel account in WHM
  • How to edit Resource Limits in WHM
  • How to edit DNS Zone of a particular Domain Name in WHM

4. WHMCS Billing Platform

  • How to install WHMCS
  • Namecheap Domain Registration module in WHMCS

* Module Configuration
* General Settings
* Domain Sync Mode
* Debug Mode

  • Namecheap SSL Certificates module in WHMCS


PACKAGE INFORMATION

Welcome Guide Email

Once your Reseller Hosting account is activated, you will receive a Welcome Guide Email containing the information about your hosting package, including WHM/cPanel access details, Addons, FTP details and other important references.

You can check an example of such an email right here.

Email with Addons

If you choose some additional services for your hosting account, or in case some of them are included into the package already like SSL Certificate or Private Nameservers, you will receive an additional email message containing the detailed information about them, for example IP addresses for Private Nameservers, etc.

You can also take a look at an example of such email message here.

NOTE
: A number of Addons may vary depending on the type of the Reseller package you choose. You can check available Reseller Hosting packages here. To view full technical specification of the package, click on the Tech Specs tab at the bottom of the page.

PREPARING the DOMAIN NAME

Once the hosting account is active, you will need to point the domain name to our nameservers or Personal Nameservers if such are included into the package. You will find nameservers in the Welcome Guide email after the package activation.

How to Manage Personal Nameservers

If you have Personal Nameservers included into your hosting package, you will need to register and set them on the side of your Domain Name Registrar.

In case the domain name is registered with Namecheap, use this tutorial to create Personal Nameservers.

NOTE: IP Addresses for Personal Nameservers are also provided in the Welcome Guide Email.

Once registered, you can set them for your Namecheap domain following the guide here.

PREPARING THE RESELLER ACCOUNT. DESCRIPTION OF MAIN WHM FUNCTIONS

Once you receive the Welcome Guide email and get access to WHM, you can start learning WHM basics and get a few things done. Find the description of main WHM functions below.

How to use Feature Manager in WHM

Feature Manager is an interface that allows creating a list of features that will be available for particular cPanel accounts.

In order to create a specific Feature List, do the following:

1. In WHM navigate to the Feature Manager menu in the section Packages
2. Type in the name of the list you wish to create next to the Feature List Name field and click on the AddFeature List button:

3. Once done, choose the newly created list from the drop-down menu next to the Edit a Feature List field and click on the Edit button:

4. You will be forwarded to the list of features available on our server. Simply pick up the required ones and click on Save at the bottom of the page.

How to create new packages in WHM

hosting package is simply a set of functions, limitations and resources each cPanel account may have within a Reseller Hosting Account. Basically, having different packages with a different set of functions and limitations allows providing a range of hosting accounts based on particular features.

NOTE: It is recommended to configure a hosting package prior to creating a new cPanel account in WHM to simplify further cPanel accounts management process.

To create a new package in WHM, you will need to do the following:

1. Log into WHM using http://domain.com/whm or https://hostname_server/whm.
2. Navigate to the Add a Package menu in the section Packages.
3. Set appropriate quotas in the Resources section.
4. Choose required settings for the package in Settings, including Feature List.
5. Click on the Add button:

How to create new cPanel Accounts in WHM

In order to create a fresh cPanel account in WHM you need to do the following:

1. In WHM navigate to the Create a New Account menu in Account Functions
2. Fill in the gaps and choose appropriate settings in the following sections:

  • Domain Information
  • Package Settings
  • DNS Settings
  • Mail Routing Settings

3. Click on the Create button:

For a more detailed and illustrative explanation, feel free to refer to our video tutorial here.

How to reset a password/contact email address for a cPanel account in WHM

If you need to change a password or a contact email address for a particular cPanel account, you can do this in the following way:

1. Navigate to the List Accounts menu
2. Click on ‘+’ next to the cPanel account you need to change the information for
3. Change the password or email account in corresponding fields and confirm by clicking on Change:

How to change a package for a particular cPanel account in WHM

In order to change a package for a cPanel account you will need to do the following:

1. Navigate to the Upgrade/Downgrade an Account menu
2. Choose the account you wish to upgrade/downgrade in Account Selection and click on the Modifybutton:

3. In the next windows you will need to choose the required package from the Available Packages list and click on the Upgrade/Downgrade button:

Feel free to use our video tutorial for a more illustrative example here.

How to edit Resource Limits in WHM

Resource Limits is a WHM function that allows allocating available system resources to cPanel users. It may be useful in order to prevent some accounts from overusing server resources.

Apart from resource limits stipulated by a package, it is possible to adjust the limits for a cPanel account particularly. This can be done in the following way:

1. In WHM navigate to the Modify an Account menu
2. Choose the account you wish to adjust the limits for in the Account Selection field and click on the Modify button
3. You will be forwarded to thte account modification window, and specific resources can be adjusted in the Resource Limits section accordingly.

How to edit DNS Zone of a particular Domain Name in WHM

A DNS Zone is an administrative portion of DNS settings that belongs to a domain name.
In other words, every domain name has certain DNS settings and in order to keep them all together, a DNS Zone file was designed. A DNS Zone can be easily edited via WHM >> Edit DNS Zone menu.

To edit DNS Zone, follow the steps below:

1. In WHM navigate to the Edit DNS Zone menu on the left-side bar.
2. Choose the account you wish to adjust the settings for in the Choose a Zone to Edit list and click on the Edit button:

3. You will be forwarded to the DNS settings modification window where different DNS records types including A, CNAME, TXT, SOA, NS, MX etc. can be adjusted accordingly.

More details on this tool can be found here.

WHMCS BILLING PLATFORM

WHMCS is an all-in-one client management, billing and support system with set-valued features designed specifically for online businesses. Before the installation and configuration process, you can check out the WHMCS demo here.

How to install WHMCS 

We highly recommend using the Softaculous script-installer as it is the easiest and the most convenient way to install the WHMCS Billing platform in a few clicks. Furthermore, Softaculous is included into a Reseller Hosting Account by default and is integrated into cPanel.

Feel free to check our video tutorial that explains how to install WHMCS using the  Softaculous script installer here.

Namecheap Domain Registration module in WHMCS

Namecheap.com WHMCS Registrar module is an open-source plugin provided free of charge. It was specifically designed with the purpose of integrating Namecheap as a Domain Registrar into the WHMCS platform.

NOTE: You can alternatively use the built-in Namecheap Registrar module in WHMCS. However, we highly recommend using our own module due to constant updates, implementation of new features and advanced functionality.

You can download the plugin right here and install it following the instructions provided on the same page.

Module Configuration

To access module configuration settings, follow the steps below:

1. Log into WHMCS Admin panel
2. Navigate to Setup >> Products/Services >> Domain Registrars menu:

3. In the list of Domain Registrars available, find Namecheap and click on the Configure button. You need to indicate the following information there:

  • Username: your Namecheap username
  • Password: Namecheap API key. To get it, you need to log into Namecheap Account, mouse over your Namecheap username >> Manage Profile >> API Access menu
  • PromotionCode: here you can use Domain Registration Promo Code. Available promo codes can be checked here

NOTE: In order to have API enabled for your account, you should meet one of the following requirements:

  • have at least 20 domains under your account
  • have at least $50 on your account balance
  • have at least $50 spent within last 2 years

Still, you are free to test our API through the Sandbox environment at www.sandbox.namecheap.com

It is also possible to run WHMCS in a test mode. This is useful to test how the configured system will work prior to making it available for public. For this, you may register a Sandbox account and get corresponding access details here.

  • SandboxUsername: your Sandbox Username
  • SandboxPassword: Sandbox API key. Sandbox API Key can be retrieved in the same way as the Namecheap API key right here
  • TestMode: By choosing this option, all the APIs will be forwarded to the Sandbox environment using the corresponding Sandbox Credentials
  • DebugMode: This option allows identifying and investigating issues with remote API systems. It will make a record of all the API calls sent to the Registrar and all the responses sent back

General Settings

General Settings of the module are available in WHMCS Admin panel >> Setup >> General Settings menu >> Domains tab:

Here you can adjust different Domain-related settings to make the domain registration process even more comfortable for your customers:

  • Enable Renewal Orders – this option allows domain renewals from the WHMCS client’s area
  • Auto Renew on Payment – with these settings enabled, the system will automatically renew domain names in WHMCS after the payment is processed
  • Auto Renew Requires Product – only free domains with the corresponding active service (hosting account, email subscription, etc.) will be auto-renewed
  • Default Auto Renewal Setting – this option will auto-generate invoices for expiring domain names. This also can be adjusted for every domain name particularly in Clients >> Domain Registrations >> choose the domain name >> select Disable Auto Renew setting
  • Domain Sync Enabled – enables automated synchronization with the Domain Registrar
  • Domain Sync Notify Only – the synchronization with the Domain Registrar will not be performed automatically; email notifications will be sent to Admin instead
  • Allow IDN Domains – this setting will disable A-Z; 0-9 cross-check character validation for domain names entered via the WHMCS client area
  • Bulk Check TLDs – this option includes TLDs that you want to check in addition to the TLD the client selects during the order
  • Use Clients Details – this setting allows specifying the details/information that will be publicly displayed during WHOIS lookup for the domains registered through WHMCS

More information on additional options can be found here.

Domain Sync Mode

Domain Sync Mode allows setting up synchronization between WHMCS module and Domain Name Registrar to keep all the domain-related information up-to-date. This includes any domain name status changes, renewals, expiration dates, etc.

To enable this feature, simply navigate to Setup >> General Settings >> Domains and check the Domain Sync Enabled option:

Once this is done, you will need to set up a Cron Job which will be responsible for synchronization in a Reseller’s cPanel account. To do this, simply follow the steps below:

for cPanel paper_lantern theme
for cPanel x3 theme

for cPanel paper_lantern theme:

1. Log into the Reseller’s cPanel account: http://domain.com/cpanel or https://hostname_server/cpanel.

2. Click on the Cron Jobs menu under the Advanced section:

3. In the Common Settings section choose the Once a week option and insert the following string into the Command field:

/usr/bin/php /home/cpanel_username/public_html/path_to_WHMCS/crons/domainsync.php

NOTE: Make sure that you replace the ‘cpanel_username’ part with your actual cPanel username provided in the Welcome Guide email and ‘path_to_WHMCS’ with the actual path to your WHMCS installation.

The sync mode is configured now and all the domain-related information will be synchronized with the WHMCS system.

for cPanel x3 theme:

1. Log into the Reseller’s cPanel account: http://domain.com/cpanel or https://hostname_server/cpanel.
2. Click on the Cron Jobs menu under the Advanced section:

3. In the Common Settings section choose the Once a week option and insert the following string into the Command field:

/usr/bin/php /home/cpanel_username/public_html/path_to_WHMCS/crons/domainsync.php 

NOTE: Make sure that you replace the ‘cpanel_username’ part with your actual cPanel username provided in the Welcome Guide email and ‘path_to_WHMCS’ with the actual path to your WHMCS installation.

The sync mode is configured now and all the domain-related information will be synchronized with the WHMCS system.

Debug Mode

The Debug Mode feature allows identifying and investigating any issues with API systems, recording and displaying output results of all the API calls sent to the Registrar and all the responses received back.

NOTE: It is highly recommended to enable Debug Mode only in case of any issues with Module behavior. Make sure that you have not enabled it permanently as it will result in massive log archives on the server side which will take a good part of disk space.

To enable Debug Mode, go to Setup >> Products/Services >> Domain Registrars:

Next to Namecheap, click on the Configure button and select the DebugMode option there. Then click on Save Changes to confirm:

In order to enable/disable debug logging and view the logs, you will need to open Utilities >> Logs >> Module Log menu:

You will find the Enable/Disable Debug Logging and Reset Debug Module Log buttons there:

All the API calls will be listed in the Request field and all the responses from the remote system can be found in the Response field correspondingly.

Namecheap SSL Certificates module in WHMCS

Namecheap.com WHMCS SLL Certificates plugin is an open-source plugin that is provided free of charge. The module is fully integrated with Namecheap, and it completely interacts with our API, which allows automating and managing SSL sales with Namecheap in full.

We have a corresponding KnowledgeBase category dedicated to the module’s general information and configuration settings here. To have a quick access to any required section, use the navigation list below:

1. Before you begin
2. Sandbox and Production environments
3. Download and installation
4. Setting up products and pricing
5. Order process and welcome emails in WHMCS
6. SSL activation from WHMCS
7. Reissue, renewal and synchronization
8. Debugging and addon functions
9. Multi-domain certificates
10. FAQs

What is the difference between shared hosting and VPS?

What is the difference between shared hosting and VPS?

What is the difference between shared hosting and VPS?
It is the same difference as between a dedicated server and usual shared hosting.

With a VPS, you receive all the power of dedicated hosting with the ability to have your own set of services and customizable disk space. With shared hosting, you have limited administrative access and can’t customize software configurations, while with a VPS you can perform any actions from your control panel and don’t need to contact technical support with every single request.

Why should I choose VPS hosting?

Why should I choose VPS hosting?Why should I choose VPS hosting?

Virtual Private Server is the right choice for developers, webmasters, resellers and simply for those who run resource-intensive websites. We use KVM and VMware technologies for virtualization, that is why each VPS performs and executes exactly like an independent physical machine and therefore offers security and flexibility for your sites, independence from neighbors, full control over your hosting environment and power of a dedicated server at an affordable price. KVM delivers 133% increase in disk speed performance comparing to XEN technology. Both KVM and VMware VPSs has got their own customers, and we respect all those customers.


What is a VPS?

What is a VPS?

What is a VPS?

With a VPS, you open a world of possibilities that would not be possible on shared hosting because of restrictions.

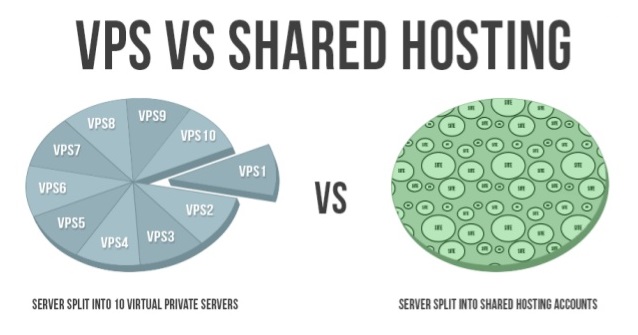
VPS stands for Virtual Private Server. This refers to the partitioning of a physical server into multiple servers. In effect, each one acts just like a dedicated server, you get all the features of a dedicated server but at a lower price. Each VPS has its own operating system, and each can be rebooted separately. These operating systems each receive a specific share of the resources of the physical server, no more and no less, they are isolated from each other so that one cannot interfere with another. If one VPS experiences problems or tries to use too much memory or CPU resources, it has no effect on the others.

There are many advantages to selecting a VPS, it costs less than a fully dedicated server and provides a great deal of freedom and flexibility over the limitations and restrictions of shared hosting. You are limited only by the capabilities of the VPS, so select one powerful enough to meet your needs. You can always upgrade later if you decide it becomes necessary.

As for virtualization technologies we offer KVM VPS servers.

Since you are supposed to manage your VPS yourself, we recommend you have a good understanding of Linux commands and are familiar with the WHM/cPanel control panel. You can get a VPS without WHM/cPanel, but in this case, you would need to have very advanced knowledge of Linux.

If you don’t feel you have the technical expertise necessary to manage your own VPS, there is no need to let that stop you – you can select full management for an additional fee.

You won’t have root access, and it will act much like a shared hosting plan, but you will still make the decisions.

cPanel is required if you choose full management for a VPS.

How to reset WordPress admin password

How to reset WordPress admin password

There are three ways to reset a lost WordPress dashboard password:

Using the Lost Password option
Using Softaculous Apps installer
In the database

Using the Lost Password option

1. Open your WordPress administrative login page – it is usually located in http://yourdomain.com/wp-admin.

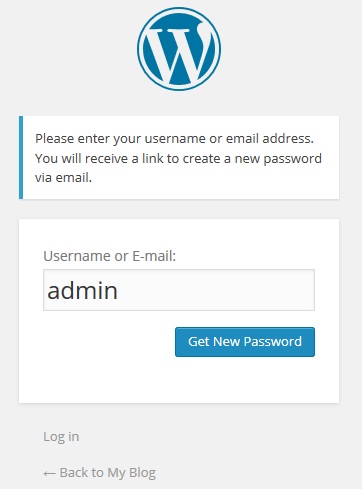
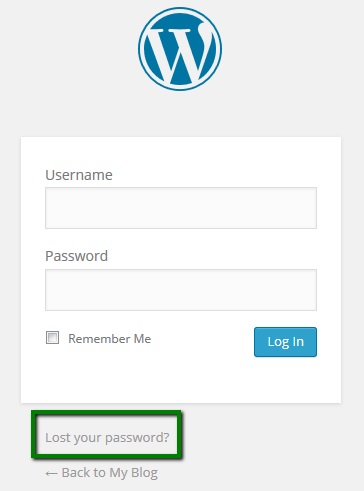
2. Click on the Lost your password? option, fill out the username or email address > Get New Password:
How to reset WordPress admin password

How to reset WordPress admin password

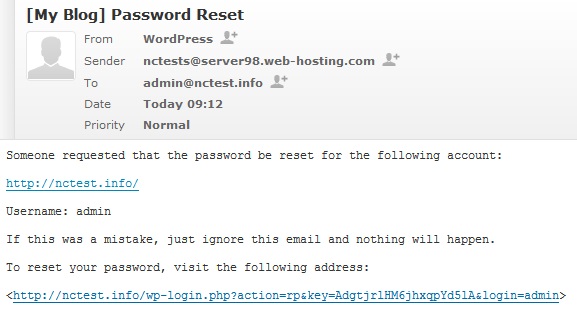
3. Log into your email account, which is set as your administrative WordPress contact. You can find the email message with the password reset URL there, click on it:
How to reset WordPress admin password

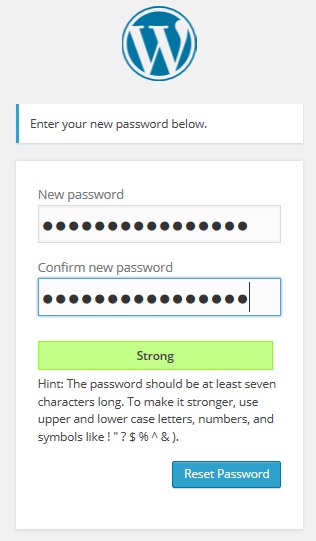
4. Enter your new strong password twice on the opened page > Reset password:
How to reset WordPress admin password

Using Softaculous Apps installer

In order to change the password for your WordPress admin user, follow next steps:

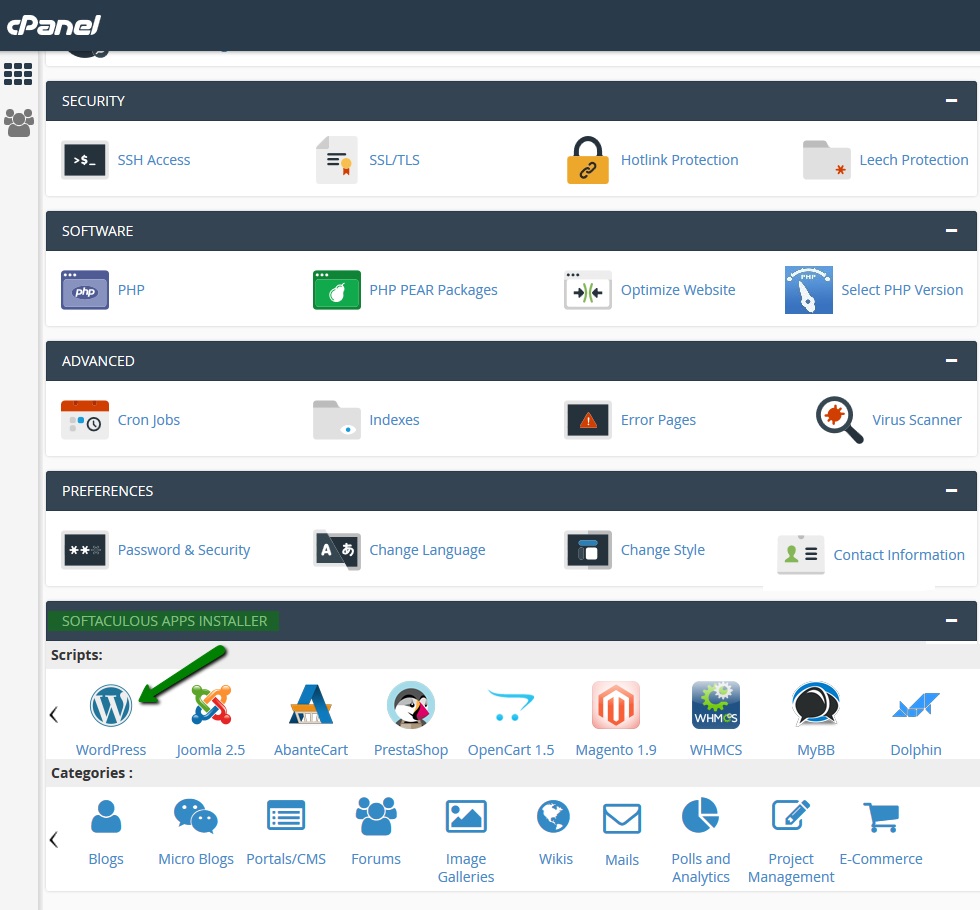
1. Log into cPanel and navigate to Softaculous Apps Installer menu:

How to reset WordPress admin password

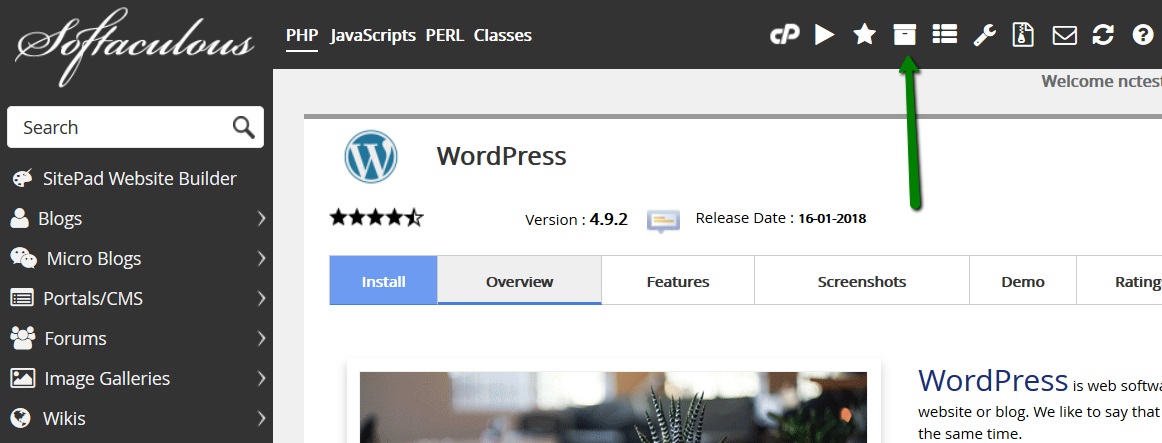
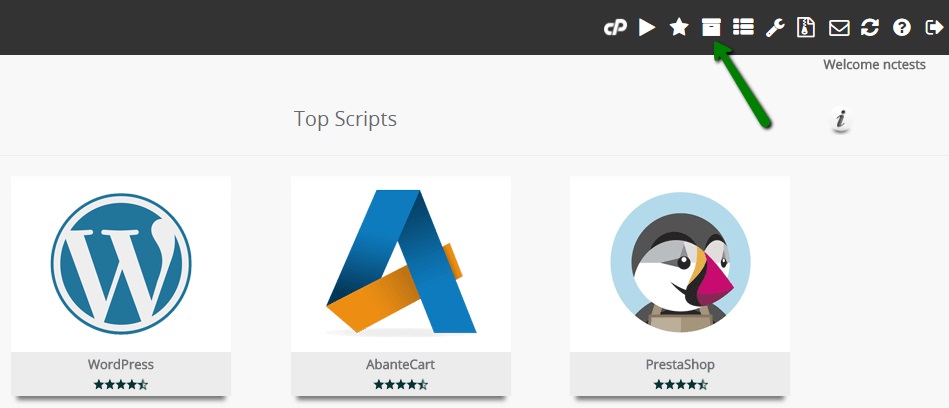
2. In the Softaculous interface find All Installations icon in the top right corner:
How to reset WordPress admin password

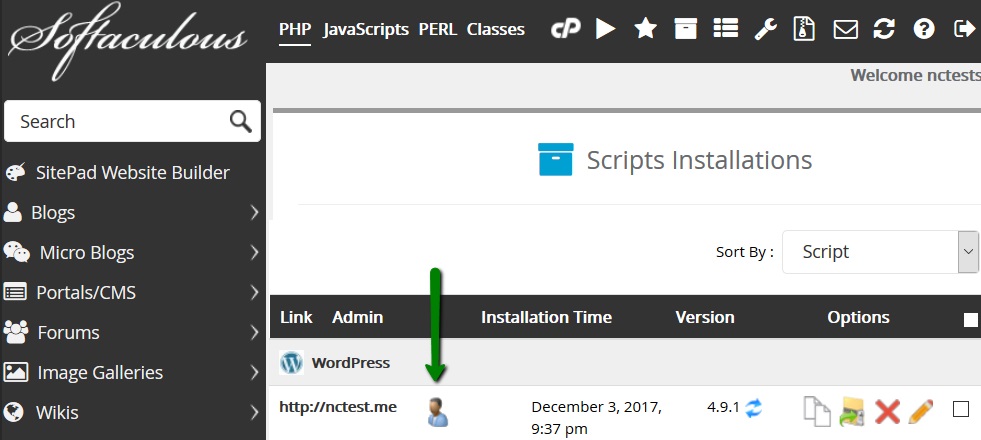
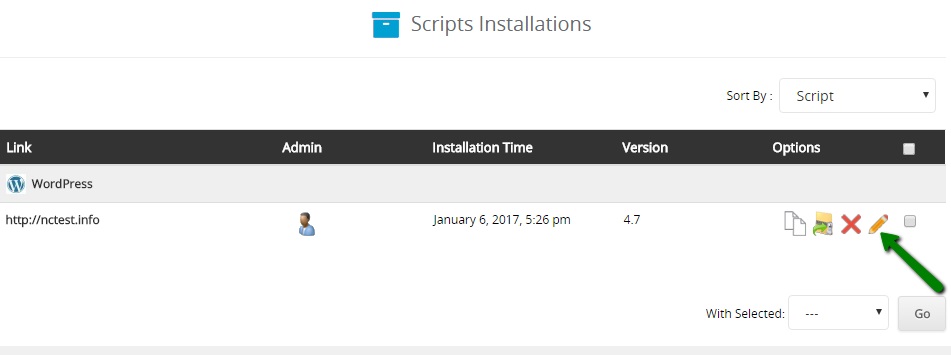
3. In this menu you will see Scripts Installations list. Select the one you need to change the admin password for and click on Edit Details (pencil icon) next to it:
How to reset WordPress admin password

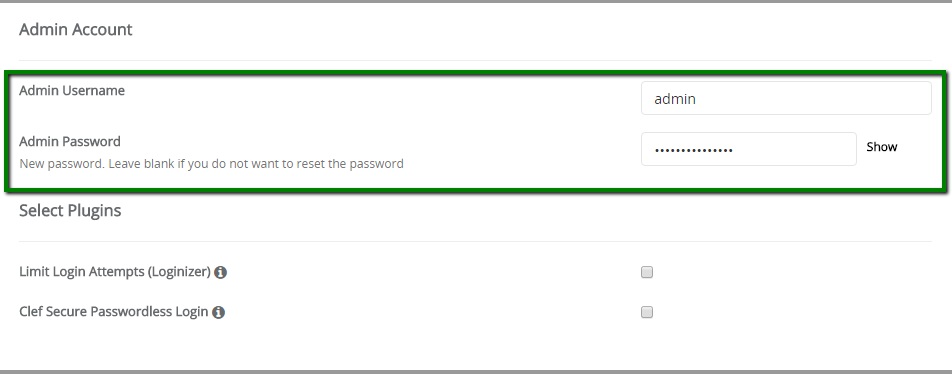
4. Next you will see installation details page. Scroll down to Admin Account section. Here you need to enter your current username and the new password in Admin Password field:
How to reset WordPress admin password

5. Once done, scroll down to the bottom of the page and hit Save installation details button:

How to reset WordPress admin password

6. After that you will receive the message about the successful update:

How to reset WordPress admin password

Feel free to log in to WordPress admin panel using the new password.

Reset the password via the database

If Lost your password? confirmation emails do not arrive, or if you have no access to the email account linked to your administrative dashboard, you can reset your password via MySQL database:

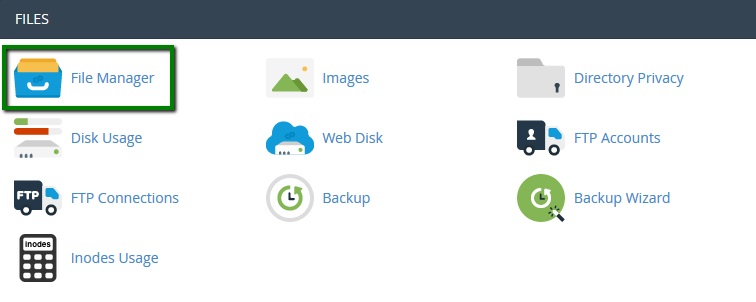
1. Log into your cPanel > section Files File manager and navigate to the document root of your WordPress website:
How to reset WordPress admin password

2. To check what database is used for your WordPress website, open the wp-config.php file located in:

How to reset WordPress admin password

3. Go to cPanel > Databases section > phpMyAdmin:

How to reset WordPress admin password

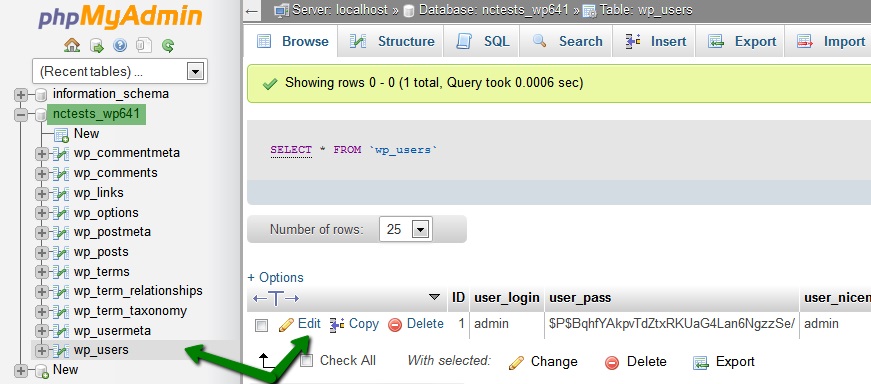
4. Select the database in question, table wp-users and click on Edit next to the admin user:
How to reset WordPress admin password

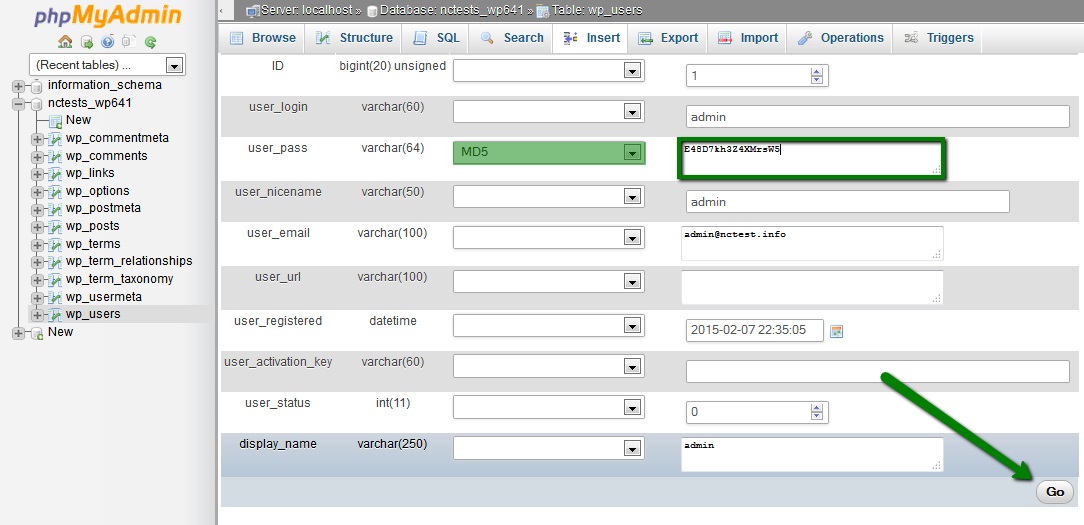
5. On the next page, type in your new strong password into the user_pass box, select MD5 in the Function column and click Go:
How to reset WordPress admin password

You can now go back to the WordPress dashboard page and try to log in with the new password.
 

How to move WordPress from a subfolder

How to move WordPress from a subfolder

This article will take you through the process of moving your WordPress website from the subfolderyourdomain.com/wp to the domain root – yourdomain.com:


NOTE: Before proceeding with any changes, make sure that you generate a full backup of your website. If you’ve created your site using Softaculous script installer, feel free to refer to this guide as well (step #4 – Backup software).

for cPanel paper_lantern theme:
Re-installation
Redirection
File migration and Database update


Re-installation

If you just installed your website and have done no or little development, WordPress re-installation will be the easiest way out.

You just need to go back to cPanel > Exclusive for Namecheap Customers section > Softaculous Apps Installer menu:

How to move WordPress from a subfolder
Create a new one, make sure the In Directory field is empty and proceed with the installation:

How to move WordPress from a subfolder

Do not forget to uninstall /subfolder website by hitting the red cross in All Installations menu:

How to move WordPress from a subfolder


Redirection

If the website is pretty much done and re-installation is not acceptable, you can set up a hidden redirect – the installation will remain in the subfolder, but your website homepage will be yourdomain.com.

Take into account that this redirect will make /subfolder disappear only on the homepage, links will still have it – e.g., yourdomain.com/subfolder/contactus.

If it sounds alright to you, add the following redirect to .htaccess file in the domain web root (replacing yourdomain.com with your actual domain name and subfolder with your subfolder):

RewriteEngine On
RewriteCond %{HTTP_HOST} ^(www\.)?yourdomain.com$
RewriteCond %{REQUEST_URI} !(/|\.[^/]*)$
RewriteRule (.*) http://www.yourdomain.com/$1/ [L,R=301]
RewriteCond %{HTTP_HOST} ^(www\.)?yourdomain.com$
RewriteCond %{REQUEST_URI} !^/subfolder/
RewriteRule ^(.*)$ /subfolder/$1 

1. Navigate to Files section > File Manager:

How to move WordPress from a subfolder

2. Move to the root folder for your WordPress installation – public_html in case it is the main domain for your account.

Once there, make sure that Show Hidden files (dotfiles) option is enabled in Settings menu:

How to move WordPress from a subfolder

3. Locate .htaccess file, right-click > Edit:

How to move WordPress from a subfolder

4. If there is no .htaccess file located in your File manager, feel free to create a new one using File option:

How to move WordPress from a subfolder

You are ready to add the redirect rule and save it.

File migration and Database update

If the option above does not work for you, and you would like to make sure there is no /subfolder on your website, you can go this way.

NOTE: We highly recommend to back up website files and the database before proceeding.

1. File migration

Go to your website folder using FTP or File Manager:

How to move WordPress from a subfolder

How to move WordPress from a subfolder

Select All files > Move them to the domain document root (in our example, from public_html/wp_subfolderto public_html):

How to move WordPress from a subfolder

Once done, go back to the domain document root to make sure all files have been moved:

How to move WordPress from a subfolder

2. Database update

You can update old URL references with the new ones in the database either using search and replace scripts or using text editors. Below we provide the guidelines using the latter:

1. To begin with, you will need to locate the database associated with your website. Right-click on the file > View or Edit option:

How to move WordPress from a subfolder

You will see the database name in this line:

How to move WordPress from a subfolder

3. The next steps is to download the backup of the database. It can be done in your cPanel > Files section > Backup menu:

How to move WordPress from a subfolder

4. Unzip the downloaded file. Now you can open .sql file with some text editor and update all the URL references.

Hit Ctrl + F and select Replace option. Fill out the corresponding fields, Find – your old domain, Replace – your new domain) and hit Replace All:

How to move WordPress from a subfolder

5. Once done, you should get the output like this:

How to move WordPress from a subfolder

Make sure that you save the changes.

6. Now you can upload the updated database to your cPanel account. To be on the safe side, we suggest creating a new database (instead of dropping the existing one) and connect it to your WordPress side.

To do so, move to Databases section > MySQL Databases menu:

How to move WordPress from a subfolder

7. Follow the steps below to create a new database and user for it:

How to move WordPress from a subfolder

Keep these details, you will need to use them a bit later.

8. After that you can upload the database using phpMyAdmin menu in Databases section:

How to move WordPress from a subfolder

9. Select the newly created database from the list on the left and use switch to Import tab. There you will need to use Browse option to pick up the database .sql file from your local device:

How to move WordPress from a subfolder

NOTE: If your database is more than 50Mb, import the database following the steps in this guide.

10. Once done, you will need to update wp-config.php file in your installation root folder:

How to move WordPress from a subfolder

The fields to be changed are:

define ‘DB_NAME’ line – the name of the new database you’ve created in MySQL Databases menu.
define ‘DB_USER’ line – the name of the new user you you’ve created in MySQL Databases menu.
define ‘DB_PASSWORD’ line – the new password you’ve set for database user in MySQL Databases menu.

How to move WordPress from a subfolder

Save the changes and feel free to check your website.

If everything is working fine, you may delete the old database you used for the website.

11. It is also advised to re-generate the permalinks to make sure they have the new URL. You can do it in your WordPress dashboard in Settings menu > Permalinks.

So if you had Post name, you need to switch it to Plain, for instance, save the changes and then revert everything back:

How to move WordPress from a subfolder


for cPanel x3 theme:

Re-installation
Redirection
File migration and Database update

Re-installation

If you just installed your website and have done no or little development, WordPress re-installation will be the easiest way out.

You just need to go back to cPanel > Software/Services section > Softaculous > WordPress, make sure the In Directory field is empty and proceed with the installation.

Do not forget to uninstall the /wp website in Softaculous once done:

How to move WordPress from a subfolder


Redirection

If the website is pretty much done and re-installation is not acceptable, you can set up a hidden redirect – the installation will remain in the /wp subfolder, but your website homepage will be yourdomain.com.

Take into account that this redirect will make /wp disappear only on the homepage, links will still have it – e.g., yourdomain.com/wp/contactus.

If it sounds alright to you, add the following redirect to the .htaccess file in the domain web root (replacing yourdomain.com with your actual domain name and wp with your subfolder)

RewriteEngine On
RewriteCond %{HTTP_HOST} ^(www\.)?yourdomain.com$
RewriteCond %{REQUEST_URI} !(/|\.[^/]*)$
RewriteRule (.*) http://www.yourdomain.com/$1/ [L,R=301]
RewriteCond %{HTTP_HOST} ^(www\.)?yourdomain.com$
RewriteCond %{REQUEST_URI} !^/wp/
RewriteRule ^(.*)$ /wp/$1 

File migration and Database update

If the variants above do not work for you, and you would like to make sure there is no /wp on your website, you can go with this option.

We highly recommend to back up website files and the database before proceeding.

1. File migration

Go to your website folder using FTP or File Manager:

How to move WordPress from a subfolder

Select All files > Move them to the domain document root (in our example, from public_html/wp to public_html):

How to move WordPress from a subfolder
Once done, go back to the domain document root to make sure all files have been moved:

How to move WordPress from a subfolder
2. Database update

You can update old URL references with the new ones in the database either using search and replace scripts or using text editors.

Below we provide the guidelines using the latter.

  • Check what database is used for your WordPress website. You can check it in the wp-config.php file located in the WordPress installation folder:

How to move WordPress from a subfolder

  • Go to cPanel > Databases section > phpMyAdmin.


  • Select the database in question and click on Export > Go:

How to move WordPress from a subfolder

  • The database will be downloaded to your computer. Now you need to open it and update all yourdomain.com/wp references with yourdomain.com.Once opened, click Ctrl+F and choose the tab Replace. Fill out the fields below correspondingly > Replace All:

How to move WordPress from a subfolder

  • Once done, the prompt below will display the result:

How to move WordPress from a subfolder

  • Save the updated database and exit the application.
  • Now go back to cPanel > Databases section > phpMyAdmin and select your database.
  • Check all tables using the option below and select Drop from the drop-down menu:

How to move WordPress from a subfolder

  • On the next page, confirm the actions by clicking Yes:

How to move WordPress from a subfolder

  • Once the old tables are dropped, go back and select the database > Import:

How to move WordPress from a subfolder

  • Choose the updated database from your computer files to upload > Go:

How to move WordPress from a subfolder

  • You will see a green status bar – this will indicate that the database has been successfully imported. On your right, a database tables tree will appear:

How to move WordPress from a subfolder
Go back to your website and refresh the page to check the results:

How to move WordPress from a subfolder