Monthly Archive November 19, 2020

ByJUJU-dev

How to use File Manager in cPanel

cPanel’s File Manager is a powerful tool that allows you to manage your website’s files and directories from within your cPanel account. Here’s a step-by-step guide on how to use the File Manager:

Accessing the File Manager

  1. Log in to your cPanel account.
  2. In the main menu, click on the “Files” icon.
  3. Click on the “File Manager” button.

Navigating the File Manager

  1. The File Manager displays a directory tree view of your website’s file system. You can navigate through the directories and subdirectories by clicking on the folders.
  2. You can also use the breadcrumb trail at the top of the page to navigate back to previous directories.

Basic Operations

  1. Upload Files: Click on the “Upload” button to upload files from your local computer to your website.
    • You can upload multiple files at once by selecting them in the file explorer and dragging them into the File Manager window.
    • Alternatively, you can use the “Upload Files” button and select the files you want to upload from your computer.
  2. Download Files: Select one or more files by checking the boxes next to them, then click on the “Download” button to download them to your local computer.
  3. Create New Folder: Click on the “Create New Folder” button to create a new directory in your website’s file system.
  4. Rename Files/Folders: Select a file or folder, right-click (or Ctrl+Click) on it, and choose “Rename” to rename it.
  5. Delete Files/Folders: Select a file or folder, right-click (or Ctrl+Click) on it, and choose “Delete” to delete it.

Advanced Operations

  1. Copy/Paste Files/Folders: Select a file or folder, right-click (or Ctrl+Click) on it, and choose “Copy” or “Cut” to copy or move it.
  2. Move Files/Folders: Select a file or folder, right-click (or Ctrl+Click) on it, and choose “Move To” to move it to a different location.
  3. Search: Click on the “Search” button to search for files and folders by name, extension, or contents.
  4. Chmod: Change file permissions by clicking on the “Chmod” button and selecting the desired permissions.
  5. View/Edit File: Double-click on a file to view or edit its contents using a text editor.

Tips and Tricks

  • You can use the “Quick File Upload” feature by clicking on the “Upload” button and dragging files into the window.
  • Use the “Path” field at the top of the page to quickly jump to a specific directory.
  • You can sort files and folders by name, date modified, size, or extension using the dropdown menu at the top of the page.

By following these steps and tips, you’ll be able to effectively manage your website’s files and directories using cPanel’s File Manager.

ByJUJU-dev

How to set up rules and redirects in .htaccess

How to set up rules and redirects in .htaccess

.htaccess is a directory-level configuration file supported by the Apache web server. It is used to alter web server configuration (enable or disable additional features) for the specific account without changing global server settings.

The .htaccess file takes effect over the entire directory it is placed in, including all files and subdirectories. The changes made in this file will be implemented immediately and no server restart is required.

How to locate .htaccess file
List of commonly used .htaccess rules:

Disabling existing .htaccess rules

To access the main .htaccess file of your hosting account, follow the steps below:

1. Log into your cPanel.
2. Navigate to the section Files >> File Manager:
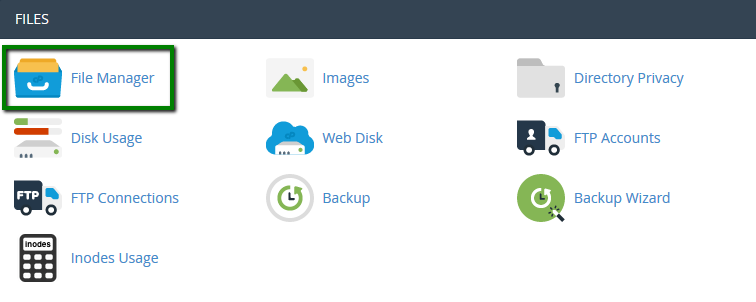
3. If you wish to edit .htaccess file for your main domain, navigate to public_html folder. If you need to make some changes to the addon domain, move to public_html/youraddondomain.com folder.

Once there, make sure that Show Hidden files (dotfiles) option is enabled in Settings menu:
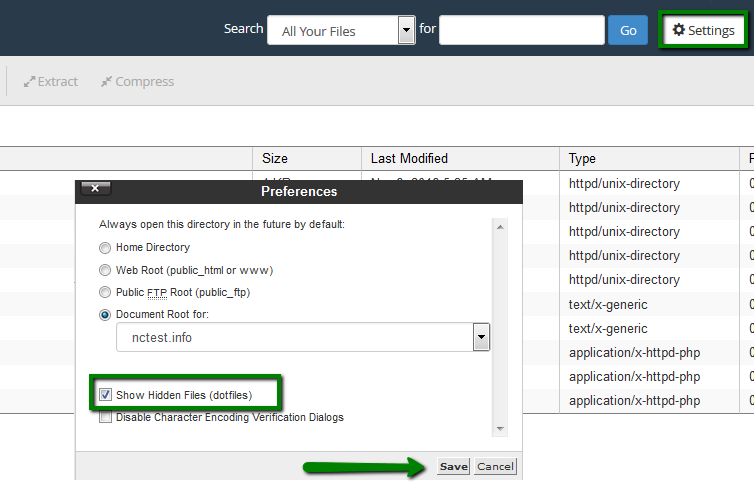
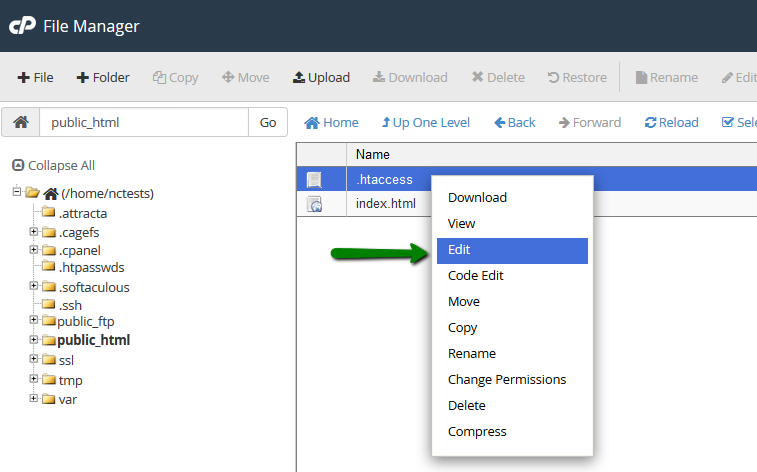
4. Locate .htaccess file, right-click >> Edit:
5. If there is no .htaccess file located in your File manager, feel free to create a new one using File option:
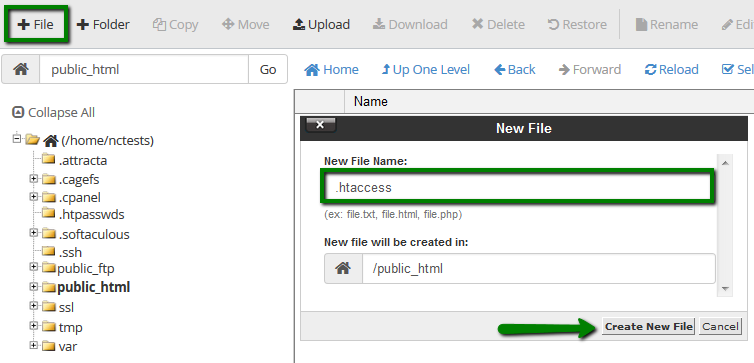
You are ready to add your own configuration rules and save them.

The common usage rules of an .htaccess file are listed below:

Authorization/authentication – specifies security restrictions for a directory/subdirectory.
You can password-protect a directory, or several of them, and any time a visitor tries to access it, username and password will be required.

To set up such protection, you need to:

1. Create the directory you want to protect in /home/cpanel_user/.htpasswds/ folder (e.g., for public_html/test the path will be .htpasswds/public_html/test/).

2. Create a passwd file in this directory and add hashed access details using this online generator.

3. Add the following directives to .htaccess:

AuthType Basic
AuthName "Directory Name"
AuthUserFile "/home/cpanel_user/.htpasswds/public_html/test/passwd"
require valid-user

Blocking – blocks users by IP address or domain. It is very useful to block unwanted visitors or to allow accessing certain sections of the website by its owner, administration area, for example.
To set up certain blocking rules, create an .htaccess file with the following text:

  • to allow access to everybody else and block users with an X.X.X.X IP address
<RequireAll>
Require all granted
Require not ip X.X.X.X
</RequireAll>


  • to block all the visitors except for the specific X.X.X.X and Y.Y.Y.Y IPs
<RequireAll>
Require ip X.X.X.X Y.Y.Y.Y
</RequireAll>


NOTE: Do not mix the deprecated AllowDeny, and Order directives with the new Require directive.
 
Custom Error Pages – allows creating custom error pages for a site. This option is very useful as it allows you to show website visitors an error message matching your website theme if a URL on your website does not work. This helps to avoid the default ‘404 File Not Found’ error for example and allows you to display a customly designed error with the guiding directions back into your website content, rather than leaving puzzled.

To set up a custom error document, create an .htaccess file with the following text below:

ErrorDocument 404 /404.html

Whenever a 404 (File Not Found) error appears, this line tells the Apache Web server to load an 404.html file located in the directory root of the domain you set the error page for.

NOTE: To set up a document for other errors (403, 500, etc.), just replace 404 with the corresponding error code and /404.html with the path to the error file.

Mod_Rewrite – specifies how web pages and URLs are displayed to the visitors.

We would like to draw your attention to the usage of Mod_Rewrite rules in .htaccess file.

By default, Mod_Rewrite maps a URL to a filesystem path. However, it can also be used to redirect one URL to another URL.

Before creating a redirect, you should choose the redirection type which would be more preferable for you:

  • Permanent redirect has a status code of 301, and unlike the temporary one, it is cached in the browser memory. It implies that the page has been moved and requests all search engines and user agent coming to the page to update the URL in their database. This is the most common type of redirect.
  • Temporary redirect means that the page is sending status code 302 to the browser. Code 302 tells the browser not to cache this redirect into its saved data. It will redirect the visitor or search engine, but the search engine will continue to index to the original page. This is the recommended type of redirect, unless you are absolutely sure that you will never change it in the future.

The list of the most common and useful redirects, which can be set through the .htaccess file, can be found below (the domains specified in the examples should be replaced with your own ones):

Permanent redirect from example.com to domain.com

RewriteEngine On
RewriteCond %{HTTP_HOST} ^example\.com$ [OR]
RewriteCond %{HTTP_HOST} ^www\.example\.com$
RewriteRule ^(.*)$ "http\:\/\/domain\.com/\" [R=301,L]

Temporary redirect from example.com to domain.com

RewriteEngine On
RewriteCond %{HTTP_HOST} ^example\.com$ [OR]
RewriteCond %{HTTP_HOST} ^www\.example\.com$
RewriteRule ^(.*)$ "http\:\/\/domain\.com\/" [R=302,L]

NOTE: Below are the examples of permanent redirects. Temporary one can be defined by replacing [R=301,L] with [R=302,L] in the end of the code (where necessary).

Redirect from example.com/subfolder to domain.com

RewriteEngine On
RewriteCond %{HTTP_HOST} ^example\.com$ [OR]
RewriteCond %{HTTP_HOST} ^www\.example\.com$
RewriteRule ^subfolder$ "http\:\/\/domain\.com\/" [R=301,L]


Redirect from HTTP to HTTPS for example.com
RewriteEngine On
RewriteCond %{HTTPS} !=on
RewriteRule .* https://example.com/%{REQUEST_URI} [R,L]

or

RewriteCond %{SERVER_PORT} 80      
RewriteCond %{HTTP_HOST} ^example\.com$ [OR]
RewriteCond %{HTTP_HOST} ^www\.example\.com$ 
RewriteRule ^(.*)$ https://www.example.com/\ [R,L]

Redirect from non-WWW to WWW

  • for any domain .htaccess takes effect on:
RewriteEngine On
RewriteCond %{HTTP_HOST} !^www\.
RewriteRule ^(.*)$ http://www.%{HTTP_HOST}/\ [R=301,L]


  • for a certain domain, example.com:
RewriteEngine On     
RewriteCond %{HTTP_HOST} ^example\.com$ [NC]
RewriteRule ^(.*)$ http://www.example.com/\ [R=301,L]


Redirect from WWW to non-WWW
 
  • for any domain .htaccess takes effect on:
RewriteEngine On
RewriteCond %{HTTP_HOST} ^www\.(.*)$ [NC]
RewriteRule ^(.*)$ http://%1/\ [R=301,L]


  • for a certain domain, example.com:
RewriteEngine On
RewriteCond %{HTTP_HOST} ^www\.example\.com [NC]
RewriteRule (.*) http://example.com/\ [R=301,L]
Redirect all example.com pages to the corresponding domain.com pages
 
RedirectMatch 301 ^/(.*)$ http://domain.com/\
NOTE: All the pages’ names have to match on both domains or the redirect will lead to a “Page not Found” message on the target website.
Redirect one page to a new URL

Redirect 301 /old_page.html http://www.domain.com/new_page.html

NOTE: This might be useful when you want to redirect a deleted page to a 404 error or for SEO purposes after the content references updates.

Changes the directory root for the main domain to public_html/subfolder

RewriteEngine on
RewriteCond %{HTTP_HOST} ^(www.)?example.com$
RewriteCond %{REQUEST_URI} !^/subfolder/
RewriteCond %{REQUEST_FILENAME} !-f
RewriteCond %{REQUEST_FILENAME} !-d
RewriteRule ^(.*)$ /subfolder/\
RewriteCond %{HTTP_HOST} ^(www.)?example.com$
RewriteRule ^(/)?$ subfolder/index.php [L]

NOTE: The .htaccess file should be located in the directory root of the domain you wish to configure certain rules for.

Disabling existing .htaccess rules

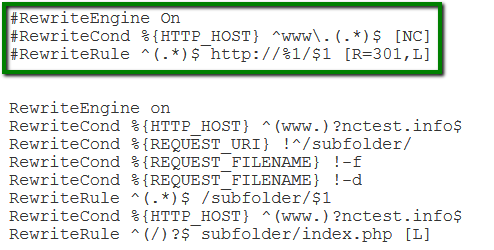
If you need to disable some of the existing rules, for example, for testing purposes, you can simply comment them out. In order to do so, add the pound sign # at the beginning of each line of the rule.
Also, it is possible to disable the line or even the block of lines by selecting ones and using the Ctrl + / shortcut.
That’s it!

ByJUJU-dev

WordPress hosting features

WordPress hosting typically includes a range of features that are specifically designed to make it easy to install, manage, and maintain a WordPress website. Here are some common features that you may find in WordPress hosting:

  1. Easy Installation: Many WordPress hosts offer a one-click installation process that makes it easy to set up a new WordPress site.
  2. Automatic Updates: Some hosts offer automatic updates for WordPress core, plugins, and themes, which helps to ensure your site stays secure and up-to-date.
  3. Caching: Caching can help improve the performance of your website by storing frequently-used data in memory.
  4. Content Delivery Network (CDN): A CDN is a network of servers that distribute your content across different locations, which can help reduce load times and improve user experience.
  5. SSL Certificates: Many hosts offer free SSL certificates, which are essential for securing your website and protecting user data.
  6. MySQL Databases: Most hosts provide access to MySQL databases, which are required for running WordPress.
  7. PHP Support: PHP is the programming language that powers WordPress, and most hosts provide support for the latest versions of PHP.
  8. Security Features: Many hosts offer security features such as IP blocking, malware scanning, and security updates to help protect your site from hacking and malware.
  9. Backups: Some hosts offer automatic backups of your site, which can be restored in case something goes wrong.
  10. Migration Tools: Many hosts provide tools that make it easy to migrate your site from another host or platform.
  11. Email Hosting: Some hosts offer email hosting services, allowing you to create custom email addresses for your domain.
  12. Domain Management: Many hosts allow you to manage your domain name through their control panel.
  13. Site Analytics: Some hosts provide site analytics tools, such as Google Analytics integration, to help you track your site’s traffic and performance.
  14. WP-CLI Support: WP-CLI is a command-line tool that allows you to manage your WordPress site using commands.
  15. White Labeling: Some hosts offer white labeling options, which allow you to customize the appearance of the hosting control panel to match your brand.

Some popular WordPress hosting options include:

  • Bluehost
  • SiteGround
  • WP Engine
  • HostGator
  • Liquid Web
  • Kinsta
  • WP Rocket
  • Pressable

When choosing a WordPress host, consider the following factors:

  • Pricing: Look for competitive pricing plans that fit your budget.
  • Performance: Ensure the host offers good performance and uptime guarantees.
  • Security: Check if the host offers robust security features and regular updates.
  • Support: Look for hosts with 24/7 support and multiple communication channels (e.g., phone, email, chat).
  • Scalability: Choose a host that can scale with your growing needs.
  • Ease of use: Opt for a host with a user-friendly control panel and easy-to-use interface.

Remember to read reviews and ask questions before committing to a hosting plan to ensure it meets your specific needs.

ByJUJU-dev

What are the features of the best hosting for WordPress?

What are the features of the best hosting for WordPress?

What are the features of the best hosting for WordPress?

What are the features of the best hosting for WordPress?

The best hosting for WordPress typically offers a combination of features that cater to the specific needs of WordPress websites. Here are some of the key features to look for:

  1. WordPress-Specific Optimization: Look for hosting providers that offer optimized servers and caching mechanisms specifically designed for WordPress, which can improve page load times and overall performance.
  2. Unlimited Resources: Ensure the hosting provider offers unlimited resources such as storage, bandwidth, and email accounts to accommodate your growing website.
  3. Automatic Updates: Automatic updates for WordPress core, themes, and plugins can help keep your website secure and up-to-date. Look for hosting providers that offer automatic updates.
  4. Security: A good hosting provider should offer robust security features such as malware scanning, firewall protection, and DDoS protection to safeguard your website from potential threats.
  5. Ease of Use: A user-friendly control panel like cPanel or Plesk can make it easy to manage your website, including installing themes, plugins, and configuring settings.
  6. Support: Reliable support is crucial when something goes wrong. Look for hosting providers with 24/7 support via multiple channels (phone, email, live chat).
  7. Scalability: Choose a hosting provider that offers scalability options, such as upgrading or downgrading plans as needed, to accommodate changes in your website’s traffic and demands.
  8. Integration with WordPress Tools: Some hosting providers offer integration with popular WordPress tools like Jetpack, Yoast SEO, or WP Rocket to streamline your workflow.
  9. Daily Backups: Regular backups are essential in case something goes wrong. Look for hosting providers that offer daily backups or allow you to set up your own backups.
  10. Free SSL Certificates: Free SSL certificates like Let’s Encrypt can help improve website security and search engine rankings. Look for hosting providers that offer free SSL certificates.
  11. PHP Version Support: Ensure the hosting provider supports the latest PHP versions (e.g., PHP 7.x) and allows you to choose the version you prefer.
  12. MySQL Version Support: Choose a hosting provider that supports the latest MySQL versions (e.g., MySQL 8.x) for better performance and compatibility.
  13. Content Delivery Network (CDN): A CDN can help improve website performance by caching content across different geographic locations. Look for hosting providers that offer built-in CDN support.
  14. Staging Environments: A staging environment allows you to test changes to your website before deploying them to production. Look for hosting providers that offer staging environments or allow you to set up your own.

Some popular WordPress hosting options that offer these features include:

  • Bluehost
  • Jujuhost
  • SiteGround
  • Kinsta
  • WP Engine
  • HostGator
  • Liquid Web
  • WPX Hosting

When choosing a WordPress hosting provider, consider your specific needs and priorities to ensure you get the best fit for your website’s growth and requirements.